We’ve all been there.
You’re standing over the grill, beverage in hand, feeling like the king of the patio. You’ve got a thick ribeye the size of a paperback novel sizzling away. Five minutes later, it looks like a meteor – charred, black, and formidable.
You cut into it, and it’s basically still mooing.
That, my friends, is the “Black and Blue” tragedy. It happens because we treat the grill like a campfire rather than a precision cooking tool.
Grilling isn’t just about making things hot. It’s about managing how that heat travels. If you want to stop serving “charcoal-flavored sushi” and start serving legendary BBQ, you have to master the fundamental divide: Direct vs Indirect Grilling.
Let’s break down the physics of the fire so you can cook with confidence.
The Science of the Sizzle: Radiation vs. Convection
Before we talk about burgers and briskets, we need to talk about how heat actually moves. Don’t worry, I’m a pitmaster, not a chemistry professor. I’ll keep the “nerd-speak” to a minimum.
Radiation: The Direct Hit
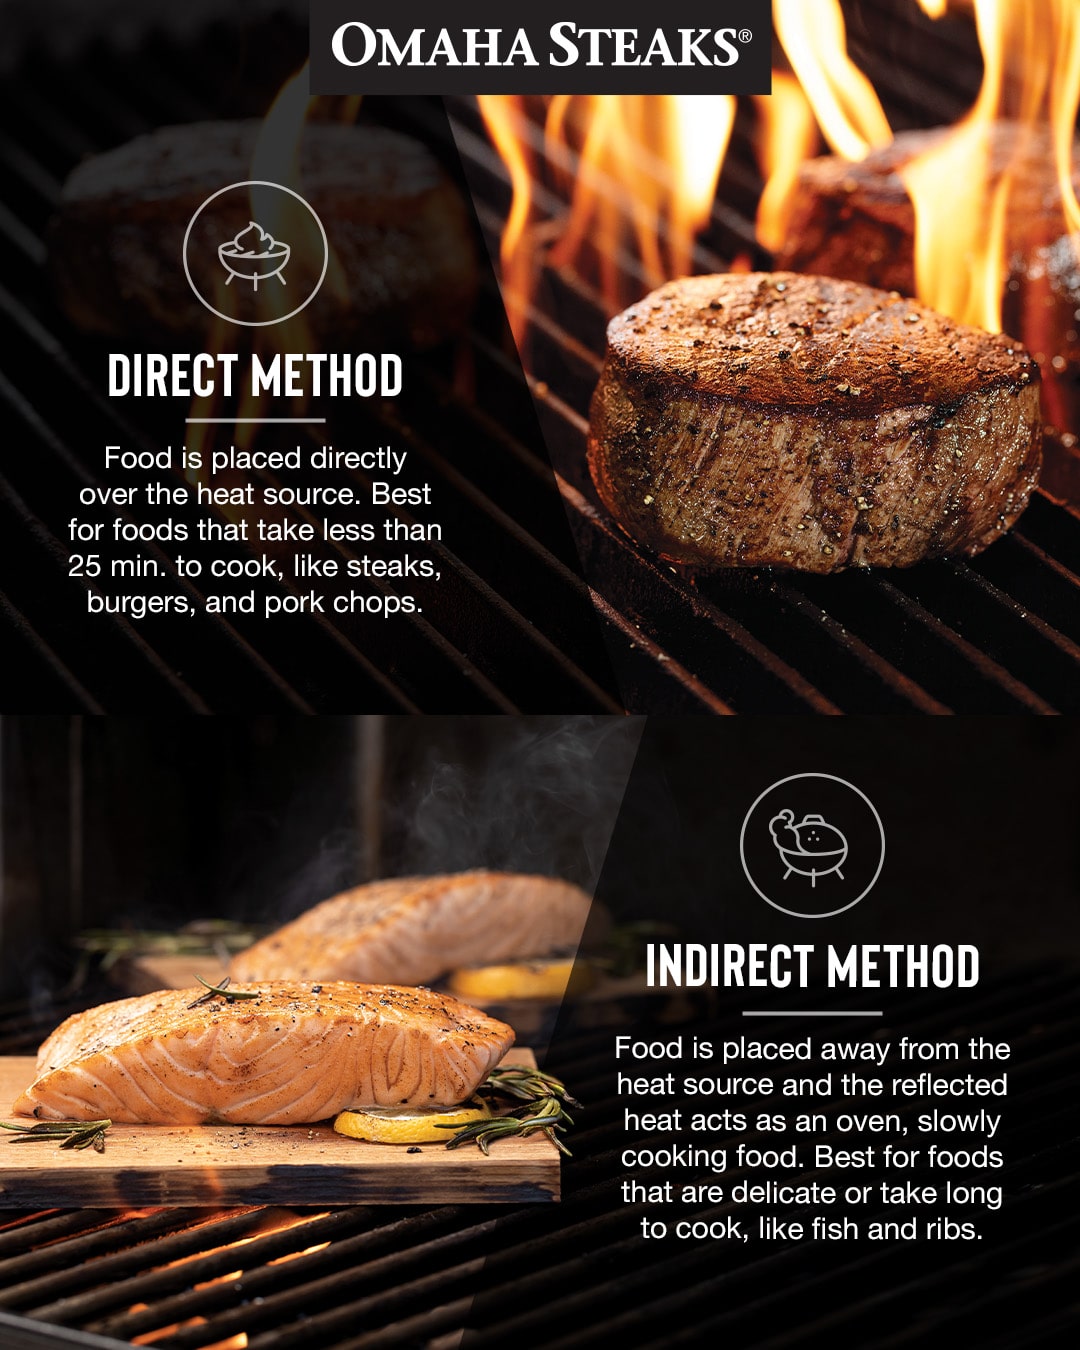
When you stand in the sun, you feel the heat on your skin instantly. That’s infrared radiation. In grilling, this is direct heat. The energy travels in a straight line from the glowing coals or gas flame directly into your food.
It is intense, aggressive, and fast. It’s great for creating a crust, but it’s terrible at penetrating deep into thick meat without burning the surface.
Convection: The Gentle Hug
Think of your indoor oven. The heating element gets hot, but your chicken isn’t sitting on the element. Instead, the air inside gets hot and circulates around the food.
That is convection. In the world of BBQ, this is indirect grilling. It’s a gentle, 360-degree heat that cooks things evenly from the outside in.
Pitmaster Rule of Thumb: If the lid is open, you’re mostly grilling with radiation. If the lid is closed, you’ve turned your grill into a convection oven.
 1")
Direct Grilling: The High-Octane Sear
Direct grilling is the “traditional” image of BBQ. You place the food directly over the fire. It’s high-heat, high-stakes, and high-reward.
When to Use Direct Heat
This method is for the “sprinters” of the culinary world. If a piece of food takes less than 20 minutes to cook, it belongs over direct heat. We are looking for temperatures between 230°C and 370°C.
- Steaks and Chops: Anything under 1.5 inches thick. You want that gorgeous brown crust (the Maillard Reaction) before the center overcooks.
- Burgers: You want a sear that holds the juices in.
- Shrimp and Scallops: These cook so fast they barely have time to realize they’re on a grill.
- Asparagus and Corn: You want those little charred spots for flavor while keeping the crunch.
Why It Works: The Maillard Reaction
This is the scientific term for “making things taste awesome.” When meat hits high heat, the amino acids and sugars react to create that savory, browned exterior.
Without direct heat, a steak is just a boiled piece of protein. Direct heat is the architect of flavor.
The Pitmaster’s Warning
Direct grilling requires your full attention. This is not the time to go inside and check the score of the game. A flare-up can turn a $40 filet mignon into a hockey puck in sixty seconds.
Indirect Grilling: The “Low and Slow” Secret
Indirect grilling is where the magic happens for the heavy hitters. You light the burners on one side of the grill and put the food on the other. No flames are touching the meat.
When to Use Indirect Heat
This is for the “marathon runners.” If it takes more than 20 minutes, or if it’s as thick as a brick, it needs indirect heat. We usually aim for 110°C to 180°C.
- Whole Chickens: Direct heat would burn the skin to a crisp while the joints stay raw. Indirect heat roasts it to golden perfection.
- Pork Shoulder and Brisket: These have tough connective tissues that need hours to melt into delicious gelatin.
- Ribs: You want them tender, not charred.
- Whole Fish: Direct heat often makes fish stick and tear. Indirect heat firms it up gently.
The Benefits of the “Oven Effect”
By using indirect heat, you eliminate the risk of flare-ups. Since the fat isn’t dripping directly onto the flames, you don’t get those “sooty” tasting fires. It also gives you a much larger window of success.
If you leave a brisket on for 10 minutes too long, it’s still fine. If you leave a shrimp on for 10 minutes too long, you’re eating rubber.
 2")
The Hybrid Mastery: The Two-Zone Setup
If you take one thing away from this guide, let it be the Two-Zone Setup. This is the hallmark of a professional. You divide your grill into a “Hot Zone” and a “Cool Zone.”
Why You Need Both
Imagine you’re grilling thick, 2-inch ribeyes.
- Start them on the Cool Zone (Indirect). Let them gently warm up until the internal temp is about 10 degrees away from your target.
- Move them to the Hot Zone (Direct) for a final 60-second sear on each side.
This is called the Reverse Sear, and it is the secret to a steak that is wall-to-wall pink with a crunch like a diamond on the outside.
The “Safe Zone”
The two-zone setup is also your insurance policy. If your burgers start dripping fat and the grill turns into a literal inferno, don’t panic.
Just slide the meat over to the “Cool Zone.” It stops the burning immediately but keeps the food warm while the flames die down. It’s the ejector seat for your dinner.
Setting Up Your Rig
How you achieve direct vs. indirect grilling depends on what’s sitting on your patio.
On a Charcoal Grill
- Direct: Spread the glowing coals evenly across the bottom grate.
- Indirect: Bank all your coals to one side. The side with the coals is your searing station; the empty side is your roasting station.
- The Ring Method: Place coals in a circle around the edge and put your food in the middle. This is perfect for a whole chicken.
On a Gas Grill
- Direct: Turn all burners to medium-high.
- Indirect: Turn on the far left and far right burners, but leave the middle ones off. Place your food in the center.
- Small Gas Grills: If you only have two burners, turn one on and leave one off. Simple.
On a Pellet Grill
Pellet grills are essentially outdoor convection ovens. They are Indirect Kings. To get direct heat on most pellet grills, you usually have to open a special “sear plate” or crank the temp to the absolute max.
 3")
Practical Examples: A Day in the Life of a Grill
Let’s look at how this plays out in real-time.
The Weeknight Burger: You’re tired. You want food fast. You go Direct Heat. High flames, 4 minutes per side, toasted buns. Done.
The Sunday Roast: You’ve got a whole prime rib. You go Indirect Heat. You put a drip pan under the meat to catch the fat for gravy, close the lid, and let it coast for two hours.
The “Show-Off” Chicken Wings: You start them Indirect to render the fat and get them cooked through without burning the sauce. Then, in the last 5 minutes, you move them to Direct heat to crisp the skin and caramelize the glaze.
That’s how you get wings that people talk about at funerals.
The “Cold Grate” Technique for the Ultimate Crust
Most people think the grate needs to be screaming hot before the meat touches it. However, the Cold Grate Technique is a direct grilling game-changer that defies traditional backyard logic.
By starting with a room-temperature grate and placing it over high heat only when the meat is ready, you achieve a professional finish:
- Uniform Sear: Prevents deep “branding” marks, allowing for a consistent, edge-to-edge mahogany crust.
- No Sticking: Cold protein doesn’t bond to cold metal, meaning your meat releases cleanly when it’s time to flip.
- Sophisticated Texture: Avoids the “grey band” of overcooked meat often found directly under heavy sear marks.
It sounds counterintuitive, but letting the metal and the meat heat up together is the secret to that steakhouse-style heavy sear that’ll make your guests think you’ve got a secret culinary degree.
Thermal Bridging and the “Carryover” Factor
Mastering heat isn’t just about what happens on the grill; it’s about what happens on the cutting board. Carryover cooking is the phenomenon where the internal temperature of your meat continues to rise after it leaves the heat.
When using indirect grilling for large roasts, the exterior is so saturated with energy that the heat has nowhere to go but inward:
- The Migration: Heat moves from the hot exterior to the cooler center even after the meat is pulled.
- The 5-Degree Rule: A large roast can jump by as much as $5°C$ ($10°F$) while resting.
- Pull Temp vs. Final Temp: Always pull your meat just before it hits your goal to account for this “thermal bridge.”
Understanding this is the difference between a perfect medium-rare and a disappointing medium. Give your meat at least 15 minutes to rest so the fibers can relax and reabsorb those precious juices.
Managing the Oxygen: The Vent Mastery
We’ve talked about fuel, but we haven’t talked about the grill’s “lungs.” Airflow management is how a pitmaster dictates the intensity of both direct and indirect heat without moving a single coal:
- Intake (Bottom Vents): These are your “gas pedal.” Open them up to invite more oxygen for a hotter fire; close them to cool things down.
- Exhaust (Top Vents): These act as the “chimney.” They control how long smoke stays in the chamber and where the heat flows.
- The Vortex Effect: For indirect cooking, position the top vent directly over the food to force heat and smoke to “wash” over the meat before escaping.
Think of your vents as the volume knob on your grill. If the exhaust is over the coals, the heat just goes straight out the chimney – master the airflow, and you master the cook.
The Science of Drip Pans and Humidity
When you’re set up for indirect grilling, your best friend is a simple aluminum foil pan. Placing a drip pan filled with liquid (water, apple juice, or even beer) directly under the meat is a low-tech solution that yields high-tech results:
- Heat Sink: The liquid helps stabilize the internal temperature of the grill, absorbing excess energy and preventing nasty spikes.
- Moisture Barrier: Ambient humidity slows down surface evaporation, keeping your bark from becoming “jerky-like.”
- Smoke Magnet: Smoke particles stick better to moist surfaces, helping you achieve that coveted, deep-red smoke ring.
This simple setup ensures your low-and-slow pork shoulder stays succulent even after an eight-hour marathon in the heat.
 4")
The “Clinching” Method: Charring in the Coals
For the truly adventurous, there is a specialized form of direct grilling known as clinching (or “dirty grilling”). This involves placing the meat – usually a thin cut like skirt steak – directly onto the glowing white coals:
- Infrared Intensity: By bypassing the grate, you get the most intense heat possible for a primal, smoky char.
- The Steam Shield: Thanks to the Leidenfrost effect, the moisture in the meat creates a steam barrier that prevents ash from sticking.
- Flavor Explosion: This method creates a bold, charred profile that a standard grate simply can’t replicate.
It’s a high-drama technique that requires natural lump charcoal (no chemical briquettes allowed!), but it’s the ultimate way to prove your status as a true fire-whisperer at your next neighborhood cookout.
7. Common Mistakes (And How to Avoid Them)
Peeking Too Much
When you’re grilling indirectly, “if you’re lookin’, you ain’t cookin’.” Every time you lift the lid, you dump all that beautiful hot air. It can add 15 minutes to your cook time every time you “just want to check.”
Using the Wrong Thermometer
Stop poking your meat with your finger to see if it’s done. Unless you’re a 30-year veteran, you’re guessing. Use a digital instant-read thermometer.
- Direct heat food is judged by the sear.
- Indirect heat food is judged by the internal number.
·
Ignoring the Ambient Temp
On a cold, windy day, your indirect zone will struggle to stay hot. You might need to turn your burners up higher than usual. Conversely, on a hot summer day, your grill can become a furnace faster than you expect.
8. Summary: The Pitmaster’s Cheat Sheet
| Feature | Direct Grilling | Indirect Grilling |
| Placement | Directly over the heat | To the side of the heat |
| Lid Position | Usually open (or cracked) | Closed |
| Temperature | High (230°C+) | Low to Medium ($110°C – 180°C) |
| Goal | Searing, browning, speed | Evening cooking, tenderness |
| Best for… | Thin, small, fast foods | Thick, large, tough foods |
 5")
Final Thoughts
Mastering direct vs indirect grilling is the moment you stop being a “guy with a grill” and start being a cook. It’s the difference between food that is merely edible and food that makes your neighbors peek over the fence with envy.
Remember:
- Direct for the crunch.
- Indirect for the soul.
- Two-zone for the win.
Commanding the temperature instead of letting the fire dictate the terms allows you to achieve a flawless sear while keeping the interior tender.
This mastery of heat distribution ensures that every cut of meat reaches its full potential rather than just surviving the flames.
Featured image credit: @omahasteaks