Most people don’t struggle with asparagus because it’s difficult. They struggle because they treat it like an afterthought on the grill – like it’s just waiting around to get lucky.
And that’s how you end up with sad, limp spears that taste like warm lawn clippings.
I’ve seen it plenty of times on the pit: someone tosses grilled asparagus on low heat, flips it like they’re nervous, and pulls it off before anything meaningful happens. No sear. No character.
Just disappointment with grill marks.
That’s where the veggie sear method changes the game.
It’s fast. It’s hot. And it treats asparagus like it actually deserves respect. The result? Crisp edges, smoky flavor, and that sweet spot between tender and snappy.

Why Asparagus Loves the Grill (When You Do It Right)
Here’s the truth: asparagus is one of the best vegetables you can throw on a grill.
Not because it’s fancy – but because it’s honest.
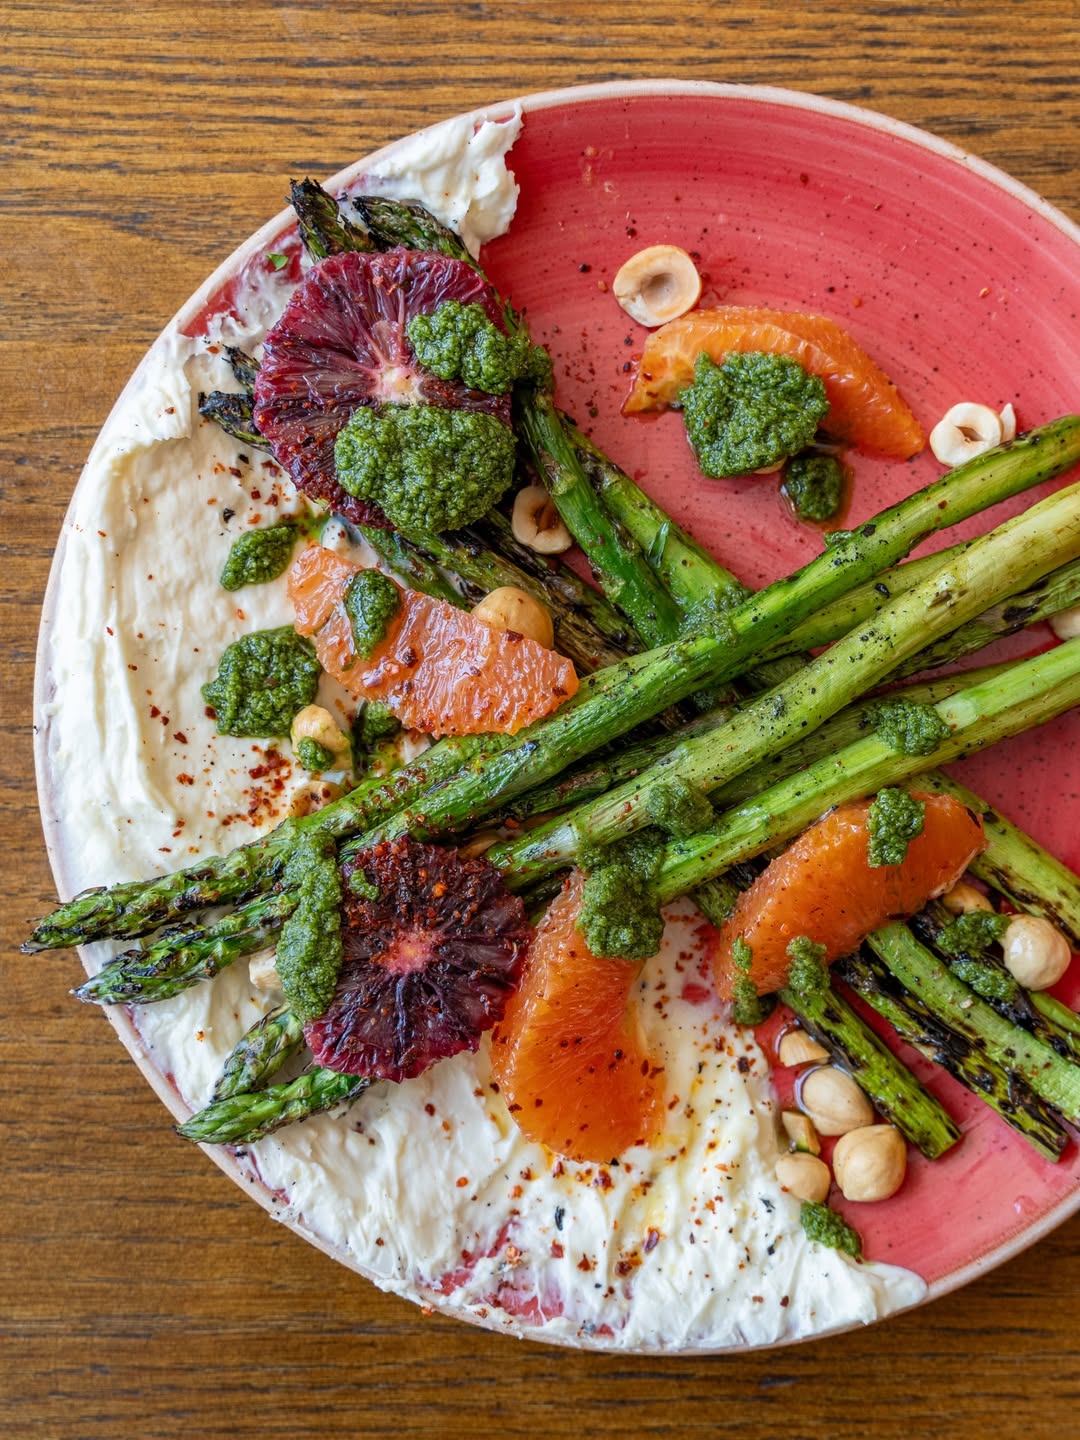
When exposed to high heat, its natural sugars start to caramelize. That’s when grilled asparagus goes from “healthy side dish” to “wait, why is this better than my steak?”
A few reasons it works so well:
- It’s naturally sturdy (no falling apart like zucchini)
- It cooks fast (you’re not babysitting it for 30 minutes)
- It absorbs smoke like a sponge wearing cologne
In peak season – spring into early summer – you don’t even need to try hard. The asparagus is already doing half the work. Your job is simply not to ruin it.
What Is the Veggie Sear Method?
Let me break it down like I would to a rookie standing next to the smoker:
The veggie sear method is high-heat, direct-contact grilling that locks in flavor quickly while building char in all the right places.
Think of it like this:
You’re not “cooking” asparagus. You’re searing its personality into it.
Low heat makes vegetables lazy. High heat makes them interesting.
The goal isn’t softness. It’s balance:
- Crispy edges
- Tender center
- Smoky finish that actually tastes like the grill
No steaming. No slow roasting. Just confidence, heat, and timing.
Choosing the Right Asparagus Thickness (It Changes Everything)
Not all asparagus spears behave the same on the grill, and this is where most people unknowingly set themselves up for disappointment. Thin spears cook fast but can easily over-char before they develop a proper veggie sear crust.
Thick spears, on the other hand, hold structure and give you that ideal contrast: a crisp exterior with a juicy, almost buttery interior.
As a pitmaster, I’ll tell you straight – if you’re cooking grilled asparagus over high heat, medium to thick spears are your safest bet. They can take the flame without collapsing into mush.
There’s also a texture payoff here.
Thicker spears give you more “bite resistance,” which means the sear actually registers when you chew. Thin ones tend to disappear into softness too quickly.
So instead of grabbing whatever’s on the shelf, choose intentionally. Think of thickness as part of your seasoning strategy – it affects everything downstream.
The Importance of Cutting Technique (It’s Not Just Prep Work)
Most people trim asparagus like it’s a chore. Snap the ends, toss it on the grill, done. But if you’re serious about perfect grilled asparagus, cutting technique actually changes how it cooks.
There are two schools of thought: the “snap method” and the “knife method.” Snapping removes the woody end naturally, but it’s inconsistent. Knife-trimming gives you control, especially when you want uniform cooking for a proper veggie sear.
Here’s the pro move: cut all spears to similar length so they hit the grill at the same time and finish together. Uneven sizing leads to uneven char, and nothing kills good grilled asparagus faster than half-perfect, half-burnt results.
Also, don’t ignore angle cuts. A slight bias cut increases surface area, which means more contact with heat – and more of that smoky, caramelized flavor we’re chasing. Small detail, big payoff.

Managing Grill Zones for Better Control (Hot, Warm, and “Don’t Burn It”)
If you’re throwing everything onto the hottest part of the grill and hoping for the best, you’re gambling – not cooking.
A smarter approach to grilled asparagus is using grill zones like a control system. You’ve got three:
- Hot zone: direct flame for the initial veggie sear
- Medium zone: for finishing without burning
- Cool zone: safety net for timing adjustments
Start asparagus on high heat to build that instant char. That’s where flavor lives. Then move it to a slightly cooler zone to finish cooking gently without overcooking the exterior.
This technique matters because asparagus can go from perfect to overdone in under a minute. Zone control gives you breathing room.
Think of it like driving a car – you don’t floor it the entire time unless you enjoy burning rubber and losing control. Same logic applies to fire and vegetables.
Resting Grilled Asparagus (Yes, It Actually Matters)
Most people don’t think vegetables need to rest – but they absolutely do, especially after a proper veggie sear.
When grilled asparagus comes off the heat, the internal steam is still active. If you serve it immediately, you lose a bit of texture and flavor intensity. A short rest – just 2 to 3 minutes – lets the moisture redistribute so every bite stays crisp-tender instead of soggy-hot.
This is the same principle used with steaks, just applied to vegetables. Resting stabilizes the texture and helps the smoky oils settle into the surface instead of running off the plate.
Here’s a small pitmaster trick: after grilling, place asparagus on a wire rack instead of a plate. Plates trap steam. Wire racks let excess heat escape, preserving that clean snap you worked for.
It’s a tiny step most people skip – but it’s also the difference between “good” and “why does this taste restaurant-level good?”
Pitmaster Secrets for the Perfect Veggie Sear
After years around fire and smoke, here’s what actually matters:
- Dry vegetables sear better (moisture kills char)
- High heat is not optional
- Don’t overcrowd the grill (give them space to breathe)
- Oil lightly, not heavily
- Watch the food, not the clock
The biggest mistake I see? People treating asparagus like it needs “help.” It doesn’t. It just needs heat and timing.
Flavor Upgrades That Don’t Overcomplicate Things
Once you’ve nailed basic grilled asparagus, you can start playing.
Try these finishing moves:
- Lemon zest + olive oil → bright and fresh
- Garlic butter drizzle → classic steakhouse energy
- Parmesan → salty umami punch
- Chili flakes → subtle heat kick
- Balsamic glaze → sweet, tangy depth
Think of asparagus like a blank canvas that actually tastes good already – you’re just adding brushstrokes, not repainting the whole thing.
How to Serve It Like a Pro
Here’s where grilled asparagus quietly becomes the most useful thing on your plate.
- Next to steak or grilled chicken? Perfect.
- Tossed into a salad? Even better.
- With eggs for brunch? Underrated.
- On a grain bowl? Suddenly you’re eating like you pay attention to health.
Honestly, I’ve seen people steal asparagus off the grill before the main protein even comes off.
That’s how you know you did it right.

Final Word: Respect the Veggie Sear
Here’s the truth most people miss:
Great grilled asparagus isn’t about ingredients. It’s about attitude.
The veggie sear method is simple – but it demands attention. High heat, fast cooking, and zero fear of a little char.
Once you get it right, you’ll stop thinking of asparagus as a side dish.
You’ll start thinking of it as something people fight over at the table.
And if that happens… you’re doing it right.

Perfect Grilled Asparagus Recipe
Image credit: @thepioneerwomanmag
Ingredients
- Keep it clean. This isn’t a spice cabinet contest.
- You only need:
- Fresh asparagus (medium or thick spears work best for grilled asparagus)
- Olive oil (or avocado oil if you’re going hotter)
- Kosher salt
- Fresh black pepper
- Optional – but highly recommended if you like personality:
- Garlic powder
- Lemon zest
- Chili flakes
- Parmesan shavings
- The key here isn’t quantity. It’s restraint. Let the asparagus speak for itself.
Instructions
This is where most people either get it right – or accidentally steam their vegetables into sadness.
Step 1: Prep Like You Mean It
Wash your asparagus, then dry it completely. And I mean completely. Water is the enemy of a good sear.
Trim the woody ends. If it bends like a rubber band, it doesn’t belong on your grill.
Step 2: Light, Even Seasoning
Coat the spears with a thin layer of oil. Not a bath. Not a drizzle contest. Just enough to glisten. Add salt and pepper right before grilling so it sticks and doesn’t dissolve into nothing.
Step 3: Fire Up the Grill
You want high heat – direct flame territory.
If your grill isn’t hot enough to make you step back a little, it’s not ready for grilled asparagus.
Clean grates are non-negotiable. Nobody wants yesterday’s burger flavor on their vegetables.
Step 4: The Actual Sear
Lay the asparagus perpendicular to the grates so they don’t fall through like rookies.
Now here’s the important part: Don’t touch them too early.
Let them sit and sear. That contact time is where flavor builds. Flip once or twice max. You’re not babysitting – you’re managing a controlled burn.
Step 5: Know When to Pull
You’re looking for:
- Bright green color
- Visible char marks
- Tender but still firm bite
Usually 5–8 minutes depending on thickness. If it bends like wet spaghetti, you went too far.
Congrats – you made vegetable sadness.
Featured image credit: @convivosb