Beer can chicken has earned its place as one of the most eye-catching recipes in backyard barbecue.
The sight of a whole chicken standing upright on a grill always sparks questions from guests. Some people think it’s a gimmick. Others think it’s barbecue wizardry.
After years behind the smoker and grill, I can tell you the truth lies somewhere in between.
What makes this version special isn’t just the classic beer can chicken technique. It’s the combination of a fragrant garlic herb rub and a flavorful hard cider infusion that takes the recipe to another level.
The result is juicy meat, crispy skin, and a subtle sweetness that perfectly complements smoky grilled flavors.
If you’re looking for a recipe that feels impressive without being complicated, this is the one to try.

Why Hard Cider Is the Secret Ingredient
Traditional beer can chicken has been around for decades, but hard cider deserves more attention in the grilling world.
The reason is simple: hard cider adds moisture and flavor without overwhelming the chicken. While some beers can introduce bitter notes, cider brings a light fruitiness that works beautifully with poultry.
As the cider heats inside the can, it releases aromatic steam that circulates through the cavity of the chicken. Meanwhile, the garlic and herbs on the outside create layers of flavor while helping develop that beautiful golden-brown skin every pitmaster loves to see.
Think of it as giving your chicken a spa treatment while it’s sitting over live fire.
I’ve tested dozens of variations over the years. Some involved fancy craft beers, expensive spice blends, and ingredients that sounded like they belonged in a chemistry lab.
Yet this simple hard cider method consistently delivers some of the juiciest chicken you’ll ever pull off a grill.
The Science Behind Why Beer Can Chicken Stays So Juicy
One of the biggest debates in barbecue circles is whether beer can chicken actually produces juicier meat. While grill masters have their opinions, the answer comes down to a combination of cooking mechanics rather than a single magic trick.
Several factors work together to help retain moisture:
- The upright cooking position allows heat to circulate evenly around the entire bird.
- Fewer hot spots mean less chance of drying out certain areas.
- The cavity traps heat and moisture, helping create a more consistent cooking environment.
- Hard cider releases aromatic steam, adding subtle flavor throughout the cook.
That said, the biggest factor isn’t the can itself – it’s proper temperature control. A chicken cooked to the right internal temperature will almost always be juicier than one that’s overcooked.
The real magic lies in understanding the science of moisture retention, allowing you to produce tender, flavorful chicken every time.
Choosing the Best Hard Cider for Maximum Flavor
Not all hard ciders bring the same flavors to the grill. Choosing the right one can have a surprisingly large impact on the final taste of your beer can chicken.
Here’s a quick guide:
- Dry hard ciders add subtle fruit notes without overwhelming the chicken.
- Semi-sweet ciders create a balanced flavor profile that pairs well with herbs.
- Sweet ciders can contribute mild caramelized notes, especially when combined with garlic-forward rubs.
- Flavored ciders featuring apple, pear, or berry notes can add an interesting twist for adventurous cooks.
The goal is simple: choose a cider that complements the chicken rather than competes with it. Think of the cider as a supporting actor in a great movie. It shouldn’t steal the spotlight, but it should make the star look even better.
When paired correctly, the right cider can turn an ordinary grilled chicken into a flavor-packed barbecue showstopper.

How to Get Competition-Worthy Crispy Skin
Ask ten pitmasters what separates average beer can chicken from championship-level barbecue, and most will point to one thing: the skin. That beautiful golden, crackling exterior doesn’t happen by accident.
For the best results:
- Pat the chicken completely dry before applying any seasoning.
- Avoid basting during cooking, as extra moisture can soften the skin.
- Maintain consistent grill temperatures from start to finish.
- Cook using indirect heat to prevent scorching.
- Refrigerate the seasoned chicken uncovered for several hours before grilling if time allows.
Moisture is the enemy of crispy skin. Every step that removes excess surface moisture helps create that satisfying crunch. The payoff comes with the first bite, when crispy skin gives way to juicy, flavorful meat underneath.
It’s a texture contrast that barbecue enthusiasts spend years trying to perfect.
The Biggest Beer Can Chicken Mistakes to Avoid
Even experienced grillers can make mistakes that prevent their beer can chicken from reaching its full potential.
Some of the most common errors include:
- Cooking over direct heat, which can burn the skin before the interior is fully cooked.
- Ignoring a meat thermometer and relying solely on cooking times.
- Over-seasoning the bird, masking the natural flavor of the chicken.
- Using excessive sugar in the rub, which may burn during longer cooks.
- Skipping the resting period after cooking.
One rule every pitmaster eventually learns is that chicken cooks to temperature, not to the clock. A reliable thermometer will always be more accurate than guessing.
Likewise, resting the chicken for 10 to 15 minutes before carving allows juices to redistribute throughout the meat, resulting in slices that remain moist, flavorful, and tender.
Turning Leftover Beer Can Chicken Into Incredible Meals
One of the hidden benefits of making beer can chicken is that the leftovers are often just as delicious as the original meal.
The smoky, herb-infused meat is incredibly versatile and can be transformed into a variety of dishes, including:
- Chicken tacos topped with fresh slaw and avocado.
- Creamy pasta dishes for an easy weeknight dinner.
- Hearty soups and stews packed with barbecue flavor.
- Sandwiches and wraps for quick lunches.
- Rice bowls and grain bowls loaded with vegetables.
Many pitmasters intentionally cook an extra chicken because they know the leftovers won’t last long. In fact, some barbecue fans argue that a next-day chicken sandwich is one of the best rewards of hosting a cookout.
A single bird can easily provide multiple meals, stretching your barbecue efforts while keeping those delicious smoky backyard flavors alive long after the grill has cooled.
Tips for the Best Beer Can Chicken
Over the years, a few lessons have consistently produced better results. First, always start with a dry bird. Moisture on the skin is the enemy of crispiness.
Second, use indirect heat. Direct flames can burn the outside long before the inside finishes cooking.
Third, trust your thermometer. It’s the single most valuable tool in barbecue.
Finally, don’t rush the resting period. Patience pays off.
Great barbecue is often less about doing more and more about knowing when to leave things alone.
Flavor Variations
Once you’ve mastered this garlic herb version, there are plenty of ways to customize it. An apple cider and sage variation delivers a richer autumn-inspired flavor profile.
Adding honey and extra garlic creates a slightly sweet glaze that caramelizes beautifully on the skin. For those who enjoy a little heat, cayenne pepper and crushed red pepper flakes pair surprisingly well with the cider’s natural sweetness.
The basic technique remains the same. You’re simply changing the personality of the bird.

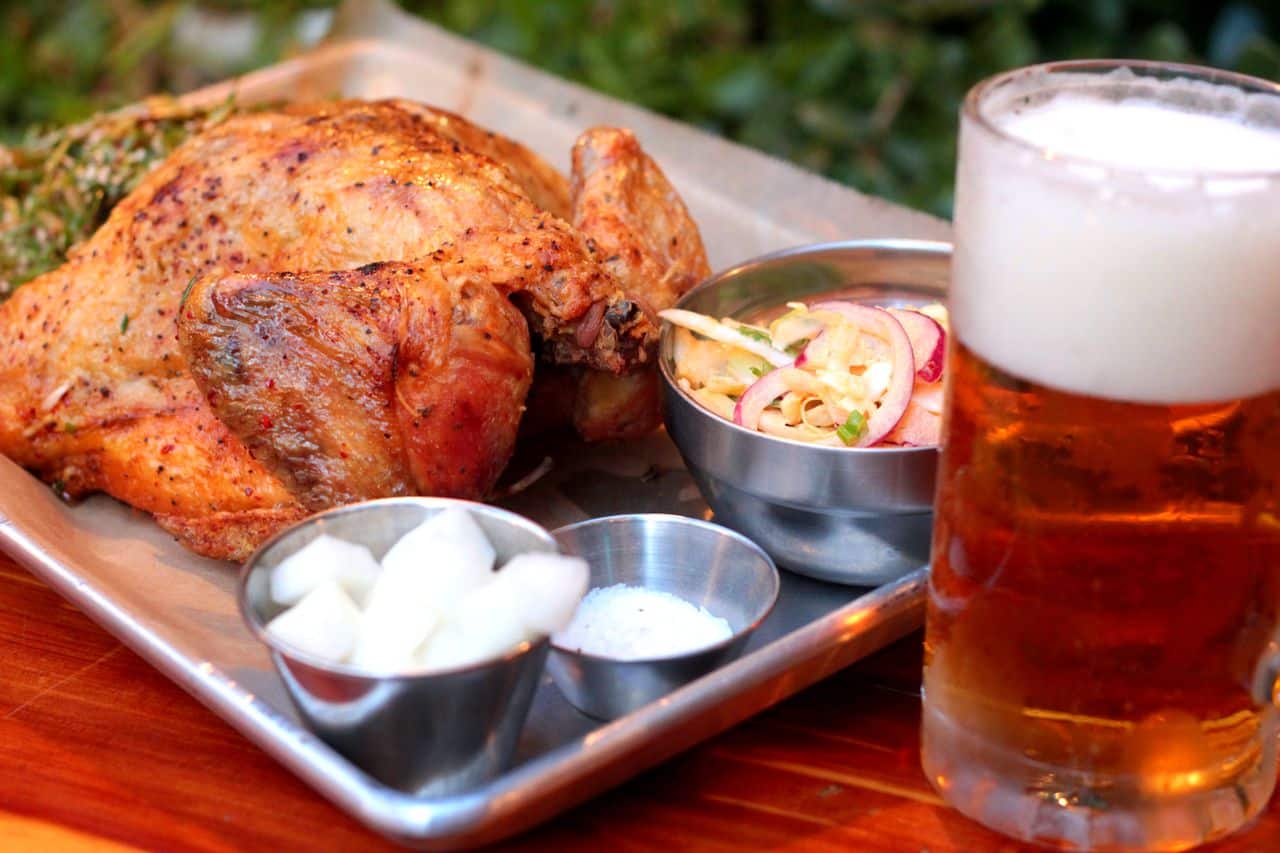
What to Serve With Beer Can Chicken
This recipe pairs beautifully with classic barbecue sides. Grilled vegetables add freshness and color. Roasted potatoes bring hearty comfort. Corn on the cob offers a touch of sweetness that complements the cider-infused chicken.
A crisp coleslaw also provides welcome contrast to the rich, smoky flavors. The goal is balance. Let the chicken remain the star of the plate.
Final Thoughts
If you’ve never made beer can chicken before, this garlic herb and hard cider infusion is the perfect place to start. It’s easy enough for beginners, yet flavorful enough to impress experienced grill enthusiasts.
The combination of aromatic herbs, savory garlic, and lightly sweet hard cider creates a chicken that’s juicy, tender, and loaded with character.
Add crispy skin and a touch of smoke from the grill, and you’ve got a recipe that earns a permanent spot in your barbecue rotation.
After all, the best recipes aren’t just about feeding people. They’re about creating moments around the grill, sharing a few laughs, and watching everyone reach for seconds before you’ve even sat down.
And trust me – when this chicken hits the table, leftovers won’t be your biggest concern.

Beer Can Chicken Garlic Herb & Hard Cider Infusion
Image credit: Mohammad Miladi
Ingredients
- For the chicken:
- 1 whole chicken (4 to 5 pounds)
- 1 can hard cider
- 2 tablespoons olive oil
- For the garlic herb rub:
- 4 cloves garlic, minced
- 1 tablespoon fresh rosemary, finely chopped
- 1 tablespoon fresh thyme leaves
- 1 tablespoon fresh parsley, chopped
- 1 teaspoon paprika
- 1 tablespoon kosher salt
- 1 teaspoon black pepper
- The beauty of this recipe is its simplicity. Every ingredient serves a purpose, and none of them try to steal the spotlight.
Instructions
Step 1: Prepare the Chicken
Remove the giblets from the cavity and pat the chicken completely dry with paper towels. This step is more important than many people realize.
Dry skin equals crispy skin.
If moisture remains on the surface, the chicken will steam rather than roast. Rub the entire bird with olive oil, making sure every surface is lightly coated.
Step 2: Make the Garlic Herb Rub
Combine the garlic, rosemary, thyme, parsley, paprika, salt, and pepper in a bowl. Work the mixture over the entire chicken, including under the skin whenever possible. This is where the flavor foundation begins.
The garlic provides savory depth, while the herbs create a fresh, aromatic profile that pairs beautifully with the sweetness of the cider.
Step 3: Prepare the Hard Cider Can
Open the can and pour out roughly half of the liquid. You can enjoy the remaining cider while you cook. Consider it quality control.
For an extra flavor boost, add a pinch of the herb mixture directly into the can. As the liquid heats, those flavors mingle together and release fragrant steam inside the bird.
Step 4: Position the Chicken
Place the can into the chicken holder or carefully insert it into the cavity of the bird. Position the chicken upright so it stands securely.
The upright position promotes even cooking and allows heat to circulate around the entire chicken.
Step 5: Grill the Chicken
Preheat your grill for indirect cooking at approximately 375°F. Place the chicken away from direct flames and close the lid.
Cook for about 1 hour and 15 minutes to 1 hour and 45 minutes, depending on the size of the bird.
The most important rule here is simple:
Cook to temperature, not time.
Insert a thermometer into the thickest part of the thigh without touching bone. The chicken is ready when it reaches 165°F.
During cooking, resist the urge to constantly lift the lid.
Every time you open the grill, heat escapes. Think of it like opening the oven every three minutes to ask your cake if it's done yet.
Step 6: Rest and Serve
Once fully cooked, carefully remove the chicken from the grill. Allow it to rest for 10 to 15 minutes before carving.
Resting gives the juices time to redistribute throughout the meat. Skip this step, and those flavorful juices will end up on your cutting board instead of your plate.
The reward is chicken that's incredibly moist and packed with flavor from the first bite to the last.
Featured image credit: calvin lee