Let’s address the elephant in the kitchen: we’ve all been hurt by a bad steak.
You spend prime paycheck money on a beautiful New York Strip Steak, slip into your favorite chef apron, fire up the stove, and somehow wind up plating a piece of seasoned leather. You chew. And chew.
Suddenly, dinner feels like a jaw workout, and you’re questioning your life choices.
It doesn’t have to be this way.
In my professional opinion—backed by thousands of steaks cooked— the New York Strip is one of the absolute greatest cuts of beef on Earth.
It boasts a deep, mineral, unapologetically beefy flavor that leaves ribeye in the dust. But it has a catch.
The strip loin is a muscle that actually does some work, meaning it has a tighter protein grain and less internal marbling than a ribeye. Cook it wrong, and it seizes up tighter than a tourist driving in Manhattan.
The good news?
Achieving steakhouse-level tenderness at home isn’t a genetic lottery, nor does it require a $500 sous vide machine or a culinary degree. It just requires a little bit of kitchen science and a lot of buttery respect.
Here is how to make your strip steak melt-in-your-mouth tender every single time.

The Science of Tenderness: Why Strips Get Tough
Before we throw meat into a hot pan, we need to understand what we’re fighting against. Think of a raw steak as a bundle of tightly wound rubber bands filled with water.
When you expose those rubber bands to high heat too quickly, they snap tight, squeezing all the water out. The result? A dry, gray, bouncy disc of sadness.
Because the New York Strip Steak is relatively lean compared to other premium cuts, it has less fat to lubricate those tightening muscle fibers.
If you take a freezing cold steak straight from the fridge and drop it into a scorching pan, the thermal shock causes instant rigor mortis.
To beat the system, we use a secret weapon: Dry Brining.
Dry brining is just a fancy culinary term for salting your meat early. When you apply coarse salt to a raw steak ahead of time, a magical three-step process happens. First, the salt draws out the steak’s surface moisture through osmosis.
Second, that moisture dissolves the salt into a highly concentrated brine. Third, the meat reabsorbs that salty liquid.
Once inside, the salt relaxes the tightly wound protein strands, permanently unlocking them so they can’t seize up during cooking. It’s essentially a spa day for your steak’s muscle fibers.
The Ultimate Tender NY Strip Steak Recipe
This is a single-pan masterclass designed for thick-cut steaks. If your grocery store is selling strips that are under an inch thick, keep walking. Thin steaks overcook in the center before the outside even realizes the pan is hot.
Demand a steak that is at least 1.5 to 2 inches thick.
The Anatomy Selection: Choice vs. Prime Grades
When standing at the butcher counter, the labels on the package matter just as much as your cooking technique. To guarantee a tender outcome, you must master the USDA Grading System:
- Skip USDA Select: Avoid this grade entirely – it is far too lean and virtually guarantees a chewy, tough dinner.
- Hunt for Choice or Prime: Look for USDA Choice or, if your budget allows, USDA Prime to ensure maximum tenderness.
- Look for Marbling: The secret is intramuscular marbling, those beautiful white flecks of fat woven directly through the red meat.
- The Self-Basting Effect: As the steak cooks, this specific fat melts from the inside out, naturally lubricating the muscle fibers and creating a velvety texture that high heat alone cannot replicate.

Enzyme Power: The Kiwi and Pineapple Hack
If you happen to end up with a budget-friendly, leaner cut of beef, you can skip the traditional aging room and use a biochemical shortcut instead. Certain fruits contain powerful natural enzymes that aggressively tenderize meat:
- The Enzyme Dynamic Duo: Kiwi contains actinidin, while pineapple contains bromelain; both actively break down tough collagen and connective tissues on contact.
- Practice Absolute Restraint: Grate a tiny amount of raw kiwi into a purée, slather it over your raw beef, and let it sit for no more than 15 minutes.
- Rinse It Off: Wash the fruit off completely before cooking. If you leave it on any longer, the enzymes will over-perform, instantly turning your steak surface into mush.
The Fat Cap Strategy: Rendering the Edge
Take a close look at your raw strip. You will notice a thick, prominent strip of white fat running along one entire side.
Most home cooks mistakenly leave this facing upward during the entire cooking process, resulting in a rubbery, unappetizing strip of gristle. To unlock maximum tenderness, you need to execute the Fat Cap Render:
- Stand It Upright: Before you even think about searing the flat sides of the meat, use your heavy kitchen tongs to stand the steaks vertically on their edge.
- Press Firmly: Press the fat side firmly against the hot cast-iron pan.
- Create Liquid Gold: Hold them there for two minutes until the fat transforms into a crispy, golden-brown ribbon, melting savory beef tallow directly into your pan to flavor the rest of the cook.
The Wet vs. Dry Aging Showdown
If you want to experience elite tenderness, you need to understand what happens to beef over time. The aging process completely changes the texture of your meat:
- Wet Aging (The Grocery Standard): Most grocery store steaks sit in vacuum-sealed plastic bags for a few weeks. This allows natural enzymes to soften the meat, but it traps excess water inside.
- Dry Aging (The Steakhouse Experience): For the ultimate meal, seek out dry-aged beef. These steaks hang in open, temperature-controlled lockers for 30 to 60 days.
- Evaporation & Tenderness: This controlled environment coaxes moisture to evaporate, which dramatically concentrates the deep beefy flavor while natural microbes quietly dismantle the tough protein structures, yielding a steak so tender you can practically cut it with a butter knife.
Acid Integration: The Board Dressing Technique
Most people assume that marinades must happen before the steak hits the heat, but the real magic happens right on the cutting board after cooking. Enter the Board Dressing:
- Prep the Board: While your seared meat is taking its mandatory ten-minute rest, pool a tablespoon of extra virgin olive oil, a splash of aged red wine vinegar, and some finely chopped flat-leaf parsley directly onto your cutting board.
- Slice on Top: Slice your hot steak right on top of this mixture.
- Drink Up the Flavor: The resting meat will greedily drink up the liquid. This splash of acid instantly cuts through the heavy fat, while simultaneously working to chemically soften the exterior crust, ensuring every slice delivers a perfectly balanced, juicy bite.

Golden Rules for Steak Success
To elevate your cooking from “good backyard chef” to “steak artisan,” keep these final structural rules in mind.
First, never trust your thumb to check for doneness. The old trick of poking your palm and poking the steak is a myth invented by people who like playing Russian roulette with dinner. Spend fifteen bucks on a digital meat thermometer.
It is the only way to guarantee consistency.
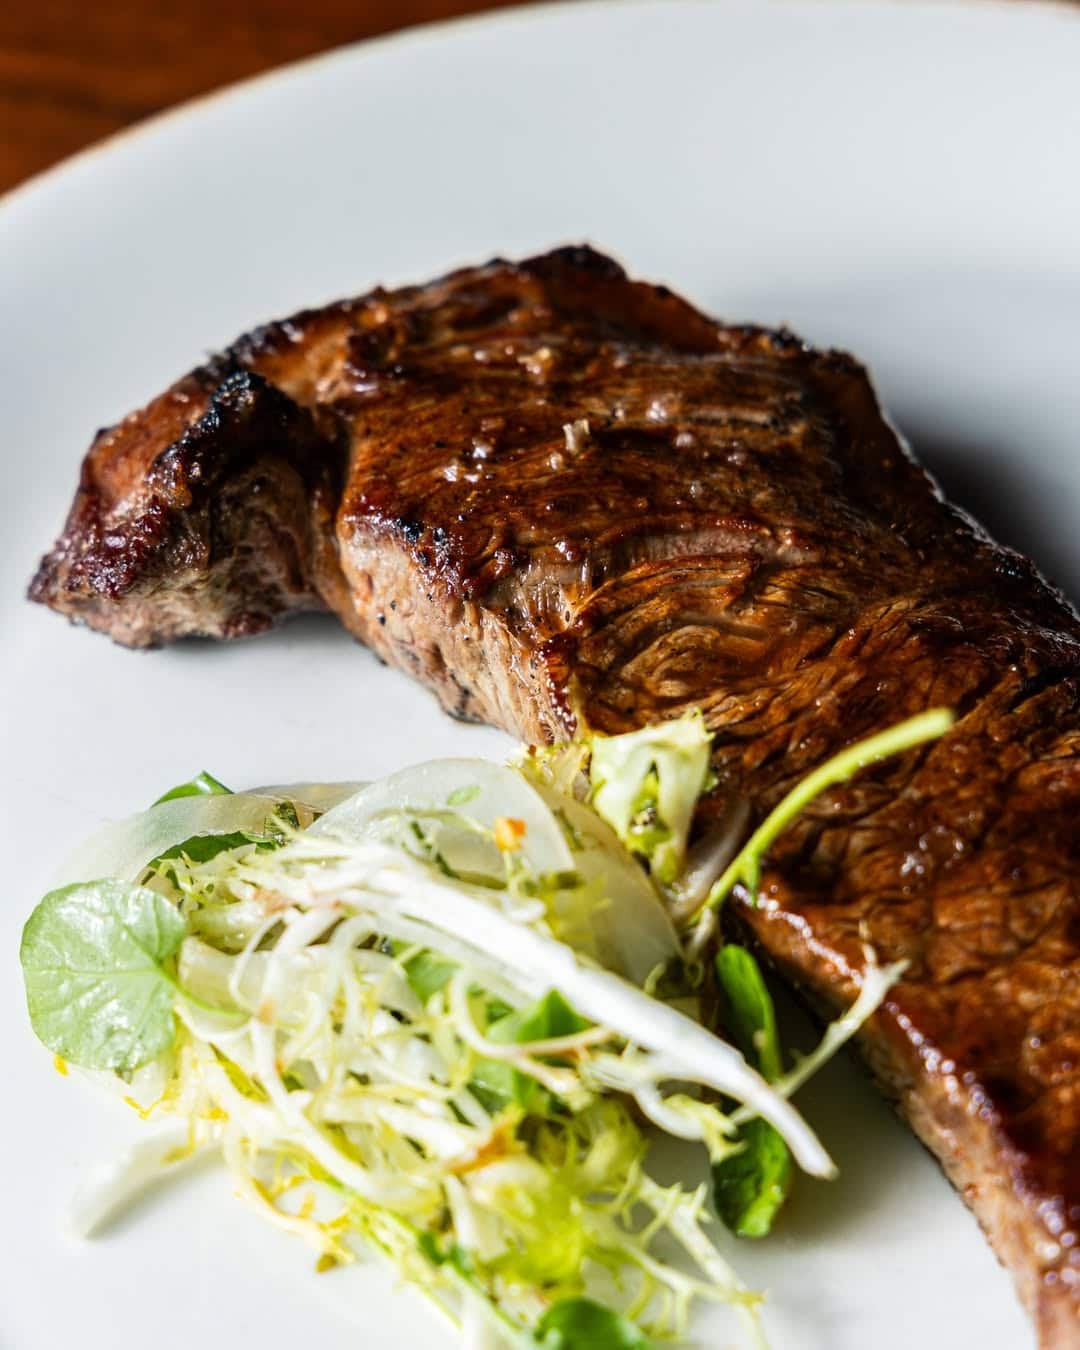
Second, always slice against the grain.
Take a close look at your cooked New York Strip Steak before you slice it. You will see lines running parallel across the meat – those are the muscle fibers. Position your knife perpendicular to those lines and slice.
By cutting across the grain, your knife does the heavy lifting of breaking up the long fiber strands, meaning your teeth don’t have to. Every single bite becomes effortlessly chewable.
Making a New York Strip Steak flawlessly tender isn’t about luck. It’s about managing moisture, mastering heat, and practicing a little bit of patience. Take your time, buy a thick cut, don’t skip the rest, and enjoy the best steak of your life.

Tender New York Strip Steak
Image credit: @skirtsteak.nyc
Ingredients
- 2 thick-cut New York Strip Steaks (1.5 to 2 inches thick)
- 1.5 teaspoons Coarse Kosher Salt (Do not use fine table salt unless you want a salt lick)
- 1 teaspoon Freshly Cracked Black Pepper
- 2 tablespoons Avocado Oil or Grapeseed Oil (High-smoke point oils only)
- 3 tablespoons Unsalted Butter
- 3 cloves Garlic, smashed open
- 2 sprigs Fresh Rosemary or Thyme
Instructions
1. The Dry Brine (The Magic Trick)
Pat your steaks completely dry with paper towels. Moisture is the sworn enemy of a good crust. Season the steaks generously with the coarse kosher salt on all sides – don't forget the edges.
Place the seasoned steaks on a wire rack set inside a baking sheet and slide them into the refrigerator. Leave them there for at least 45 minutes, but ideally overnight.
The refrigerator air will dry out the exterior skin like parchment paper, guaranteeing a legendary sear, while the salt works its tenderizing voodoo inside.
2. The Counter Chill-Out
Take your steaks out of the fridge exactly 30 minutes before you intend to cook them. If you skip this, the center of the steak will stay ice-cold while the outside burns.
We want the meat at a relaxed room temperature. Pat the surface dry one final time, and press the freshly cracked black pepper firmly into the meat.
3. The Hard Sear
Place a heavy cast-iron skillet over high heat. You want the pan screaming, smoking hot.
Add your avocado oil – it should shimmer and flow like water immediately. Carefully lay the steaks into the pan, laying them down away from you so hot oil doesn't splash your face.
Leave them alone for 2 minutes. Don't poke them, don't slide them, don't panic. Let that beautiful, mahogany crust develop. Flip the steaks and sear the other side for another 2 minutes.
4. The Butter Baste (The French Bath)
Turn the heat down to medium-low. Toss the unsalted butter, smashed garlic, and fresh herbs into the pan. The butter will melt and instantly start foaming. Tilt your skillet slightly so the melted butter pools at the bottom.
Grab a large spoon, scoop up that hot, garlic-and-herb-infused foam, and continuously pour it over the top of the steaks.
This technique, called arrosé, cooks the steak gently from the top down, sealing in moisture and creating an incredibly decadent texture. Baste for about 2 to 3 minutes.
5. The Rest (The Ultimate Test of Patience)
Pull the steaks out of the pan when a meat thermometer reads 130°F for a perfect medium-rare. Place them on a warm cutting board or plate. Now, walk away. Let the steaks rest for 8 to 10 minutes.
If you cut into that steak immediately, all the pressurized juices will flood out onto your board, leaving you with a dry piece of meat.
Resting allows the muscle fibers to cool down, relax, and reabsorb those delicious juices, trapping them inside the meat where they belong.
Featured image credit: @arnetteschopshop