Ever look at leftover prime rib and think, “I can’t just reheat this again”? Good – because you really shouldn’t do that anymore.
Because I’ll tell you what I tell my kitchen crew after a big service: good meat never gets wasted, it gets reinvented.
And this is where prime rib soup steps in like a quiet hero – rich, comforting, and honestly better than it has any right to be for something made from leftovers.
I’ve been in kitchens long enough to know this: the best soups aren’t planned. They’re rescues. And this one? It’s a rescue mission with flavor.
 1")
Why This Prime Rib Soup Works So Well
Let me break it down like I would on a busy prep table:
This prime rib soup recipe works because it’s built on what already made your roast special – beefy richness, rendered fat, and deep seasoning – then it stretches that flavor into something new.
You’re not “using leftovers.”
You’re upgrading them.
And the best part?
- It’s one pot
- It’s flexible
- It tastes like you spent hours, even if you didn’t
Honestly, it’s the culinary equivalent of turning yesterday’s tuxedo into a great leather jacket.
Choosing the Right Bread for Herbed Stuffing
Great stuffing doesn’t start with herbs – it starts with the right bread. Get this wrong, and no amount of seasoning will save it.
Soft sandwich bread? That’s how you end up with a pan of mush. What you want is bread with backbone – something that can absorb flavor without falling apart.
Here’s what works best:
- Sourdough for structure and slight tang
- French bread for a balanced, chewy bite
- Rustic country loaves for depth and texture
Day-old bread is ideal because it acts like a sponge while still holding its shape. Too fresh? No problem – just toast it lightly.
👉 Chef move: Mix two types of bread:
- One for softness
- One for structure
That simple upgrade gives your herbed stuffing recipe more texture, more character, and a lot more respect at the table.
Layering Flavor Like a Pro Chef
If your stuffing tastes flat, it’s not the herbs – it’s your process. Flavor comes from building in stages, not throwing everything in and hoping for the best.
Start with your aromatics and let them do their job. This is where the foundation is built.
A solid flavor-building sequence looks like this:
- Sauté onions, celery, and garlic until soft and fragrant
- Add butter or oil to develop richness
- Pour in broth gradually, not all at once
- Layer in herbs and seasoning as you go
Each step adds depth. Skip one, and you’ll taste the difference.
Think of it like a band:
- Aromatics = rhythm section
- Herbs = lead guitar
- Broth = the glue holding it all together
Key rule: Taste as you go. Adjust as needed.
That’s how a basic homemade herbed stuffing turns into something people remember.
Butter vs. Oil: What Really Makes It Better?
Let’s be honest – butter brings the flavor. But that doesn’t mean oil doesn’t belong in the pan.
Butter gives you:
- Richness
- Aromatic depth
- That classic comfort-food finish
But oil (especially olive oil) helps:
- Prevent burning during sautéing
- Lighten the overall texture
- Balance out heaviness
The real move? Use both.
- Start with oil to cook your aromatics
- Finish with butter to round out the flavor
And don’t go shy on fat – this isn’t a salad.
A great herbed stuffing recipe should be:
- Moist, not dry
- Rich, not greasy
- Full-bodied, not flat
Fat is flavor. Treat it that way.
 2")
Fresh vs. Dried Herbs: When to Use Each
There’s a lot of hype around fresh herbs – and yeah, they deserve it. But dried herbs are just as important when used correctly.
Here’s how to think about it:
Fresh Herbs
- Bright, aromatic, and vibrant
- Best added at the end
- Great for finishing flavor
Dried Herbs
- More concentrated and intense
- Best added early in cooking
- Build deep, slow flavor
The winning combination:
- Use dried herbs to create the base
- Finish with fresh herbs for a pop
This balance gives your herbed stuffing layers instead of overload. Too much of either one, and things get muddy fast.
Stuffing vs. Dressing: What’s the Real Difference?
This debate gets loud fast – but here’s the clean breakdown.
Technically:
- Stuffing = cooked inside the bird
- Dressing = baked in a separate dish
But the real difference comes down to this:
Stuffing (inside the bird)
- Absorbs rich drippings
- More traditional
- Risk of uneven cooking
Dressing (baked separately)
- Gets crispy edges
- Cooks more evenly
- Easier to control texture
Most chefs lean toward dressing – and for good reason. It’s more reliable and safer.
Want that classic flavor without the risk?
Use:
- High-quality broth
- Pan drippings
Same flavor. Better control.
At the end of the day, your herbed stuffing recipe isn’t defined by the name – it’s defined by the result.
How to Get That Perfect Crispy Top
Let’s talk about the part everyone fights over – the crispy, golden top.
That contrast between soft interior and crunchy surface? That’s what separates good stuffing from great stuffing.
Here’s how to nail it:
- Bake covered first to lock in moisture
- Uncover during the last 10–15 minutes
- Dot the top with butter for better browning
- Optional: add breadcrumbs for extra crunch
Want next-level texture?
Don’t stir it too much before baking. Let the top naturally crisp up.
The goal is simple:
- Soft, rich interior
- Golden, slightly crunchy top layer
That’s the kind of herbed stuffing people go back for – again and again.
Chef’s Tips (Learn This Once, Cook Better Forever)
I’ve made enough prime rib soup to know what separates “good” from “legendary”:
- Don’t rush the broth – flavor needs time to wake up
- Keep the meat tender – add it late, not early
- Use the fat – flavor lives there, not just the meat
- Balance richness – a little acid goes a long way
And here’s a truth from the line:
Soup doesn’t forgive laziness – but it rewards patience.
Variations (Because One Soup Shouldn’t Have One Personality)
Creamy Prime Rib Soup
Add a splash of cream at the end. Now you’ve got something closer to a steakhouse chowder.
Veggie-Heavy Version
Load it with mushrooms, greens, or whatever’s about to go bad in your fridge.
Barley Beef Soup Style
Add barley and suddenly your soup is eating like a full meal and judging your portion control.
Low-Carb Version
Skip the starch. Keep it all meat, broth, and vegetables.
Storage (If You Somehow Have Leftovers Again)
- Refrigerate: 3–4 days
- Freeze: up to 2–3 months
Reheat slowly. Soup is not a microwave personality – it prefers gentle persuasion.
What to Serve With It
If you’re serving this prime rib soup, don’t overthink sides:
- Crusty bread (mandatory in my kitchen)
- Grilled cheese (because joy exists)
- Simple salad (to pretend balance matters)
 3")
Final Thoughts
At the end of the day, this easy prime rib soup recipe is less about precision and more about instinct.
It’s what I call a “second-day victory dish.”
Because in good cooking, nothing truly ends – it just changes form.
And if anyone at your table says, “This tastes better than the roast,” just smile.
That’s the chef’s version of winning the lottery.
 4")
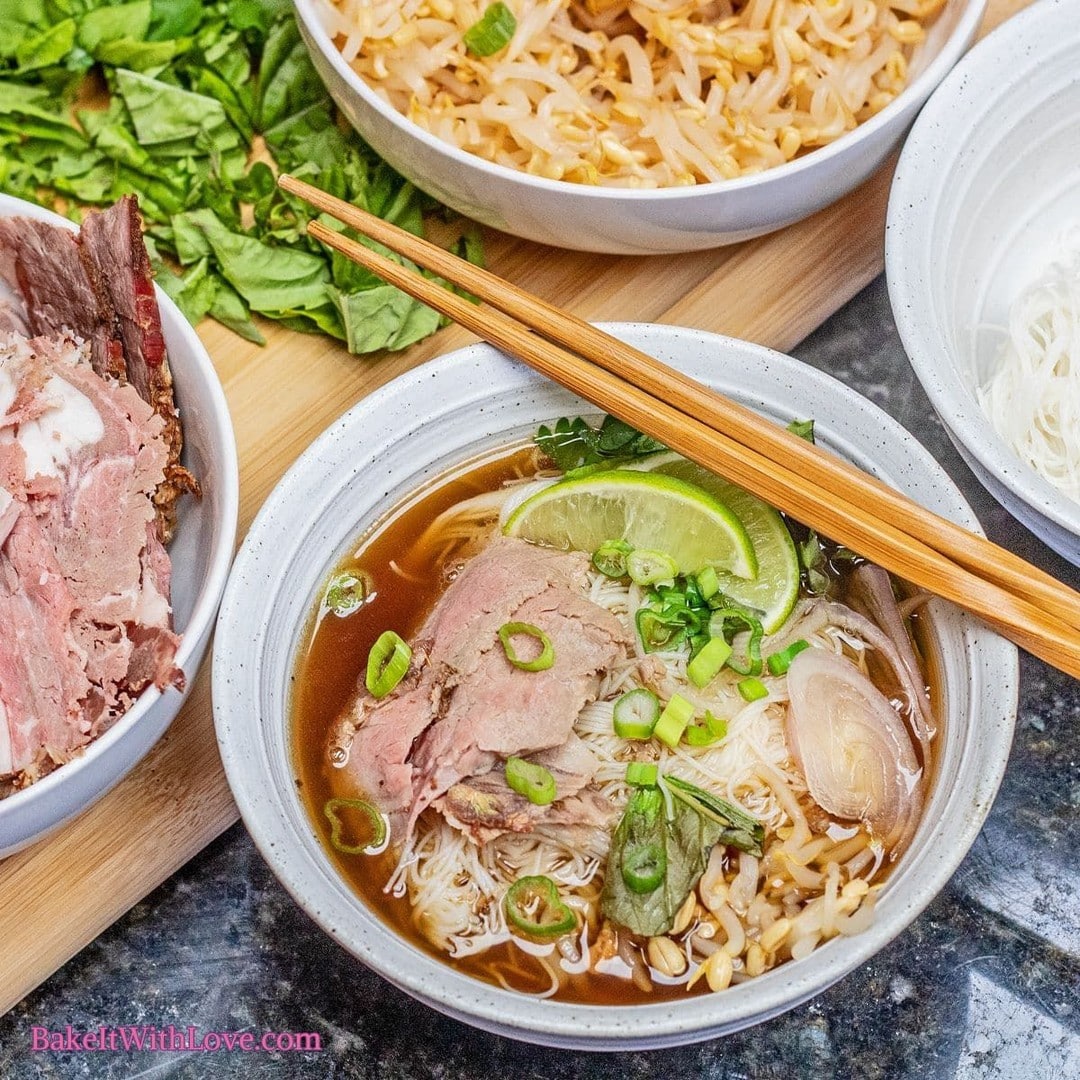
Amazing Prime Rib Soup Recipe
Image credit: @mrhugomelb
Ingredients
- (Nothing Fancy, Just Smart Cooking)
- Here’s what you’ll need for this easy prime rib soup:
- The Star
- Leftover prime rib, sliced or chopped (fat included – don’t you dare trim all the flavor away)
- The Backbone
- Onion (1 large, diced)
- Garlic (3–4 cloves, minced)
- Carrots (2–3, sliced)
- Celery (2 stalks, chopped)
- The Liquid Gold
- Beef broth (6–8 cups) – homemade if you’re serious, boxed if you’re human
- The Flavor Builders
- 1–2 bay leaves
- Fresh thyme or rosemary
- Salt and black pepper
- 1 tbsp Worcestershire sauce (optional, but it adds that “what is that magic?” depth)
- Optional but Dangerous (in a good way)
- Potatoes or barley (for body)
- Mushrooms (for earthiness)
Instructions
This is where the magic happens – and where most people overthink things. Don’t.
1. Start with the Aromatics
Heat a large pot or Dutch oven. Add a bit of oil or beef fat if you saved it (you should’ve). Toss in your onions, carrots, and celery. You’re not rushing here. You’re building the foundation of your prime rib soup.
Cook until everything softens and starts smelling like you know what you’re doing – about 6–8 minutes. Then add garlic. Always garlic last in the sauté stage unless you enjoy bitter regret.
2. Build the Broth Like You Mean It
Pour in your beef broth.
Scrape the bottom of the pot like you’re collecting flavor debt. That’s called deglazing, but I call it “getting your money back.”
Add:
- Bay leaves
- Thyme or rosemary
- Worcestershire sauce
Bring it to a gentle simmer. Not a boil. We’re cooking soup, not punishing it.
3. Add the Prime Rib (The Respectful Way)
Now comes the moment of truth. Add your leftover prime rib.
And here’s the chef rule:
“Treat leftover prime rib like a guest, not an ingredient.”
That means:
- Don’t overcook it
- Don’t boil it hard
- Just let it warm through gently
This keeps it tender instead of turning it into beef-flavored rubber.
4. Optional Add-Ins for Personality
This is where your soup develops attitude.
Add:
- Potatoes for comfort
- Barley for chew
- Mushrooms for depth
Let it all simmer together for 20–30 minutes.
At this point, your kitchen should smell like a place people randomly walk into asking, “What is THAT?”
5. Final Taste Check (Don’t Skip This)
Taste it. Not once. Twice. Adjust salt, pepper, maybe a splash more Worcestershire if it needs a kick. If it feels too heavy, a tiny splash of vinegar or lemon juice wakes it up like a cold shower.
Featured image credit: @bake_it_with_love