Picture this. You woke up at four in the morning. You battled the temperamental spirit of your offset smoker for twelve straight hours.
You endured the agonizing stall, breathed in enough post oak smoke to perfume your clothes for a week, and spent a small fortune on a beautiful, choice-grade brisket. Your internal temperature hits that magical number, 203 degrees. The meat probes like warm butter.
Victory is yours. You haul that massive hunk of beef into the kitchen, slap it down on a cutting board, and immediately plunge your chef’s knife straight into the center.
Within five seconds, a literal tidal wave of steaming juices rushes out of the meat, pooling across your counter and dripping onto the kitchen floor.
Ten minutes later, you hand your guests a slice of meat that has the exact moisture content and texture of a cardboard shipping box.
You did everything right for twelve hours, only to ruin the entire meal in twelve seconds.
As a pitmaster, I see this tragedy happen all the time in backyards across the country.
We spend ninety percent of our time obsessing over wood types, regional spice rubs, custom butcher paper, and precise pit temperatures. Yet, we completely ignore the final mile of the journey.
The truth is simple. The final steps – resting, slicing, and serving – are just as critical as the fire in your pit. They are not administrative afterthoughts. They are active, physical, and chemical processes that dictate whether your barbecue is legendary or completely unchewable.
Let us dive deep into the grand finale of great barbecue, so you never have to watch your hard work wash down the kitchen sink again.
Phase 1: The Science and Art of Resting
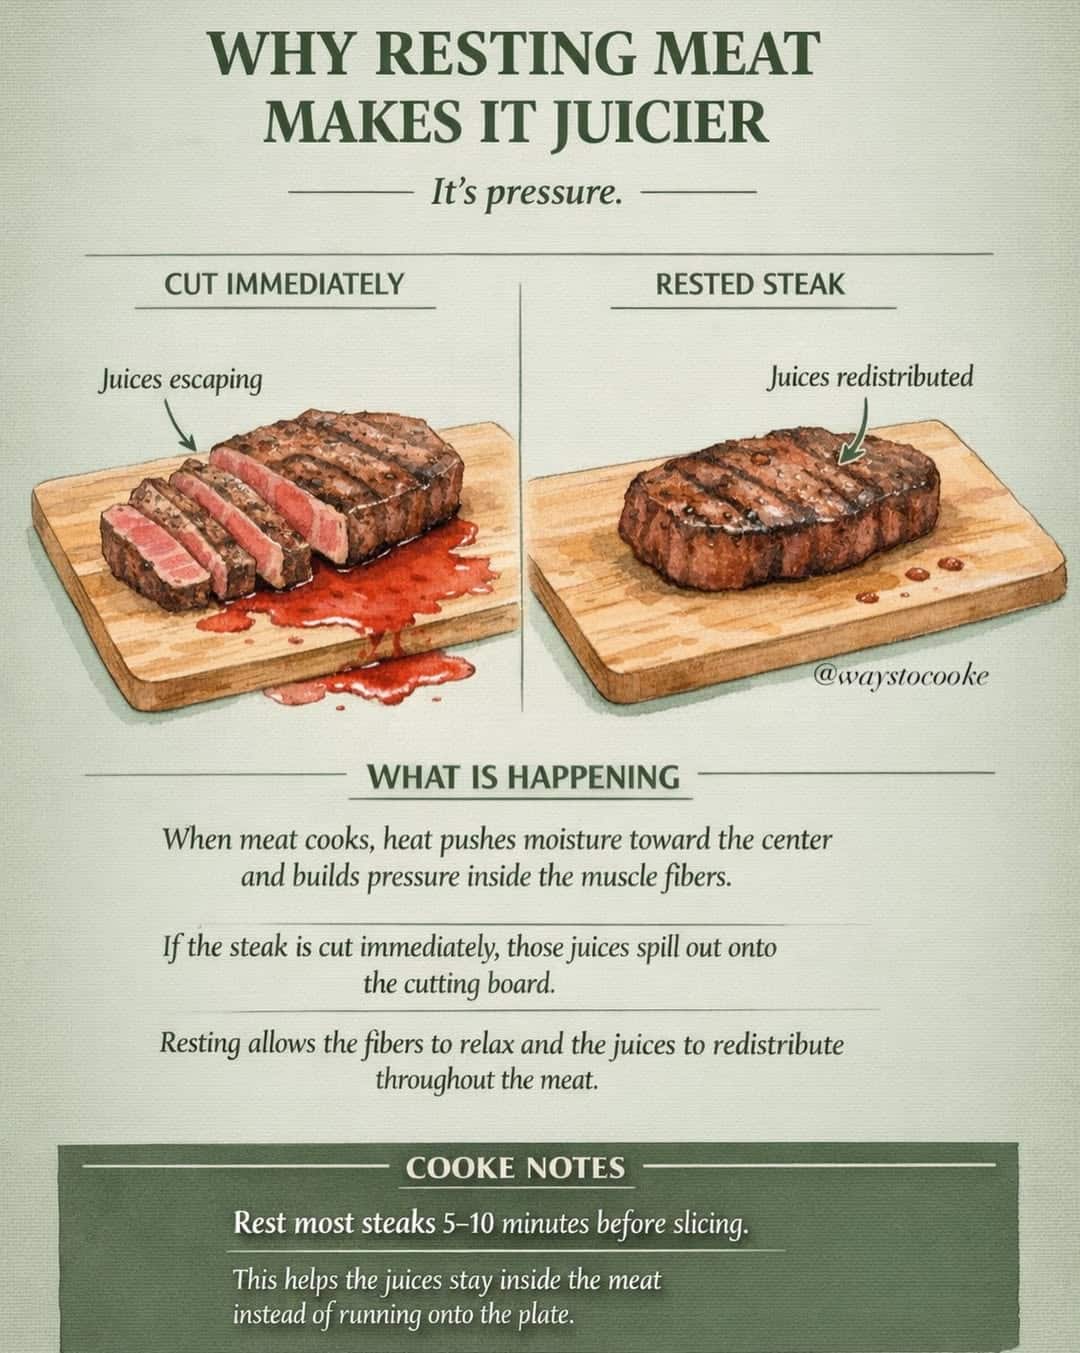
To understand why resting your meat is a non-negotiable law of the backyard, we need to talk about what happens inside those muscle fibers when they are exposed to extreme heat.
The Physics of Meat Moisture
When meat cooks, the proteins constrict.
Think of a handful of tiny muscle fibers acting like millions of microscopic sponges. As the heat climbs, these sponges squeeze tightly, forcing all their moisture away from the hot exterior and driving it directly toward the cooler center of the meat.
If you slice into that meat the second it leaves the smoker, those tightly wound muscle fibers will instantly release all that trapped liquid. Because the pressure is so high, the moisture escapes into the atmosphere as steam and pours onto your cutting board.
Resting reverses this entire process. When you remove the meat from the heat source and let the ambient temperature drop, the constricted muscle fibers finally begin to relax.
As they loosen their grip, the trapped moisture slowly migrates back out to the edges of the meat, redistributing evenly throughout the entire cut.
The Golden Rule: A perfectly rested piece of meat keeps its juices inside the slice, not on the board.

The Power of Carryover Cooking
Another crucial reason for resting is a phenomenon called carryover cooking. When you pull a large brisket or pork shoulder off the pit, the exterior of the meat is significantly hotter than the core.
That residual heat does not just vanish. It continues to travel inward, cooking the center of the meat for an additional fifteen to thirty minutes after it leaves the smoker.
If you do not account for carryover cooking by venting your meat and letting the temperature stabilize, your perfectly cooked brisket can easily push past its threshold and turn into overcooked, crumbly pot roast while it sits on the counter.
Resting versus Holding
There is a massive practical difference between letting your meat rest on the counter and holding it at temperature for an extended period.
- Resting is the initial cool-down phase where the meat drops from its peak cooking temperature to a stable internal temperature, usually around 140 to 150 degrees.
- Holding is the act of keeping that meat at that safe, warm sweet spot for hours until you are ready to serve.
If you are just doing a standard backyard cook, a simple countertop rest is perfectly fine. But if you want to elevate your barbecue to competition-grade quality, you need to learn how to hold your meat.
Step-by-Step Instructions by Meat Type
Brisket and Pork Shoulder
Large, collagen-heavy cuts require a long, slow deceleration. For these big cuts, the absolute gold standard is the faux-Cambro technique.
Once your brisket or pork butt comes off the pit, let it sit on the counter in its wrapping for about twenty minutes to vent the initial steam and arrest the carryover cooking.
If you skip this venting step and put it straight into an insulated environment, it will continue to cook and ruin your bark.
After venting, wrap the meat tightly in a couple of old bath towels and place it inside a clean, insulated plastic cooler. Close the lid and leave it alone for at least two to four hours.
The insulation keeps the meat at a perfectly safe, piping-hot temperature while giving the gelatin and fats ample time to cool into a rich, unctuous liquid that coats every single muscle fiber.

Pork and Beef Ribs
Ribs have a much higher surface-area-to-volume ratio than a giant brisket, meaning they lose heat at a rapid pace. They do not need, nor can they handle, a three-hour stay in a cooler.
When your ribs finish cooking, pull them from the smoker, open up the foil or butcher paper wrap, and let them vent on your counter for fifteen to twenty minutes.
This quick drop in temperature firms up the meat just enough so it will not fall apart when you slice it, while keeping the bark beautifully intact.
Steaks and Tri-Tip
For smaller, faster-cooking beef cuts, the goal is simply to let the high internal pressure equalize. Place your steak on a warm plate, tent a piece of aluminum foil loosely over the top, and let it sit for ten to fifteen minutes.
Do not wrap the foil tightly around the steak, or you will trap the steam and completely ruin that beautiful, hard-earned crust on the exterior.
Phase 2: The Precision of Slicing
Once your meat has enjoyed its mandatory spa day in the cooler, it is time for the moment of truth. Slicing is where you either honor the structural engineering of the animal, or completely destroy it. You can take a perfectly smoked, beautifully rested piece of meat and make it taste like old leather simply by running your knife in the wrong direction.
The Ultimate Rule: Against the Grain
If you take away only one single piece of advice from this guide, let it be this: always slice your meat against the grain.
To understand why this matters, imagine a piece of meat as a giant bundle of thick rubber bands running parallel to each other. Those rubber bands represent the long muscle fibers of the animal. If you slice parallel to those fibers, your teeth have to do the hard work of tearing those long, incredibly strong rubber bands apart. The result is a tough, chewy piece of meat that gets stuck in your teeth.
When you slice perpendicular to those fibers – cutting directly across the grain – you are using the sharp edge of your knife to cut those long rubber bands into thousands of tiny, microscopic pieces. When someone takes a bite, their teeth do not have to work at all. The meat effortlessly pulls apart because your knife already did the structural heavy lifting.
Incorrect Slicing (With the Grain):
- Muscle Fibers
- Knife Cuts (Leaves long, chewy fibers)
Correct Slicing (Against the Grain):
- Muscle Fibers
- Knife Cuts (Creates short, tender fibers)
Finding the grain on a raw piece of meat is easy, but once it is covered in a dark, midnight-black bark, it becomes nearly impossible.
Pitmaster Pro Tip: Before you apply your rub or put your meat on the smoker, take a small knife and slice off a tiny corner of the meat perpendicular to the grain. When the cook is over, look for that notched corner.
It will tell you exactly which way your knife needs to face.

Essential Tools of the Trade
Please step away from the standard kitchen chef’s knife. A standard eight-inch chef’s knife has a thick spine and a curved blade designed for rocking back and forth on a cutting board.
If you try to slice a delicate brisket with it, the thick blade will wedge the meat apart, tearing the bark and crushing the tender interior.
Instead, invest in a twelve-inch scalloped or granton-edge slicing knife. These knives are long, thin, and perfectly straight. The small indentations along the blade create tiny pockets of air that prevent the hot fat and sticky bark from adhering to the steel.
The extra length allows you to cut through an entire brisket in one single, smooth, sweeping pull motion, rather than sawing back and forth like you are harvesting a Christmas tree.
Additionally, make sure you are using a massive, heavy wooden cutting board with a deep juice groove running around the perimeter.
A flimsy plastic cutting board will slide all over your counter, which is a massive safety hazard when you are wielding a razor-sharp twelve-inch blade.
Anatomy of a Cut: Slicing Guide by Meat
The Brisket Dilemma
Slicing a whole brisket is the ultimate test of a pitmaster because a packer brisket is actually made up of two entirely separate muscles that run in completely different directions: the Flat and the Point.
- The Point (Top Muscle)
- Seam of Fat
- The Flat (Bottom Muscle)
The Flat is the long, lean, rectangular bottom muscle. The Point is the thick, highly marbled, fatty top muscle that sits on one end of the brisket.
- Start at the lean end of the Flat. Slice individual pieces that are exactly the thickness of a standard No. 2 pencil. If you cut them too thin, they will fall apart. If you cut them too thick, they will feel heavy and unappealing.
- Work your way down the Flat until you hit the area where the Point sits right on top of it.
- Stop slicing. Rotate the remaining chunk of meat exactly ninety degrees. Because the grain of the Point runs perpendicular to the grain of the Flat, you must change your cutting angle to ensure you are still cutting against the grain for both sections.
- Continue slicing your pencil-thick pieces, or slice the rich Point muscle into large, decadent cubes to make burnt ends.
Pork Ribs
Slicing ribs seems straightforward, but it requires a careful eye.
Flip your slab of ribs bone-side up on the cutting board. It is much easier to see the skeletal structure of the rack from the bottom than it is through the dark bark on top.
Take your slicing knife and aim directly down the center of the white channels of fat between each bone. Use a clean, decisive downward stroke.
If you hesitate or saw back and forth, you will tear the meat clean off the bone, leaving you with a messy plate of shredded pork.
Pulled Pork
With a pork shoulder, you are not slicing; you are shredding. But timing is everything. Do not pull your pork until the exact moment you are ready to serve it.
Once you shred pork shoulder and expose all that surface area to the open air, it begins to oxidize and dry out at an alarming rate.
Keep the pork butt whole in its holding environment, and pull it apart with gloved hands right in front of your guests.
Phase 3: The Art of Serving
You have rested the meat to peak juiciness. You have sliced it with surgical precision. Now comes the final leg of the relay race: getting that food into your guests’ mouths while it is still in its absolute prime.

Temperature Management
Barbecue is incredibly sensitive to the ambient room temperature. The moment a slice of fatty brisket or a rib hits a cold porcelain plate, the rendered liquid fat begins to solidify, turning into a greasy, waxy coating that masks the true flavor of your food.
To prevent this barbecue tragedy, try pre-warming your serving platters in a low oven for a few minutes before pileing them high with meat.
Better yet, ditch the traditional plates entirely and serve your barbecue exactly like the legendary joints in Central Texas do: laid out on wide sheets of unbleached peach butcher paper spread across the table.
The paper absorbs excess grease without pulling moisture out of the meat, and it acts as an excellent insulator.
Never slice your entire brisket or pork shoulder all at once unless you are feeding an army of fifty people simultaneously. Slice to order.
Cut three or four slices for the person at the front of the line, and leave the rest of the meat whole under a loose tent of foil. This keeps the remaining meat hot, moist, and protected from the drying effects of the air.
The Sauce Debate
Let us address the elephant in the room: barbecue sauce.
There is nothing wrong with sauce, but if you spent fourteen hours developing a beautiful, crunchy, peppery bark, the last thing you want to do is drown your hard work in a thick blanket of high-fructose corn syrup before anyone even gets a chance to taste the meat.
Serve your sauces on the side in small ramekins. This shows your guests that you have absolute confidence in the quality of your meat, and it allows them to customize their own experience.
If you must glaze your ribs, apply a very thin layer of sauce during the final ten minutes of the cook while they are still on the smoker, allowing the heat to set the sauce into a beautiful, sticky lacquer that complements the bark rather than washing it away.
The Finishing Touches
Right before the meat leaves your cutting board, there are two secret weapons you can use to take your presentation to the absolute elite level.
- The Board Juice Splash: Before your guests arrive, save some of the clean, rendered beef fat (tallow) or pork fat that accumulated in your foil wrap during the rest phase. Right after you slice your meat, use a pastry brush to lightly paint a thin layer of this liquid gold back onto the freshly cut surfaces. It gives the meat a stunning, glistening sheen under the lights and provides an instant burst of rich flavor.
- The Finishing Dust: A tiny pinch of coarse finishing salt, like Maldon sea salt, or a very light dusting of your base rub from a high shaker can completely transform the final product. It adds a delightful, unexpected crunch and wakes up the palate right before the rich, smoky flavors take over.

Plating and Accompaniments
Barbecue is heavy, rich, and loaded with intense fats and salt. To create a truly balanced meal, your sides and accompaniments need to work in direct opposition to the meat.
Always provide plenty of high-acid, crisp elements on your serving platters. Sliced dill pickles, pickled red onions, and raw jalapeños are classic options for a reason.
The sharp acetic acid from the vinegar cuts right through the heavy coating of beef and pork fat, instantly cleansing the palate and preparing your guests for the next decadent bite.
Troubleshooting & Common Mistakes
Even the most experienced pitmasters hit a snag every now and then. If things do not go perfectly according to plan, use this quick reference guide to save your cook.
The Bark Turned Soft and Mushy
- The Cause: You wrapped the meat too tightly while it was boiling hot, trapping a massive cloud of steam inside the wrapper that effectively braised the exterior of your meat.
- The Fix: Next time, make sure you open the foil or butcher paper and let the meat vent on the counter for twenty minutes to let that aggressive steam escape before you lock it away in your holding cooler.
The Brisket is Crumbling and Falling Apart
- The Cause: The meat is slightly overcooked, meaning the connective tissues have broken down to the point where they can no longer hold the muscle fibers together.
- The Fix: Do not panic. Simply adjust your slicing technique. Abandon the pencil-thickness rule and slice the remaining meat into thick, hearty slabs about the width of your index finger. The extra thickness will provide the structural integrity the meat needs to hold its shape from the board to the plate.
The Meat Got Cold Too Quickly
- The Cause: You sliced the entire cut of meat all at once and let it sit out on a cold metal counter.
- The Fix: Keep the uncut portions of the meat wrapped tightly in butcher paper and tucked away inside a warm, low oven set to 150 degrees. Only slice what you are actively putting onto a plate at that exact second.
Crafting the Perfect Bark – And Why You Shouldn’t Rush It
Barbecue is an exercise in extreme patience. It is an art form that rewards discipline and punishes short cuts.
After spending an entire day managing a fire, monitoring internal temperatures, and carefully crafting the perfect bark, it is incredibly tempting to rush through the final steps just to get food onto the table.
But the true masters of the craft know that the final hour is where the magic truly happens.
When you give your meat the respect it deserves during the resting phase, cutting with absolute precision against the grain, and serving it with careful attention to temperature and balance, you ensure that every single ounce of your hard work is fully realized on the plate.
The next time you fire up your smoker, do not just plan your cook around the time the meat leaves the fire. Schedule the rest directly into your timeline.
Your patience will be rewarded with the juiciest, most tender barbecue you have ever tasted.
Now fire up the pit, stay patient, and happy smoking!
Frequently Asked Questions
Q: Can I rest my BBQ for too long?
A: Yes, but it takes a while. If you use the cooler method (faux-Cambro), large cuts like brisket and pork shoulder can easily stay safely piping hot for up to 4 hours.
However, if the internal temperature drops below 140°F, you enter the food safety danger zone where bacteria can grow. Plus, holding it for too long (like 8+ hours in a standard cooler) can eventually make the texture turn soft and mushy.
Q: What should I do if my meat is ready hours before my guests arrive?
A: Don’t panic! This is actually a blessing. Keep the meat tightly wrapped in its butcher paper or foil, and place it in your kitchen oven set to its lowest possible temperature – ideally between 140°F and 150°F.
Many modern ovens have a “warm” setting that sits right in this sweet spot. This allows you to safely hold the meat for hours without losing moisture, mimicking the commercial holding ovens used by legendary BBQ joints.
Q: Why does my brisket slice crumble and break apart instead of holding its shape?
A: If your slices are falling apart on the board, it’s a classic sign that the meat is slightly overcooked. The collagen and connective tissues broke down just a little too much.
To save the presentation, adjust your knife work immediately: stop cutting thin slices and start cutting thick slabs about the width of your index finger. The extra thickness provides the structural support the meat needs to stay in one beautiful piece.
Q: Is it better to pull pork shoulder by hand or slice it with a knife?
A: For a traditional pork shoulder, pulling by hand (while wearing insulated gloves) is the absolute gold standard.
Pulling allows the meat to naturally separate along its muscle seams, leaving you with irregular, texturally perfect shreds that catch and hold onto juices.
Slicing or chopping pork shoulder with a knife can dry it out faster because it exposes too much surface area to the air all at once.
Q: Can I use a regular serrated bread knife to slice my brisket if I don’t own a slicing knife?
A: In a pinch, a serrated bread knife is actually a better fallback option than a standard chef’s knife, because the teeth can saw through a tough bark.
However, it’s far from ideal. The aggressive teeth of a bread knife tend to shred the delicate, tender interior of a brisket and create a jagged, messy edge.
If you want those clean, competition-perfect, photo-worthy slices, a dedicated 12-inch granton-edge slicing knife is worth every penny.
Featured image credit: @waystocooke