Note: This article is written after interviewing an old colleague from high school who is now a successful contractor.
Lighting is the “secret sauce” of outdoor design.
You can have the most expensive professional grill and a slab of granite that looks like it was harvested from the moon, but if you’re squinting at a steak under the glow of a nearby bug zapper, the magic is gone.
My contractor/architect high school classmate shared with me, in all her years of designing outdoor spaces, she’s seen homeowners drop five figures on stone masonry and then forget that the sun actually sets.
“We’re going to change that.” She told me.
This isn’t just about sticking a few solar stakes in the dirt; it’s about blending hardscaping & countertop lighting into a seamless, weather-proof system that makes your backyard the best “restaurant” in town.
Why Durability Matters in Outdoor Kitchen Lighting
Before we talk about the “pretty” stuff, we have to talk about the “gritty” stuff. An outdoor kitchen is a hostile environment. It deals with rain, snow, UV rays, and – the worst of all – vaporized grease.
The IP Rating System
When you’re shopping for fixtures, look for the IP (Ingress Protection) rating. It’s a two-digit code. The first digit is for solids (dust/dirt), and the second is for liquids.
For a high-performance outdoor kitchen, don’t settle for anything less than IP65. If a light is going to be near a splash zone or a pressure-washer’s path, aim for IP67.
Materials: Brass vs. The World
She tells her clients: “Cheap aluminum is just a slow-motion science experiment in corrosion.” In a salty or humid environment, painted aluminum will flake and pit within two seasons. Solid brass and copper are the heavyweights.
They don’t just last; they “age” into a beautiful patina that looks even better against natural stone.
The Heat Factor
Your countertop lighting needs to be a “cool customer.”
Placing a plastic-housed LED too close to a pizza oven or a high-BTU grill is a recipe for a melted mess. We use high-temp glass lenses and metal housings to ensure the lights don’t quit just because the grill is at 700°F.

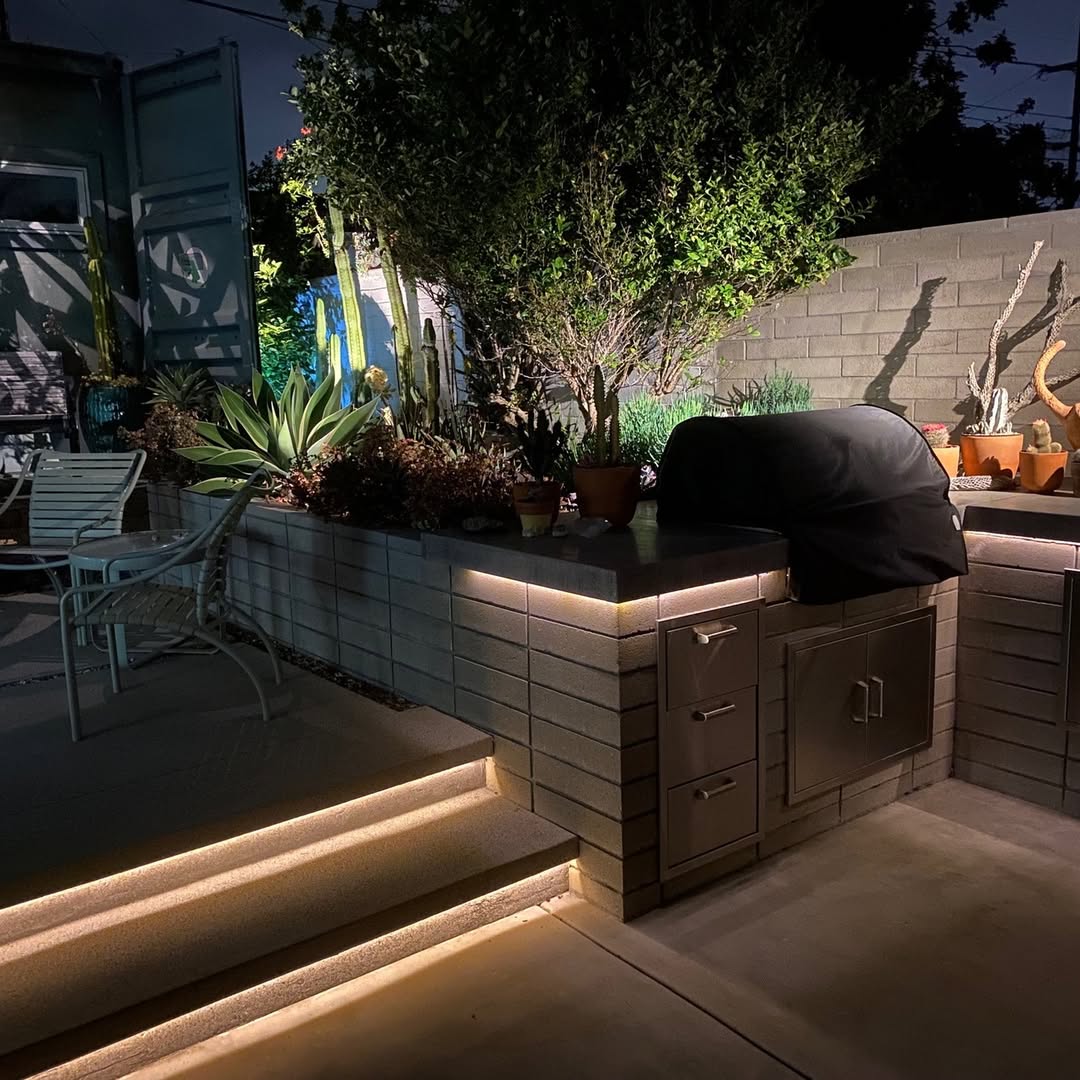
1. Integrated Under-Capping LED Strips
This is the “gold standard” for a modern hardscape look. Most outdoor kitchens use a stone “cap” on top of the masonry walls. By tucking a light strip just under that lip, you create a floating effect that is visually stunning.
- The Durability Hack: Use silicon-encased COB (Chip on Board) LED strips. Standard strips have visible “dots” of light that can look cheap. COB strips provide a continuous, smooth beam of light.
- Practical Use: This isn’t just for show. These lights illuminate your cabinet handles and the floor space below, ensuring you don’t trip over a stray bag of charcoal.
Pro Tip: Always install these in a mounting channel. It protects the strip and acts as a heat sink to keep the LEDs from burning out early.

2. Hardscape Wedge Lights for Retaining Walls
If your outdoor kitchen is surrounded by stone seating walls or retaining walls, wedge lights (sometimes called flange lights) are your best friend. These are flat metal plates with a light tucked underneath that slide directly between your layers of stone.
- Permanent Installation: These are built into the “bones” of the masonry. You don’t have to worry about the wind blowing them over or a guest bumping into them.
- Subtle Ambiance: They cast light downward, highlighting the texture of the stone without blinding anyone sitting across from you.

3. Heavy-Duty Gooseneck Task Lighting
Let’s get practical. You can’t tell if a burger is medium-rare if you’re working in a shadow. This is where heavy-duty task lighting comes in.
- The Professional Edge: I like using industrial-grade gooseneck lights mounted to a nearby pillar or the backsplash. They are flexible, allowing you to point the light exactly where the knife meets the cutting board.
- The “Punchline”: Think of these as the “surgical lights” of the BBQ world. When you’re slicing a $100 brisket, you want to see every grain.

4. Core-Drilled In-Counter Accents
This is a high-end move that requires a brave contractor with a diamond-tipped drill bit. Core-drilling involves creating a small hole directly through your granite or concrete countertop to flush-mount a tiny, waterproof LED.
- Safety Meets Style: These act as “runway lights” for your kitchen. They mark the corners of the counter so no one accidentally bumps a drink off the edge in the dark.
- Unobstructed Workspace: Because they sit perfectly flush, you can still wipe your counters down with a squeegee or cloth without catching on the fixture.

5. Masonry Pillar Lanterns (Sconces)
Verticality is important. If all your lights are at waist level, the space can feel “flat.” Adding sconces to stone pillars helps define the “walls” of your outdoor room.
- The “Dark Sky” Approach: Choose fixtures that are “full cutoff,” meaning the light only shines down. This prevents light pollution and keeps your neighbors from thinking a UFO is landing in your backyard.
- Lighting the Path: These are great for transitions between the cooking zone and the dining zone.

6. Perpendicular Step & Toe-Kick Lights
In a kitchen, we call the recessed space at the bottom of a cabinet the “toe-kick.” In an outdoor hardscape, this is a prime spot for safety lighting.
- Toe-Kick Lights: Recessing small lights into the base of your island prevents “stubbed-toe syndrome” – a common ailment at nighttime cookouts.
- The Pressure-Wash Test: Ensure these are IP68 rated. Since they are at ground level, they will deal with puddles, leaf blowers, and the occasional spilled beer.

7. Smart-Integrated Pergola Downlighting
If you have a pergola or a pavilion over your kitchen, you have a ceiling. Use it! Pergola downlighting mimics the recessed “can” lights you have in your indoor kitchen.
- Modern Integration: Many modern pergolas come with pre-drilled channels for wiring. This keeps the look “clean” with no visible wires running along the wood or aluminum beams.
- The Smart Home Connection: I always recommend connecting these to a smart transformer. Being able to say, “Hey Google, turn on the Grill Zone,” while your hands are covered in dry rub is a game-changer.
The Psychology of Color Temperature (Kelvin)
Most people think a bulb is just a bulb, but the Kelvin (K) rating dictates the entire vibe of your “chef’s theater.”
Choosing the wrong temperature can turn a luxury patio into a cold, uninviting space. To keep your outdoor kitchen looking high-end, follow these light-science rules:
- The Warm White Sweet Spot: Aim for 2700K to 3000K. This temperature highlights the natural earthy tones of stacked stone and wood grain, making the kitchen feel like an extension of your home.
- Avoid the “Hospital Look”: Anything higher than 4000K starts to look like a sterile clinic or a gas station parking lot – definitely not the mood you want for a Wagyu dinner.
- Prioritize Visual Fidelity: Keep your Color Rendering Index (CRI) at 90 or above. This ensures the “red” of a medium-rare steak looks like a steak and not a grey mystery.
It is all about ensuring you can see the true colors of your ingredients as you prep. After all, nobody wants to serve a “perfectly cooked” brisket that looks purple under a cheap blue light.
Motion-Activated “Chef’s Path” Lighting
Imagine walking toward your grill with a heavy tray of marinated ribs and having the lights intuitively guide your way. Motion sensors aren’t just for scaring off raccoons anymore; they are a premium convenience feature for the serious pitmaster.
- Discreet PIR Sensors: By integrating Passive Infrared sensors directly into your masonry, you create a “smart” path that illuminates only when needed.
- Zonal Programming: You don’t want the whole yard flashing on like a stadium. Program specific zones to gently fade up to 50% brightness as you enter the workspace.
- Dark Sky Compliance: This setup preserves the night sky ambiance when the kitchen isn’t in use, saving energy and keeping the neighbors happy.
It’s the ultimate “hands-free” welcome. Plus, there is something undeniably cool about your countertop lighting waking up just as you arrive to start the feast.

Fiber Optic “Star-Map” Countertops
If you want a feature that makes guests drop their forks, look into fiber optic integration. Unlike traditional bulbs, fiber optics carry no heat or electricity to the “end” of the strand – they only carry light, making them perfect for stone.
- Zero Heat, Total Safety: Since the “light engine” is located remotely, you can cast hundreds of tiny “stars” directly into the surface of your hardscape counters without worrying about moisture or heat.
- Invisible by Day, Galaxy by Night: The strands are microscopic and invisible during lunch, but they transform your prep surface into a celestial map once the sun goes down.
- Low Maintenance: Because there are no bulbs to change inside the stone, it’s the definition of permanent durability.
It’s the ultimate fusion of culinary art and aerospace tech. You simply house the LED source in a dry cabinet, making maintenance a five-minute job once every decade.
Shadow-Gap Lighting for Architectural Depth
In high-end architecture, what you don’t light is just as important as what you do. Shadow-gap lighting is the trick professional designers use to make massive stone islands look like they are floating on air.
- The Weightless Aesthetic: By creating a deliberate 1-inch “reveal” between materials (like stone and decking), you hide a linear light source that washes the ground in a soft glow.
- Defining the Structure: This prevents the kitchen from looking like a flat, dark “block” of stone, adding incredible architectural depth.
- Precision Rough-In: This technique requires a bit more coordination during the construction phase, but it separates a DIY project from a professionally designed estate.
The result is a sophisticated, gallery-style glow that makes your heavy masonry look effortless and modern.
Heat-Shielded Induction Zone Glow
As outdoor kitchens evolve, we’re seeing more induction technology integrated directly into stone surfaces. These burners stay cool to the touch, but the cookware – and the food inside – gets incredibly hot.
- Visual Warning System: Adding heat-shielded amber glow lights around the burner perimeter serves as a vital safety signal that the area is active.
- Primal Aesthetic: By using a warm amber or deep orange hue, you mimic the traditional “glow” of a flame, giving you that satisfying feeling of cooking over fire.
- Durable Housing: Use high-output LED chips tucked behind tempered, frosted glass lenses to ensure the fixtures can handle the weight of heavy cast-iron pans.
It’s a brilliant mix of safety and “wow” factor, ensuring your high-tech, flameless cooking zone still feels like the warm heart of the backyard.

Technical Deep Dive: The Power Behind the Glow
You have two choices: Line-Voltage (120V) or Low-Voltage (12V). In almost every scenario, I steer my clients toward low-voltage systems. Why?
- Safety: If a rogue shovel nicked a 120V wire, it’s a disaster. If it nicks a 12V wire, it’s a minor repair.
- Efficiency: LED low-voltage systems use about 80% less energy.
- Flexibility: The wires are smaller and easier to hide within the mortar joints of your hardscaping.
Calculating Voltage Drop
If your kitchen is 100 feet away from the house, the light at the end of the line might look dimmer than the first. To fix this, we use thicker gauge wire (like 12/2 or 10/2) to ensure the “juice” makes it all the way to the last countertop light.
Maintenance & Care for Longevity
Even the most durable light needs a little love. If you want your investment to last fifteen years instead of five, follow the “Two-Season Rule.”
- The Spring Clean: Every spring, take a damp microfiber cloth and wipe the lenses. Grease from the grill creates a film that traps heat and dims the light.
- The Fall Check: Before the ground freezes, check your junction boxes. Make sure no “critters” have decided your warm transformer box is a great place for a winter nest.
Lighting is the Final Ingredient
Designing an outdoor kitchen without a solid plan for hardscaping & countertop lighting is like buying a Ferrari and driving it only in the garage. The right lighting doesn’t just show you where the food is; it creates an emotional atmosphere.
It’s the difference between “cooking outside” and “an outdoor culinary experience.”
By choosing durable materials like brass, focusing on IP-rated fixtures, and layering your light – from the “toe-kick” to the “task light” – you ensure that your backyard remains the heart of the home long after the sun goes down.
Now, go grab a cold drink, flip that switch, and watch your hardwork glow. You’ve earned it.
Frequently Asked Questions
Setting up a high-end outdoor kitchen involves more than just picking out a grill; it’s about engineering an environment. Here are the most common questions I get from homeowners and DIY enthusiasts looking to brighten up their backyard retreats.
What is the best “color” of light for an outdoor cooking area?
For most residential hardscaping, you want to stay in the 2700K to 3000K (Warm White) range. This mimics the cozy, inviting glow of indoor lighting and makes natural stone and wood grain pop.
Avoid “Cool White” or blue-toned lights (4000K+), which can make your food look unappetizing and your patio feel like a commercial parking lot.
Can I install countertop lighting myself, or do I need a pro?
If you are using a low-voltage (12V) system, it is very DIY-friendly because the risk of a dangerous electrical shock is minimal.
However, if you are integrating lights into permanent masonry or “core-drilling” through granite, I highly recommend hiring a contractor. Messing up a $3,000 slab of stone with a bad drill hole is an expensive mistake you don’t want to make.
Are LED strips actually durable enough to stay outside all year?
Yes, but only if they are IP65 or IP67 rated and encased in silicon. Standard “indoor” LED strips will yellow and crack within months.
For the best results, always install your strips inside an aluminum mounting channel with a frosted lens. This protects the lights from the elements and helps dissipate heat, extending the life of the LEDs.
How do I clean grease and soot off my outdoor light fixtures?
Outdoor kitchens are grease magnets. Every 6 months, use a soft microfiber cloth and a mild, grease-cutting dish soap (like Dawn) to wipe down the lenses.
Never use abrasive scrubbers or harsh chemicals, as these can scratch the glass or strip the patina off high-quality brass and copper fixtures.
Will my outdoor lights attract more bugs to the cooking area?
Bugs are generally more attracted to UV light and higher color temperatures.
By using warm LEDs (3000K or lower) and keeping your light focused downward toward the countertops and floor (rather than glowing outward into the yard), you can significantly reduce the number of uninvited winged guests at your dinner party.
What happens if a light built into my stone wall burns out?
This is a common fear! High-quality hardscape wedge lights are designed with replaceable LED modules. You usually only need to remove two small screws to swap the light engine without having to tear apart your masonry.
This is why buying “pro-grade” fixtures from brands like Hestan or Lynx is worth the extra investment over cheap, “sealed” units.
Featured image credit: @graveltogold