Notice: This article was created with the help of a close friend of mine who has decades of experience in working with house remodeling, home renovations, landscaping and outdoor kitchens.
Why Lighting Is the Real Upgrade
Here’s something most homeowners don’t realize until it’s too late: you can drop serious money on a beautiful outdoor kitchen – premium grill, stone counters, custom cabinetry – and still end up with a space that feels… flat.
Why? Because when the sun goes down, lighting becomes the entire experience.
A friend of mine who is in the contractor business has shared numerous experiences about a botched outdoor kitchen design job.
A client calls him over, proud of their new setup. Daytime? Gorgeous. Nighttime? It looks like a parking lot or worse – like nobody thought about it at all.
That’s where the lighting secrets of designer outdoor kitchens come in. These aren’t just aesthetic tweaks. They’re the difference between a backyard and a resort-style destination.
Let’s break it down.

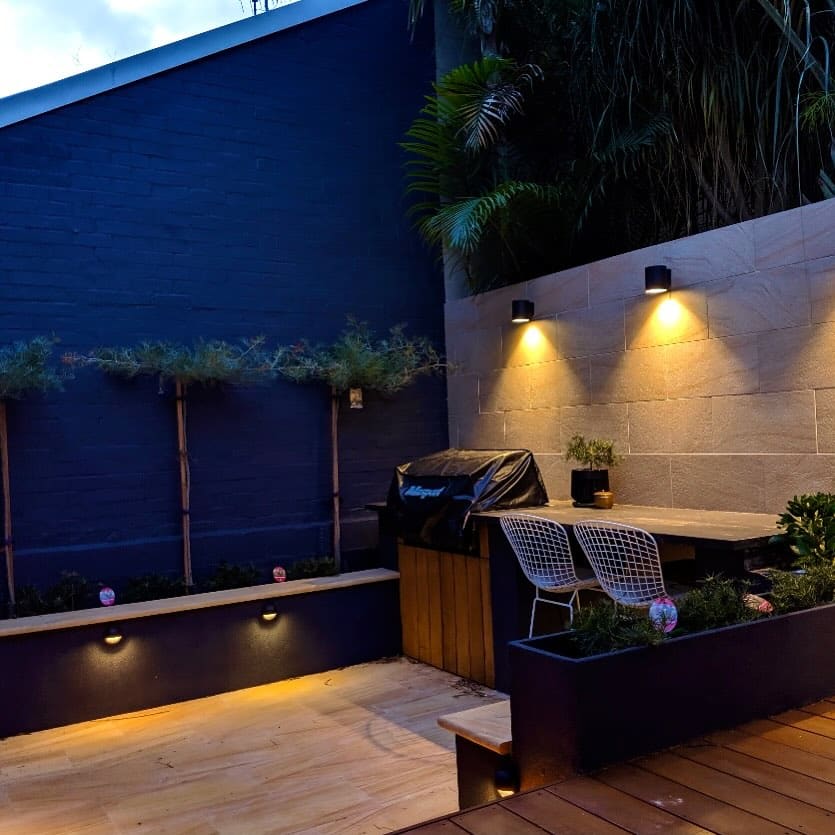
1. Layer Your Lighting Like a Pro Chef Layers Flavor
If you take one thing from this article, make it this:
great lighting is layered, never single-source.
Relying on one overhead light is like seasoning a steak with just salt. Technically fine. But you’re leaving a lot on the table.
Designers think in three lighting layers:
- Ambient lighting – your base glow, setting the overall tone
- Task lighting – focused, practical light where work happens
- Accent lighting – the “wow factor” that adds depth and drama
Here’s the trick: these layers should work together, not compete.
Picture this:
- A soft overhead wash sets the mood
- Under-counter lighting adds a subtle glow
- A spotlight gently highlights a stone backsplash
Now you’ve got dimension. You’ve got mood. You’ve got intention.
Key takeaway:
Stop thinking in fixtures. Start thinking in zones.

2. Prioritize Task Lighting Where the Action Happens
Let me be blunt: if you can’t see what you’re cooking, nothing else matters.
One of the most overlooked lighting secrets of designer outdoor kitchens is how seriously they treat task lighting. This isn’t decorative – it’s functional, and it needs to be precise.
Focus on the “work triangle”:
- Grill
- Prep area
- Sink
These spots need clear, shadow-free lighting.
What works best?
- Directional LED spotlights aimed exactly where needed
- Under-cabinet lighting that illuminates countertops
- Adjustable fixtures that let you control angles
Here’s a mistake I see all the time:
People light the space beautifully but leave the grill in shadow. That’s like building a stage and forgetting the spotlight.
Pro tip:
Hide the fixture, highlight the surface.
Good task lighting should feel invisible – but perform like a pro.

3. Use Warm Lighting to Create a Resort-Level Atmosphere
If your outdoor kitchen feels a bit… sterile at night, chances are your lighting is too cool.
Designers almost always stick to warm color temperatures (2700K–3000K). Why? Because it instantly shifts the mood from “workspace” to “destination.”
Cool white lighting (4000K+) might work in a garage.
But outdoors? It kills the vibe.
Warm lighting:
- Softens materials like stone and wood
- Makes food look more appetizing (yes, it matters)
- Creates that relaxed, upscale resort feel
I once participated in my contractor friend’s projects and we were on-site.
His team swapped out a client’s lighting from cool to warm without changing anything else. Same layout, same fixtures – completely different atmosphere. Their exact words: “It finally feels like a place we want to stay in.”
Key takeaway:
Lighting color is emotional, not just technical.
Consistency matters too. Mixing warm and cool lighting in the same space? That’s how you end up with visual chaos.

4. Highlight Architectural Features and Textures
This is where things start to feel expensive – in the best way.
One of the smartest lighting secrets of designer outdoor kitchens is using light to show off materials. Not everything needs to be bright. Some things just need to be noticed.
Think about what deserves attention:
- A textured stone wall
- A sleek backsplash
- Wood grain on cabinetry
- A custom-built bar
Now instead of flooding them with light, graze them.
Techniques designers love:
- Uplighting from the base of a wall
- Directional lighting that skims across textures
- Soft washes that create shadows and depth
Here’s the magic: when light hits texture at an angle, it creates contrast. That contrast creates drama. And drama? That’s what makes a space feel designed, not assembled.
Pro insight:
Don’t light everything equally. Highlight what matters.

5. Incorporate Hidden and Indirect Lighting
If you’ve ever walked into a high-end resort and thought, “Why does this feel so good?” – this is probably why.
You’re not seeing the light source. You’re seeing the effect.
Hidden lighting is one of the most powerful lighting secrets of designer outdoor kitchens, and it’s surprisingly simple to implement.
Where to use it:
- Under countertops
- Along toe kicks
- Behind panels or ledges
- Beneath seating edges
Instead of shining light at you, it creates a soft glow around you.
The result?
- Less glare
- More depth
- A layered, luxurious atmosphere
My architect buddy (who was also my high school best friend) likes to call this “quiet lighting.” It doesn’t scream for attention – but it completely transforms the space.
Key takeaway:
The best lighting isn’t always seen – it’s felt.

6. Add Statement Fixtures for a Designer Focal Point
Now that you’ve built your layers, it’s time for a little personality.
Every well-designed outdoor kitchen has a focal point, and lighting is often the easiest way to create one.
Think:
- Pendant lights over an island
- A bold fixture above the dining table
- A subtle but striking chandelier
This is where form meets function.
But here’s the balance:
- Too flashy, and it feels out of place
- Too subtle, and it disappears
You want something that anchors the space without overpowering it.
Material choices matter outdoors:
- Weather-resistant metals
- Treated wood
- Glass or woven textures for warmth
Among the many projects my friend handled was installing oversized pendants over an outdoor bar, and according to him, suddenly the whole space felt like a high-end lounge. Same layout – just one smart focal point.
Pro tip:
Pick one hero piece. Let everything else support it.

7. Use Smart Lighting Controls for Ultimate Flexibility
Here’s where modern design really shines – literally.
The final piece of the puzzle in the lighting secrets of designer outdoor kitchens is control.
Because great lighting isn’t static. It adapts.
At minimum, you want:
- Dimmers on key lighting zones
- The ability to shift from bright to soft instantly
Step it up with smart controls:
- App-based systems
- Pre-set lighting scenes
Imagine this:
- “Cook mode” → bright, focused lighting
- “Dinner mode” → warm, dimmed ambiance
- “Late-night drinks” → soft glow with accents
That flexibility is what makes a space feel high-end.
And let’s not ignore the practical side:
- Energy savings
- Longer bulb life
- Easier adjustments without rewiring
Key takeaway:
Luxury isn’t just how it looks – it’s how easily it adapts.

8. Use Lighting to Control Bugs (Yes, Really)
Here’s a trick most homeowners don’t expect: your lighting choices can attract – or repel – bugs.
Traditional bright white or blue-toned lights are basically a neon sign for insects. If you’ve ever tried enjoying a steak while swatting mosquitoes like you’re in a martial arts movie, you already know the problem.
One of the more underrated lighting secrets of designer outdoor kitchens is switching to warm or amber LED lighting. These wavelengths are far less attractive to bugs, which means fewer uninvited guests hovering over your food.
You can also:
- Position lights away from dining areas to draw insects elsewhere
- Use shielded fixtures to minimize glare and exposure
- Add subtle perimeter lighting instead of harsh central lights
Key takeaway:
Smart lighting doesn’t just set the mood – it protects it.

9. Integrate Lighting into Landscaping for a Seamless Look
Most people treat the outdoor kitchen as one zone and the yard as another. Designers don’t.
They blur the line.
A powerful move in the lighting secrets of designer outdoor kitchens is extending your lighting into the surrounding landscape. This creates a seamless visual flow instead of a bright island floating in darkness.
Think beyond the kitchen:
- Soft uplighting on nearby trees
- Low path lights guiding movement
- Gentle washes along garden beds
This does two things:
- Makes your space feel larger and more immersive
- Creates a resort-style environment, not just a cooking station
My contractor friend always tells his clients: if the edges disappear, the experience expands.
Pro insight:
Your outdoor kitchen shouldn’t end at the counter – it should fade into the environment.

10. Design for Day-to-Night Transitions
A great outdoor kitchen doesn’t just look good at night – it transforms gracefully from day to night.
One of the overlooked lighting secrets of designer outdoor kitchens is planning for that transition period – the golden hour into evening. That’s when your space is working the hardest.
During the day, lighting is subtle or invisible. But as the sun dips, your system should gradually take over without feeling abrupt.
How to pull it off:
- Use automatic timers or light sensors
- Layer lighting that becomes noticeable in stages
- Avoid lights that feel too harsh when they first turn on
The goal is simple: no sudden “flip-the-switch” moment.
Key takeaway:
Great lighting doesn’t just turn on – it eases in.
That smooth transition is what separates a well-lit space from a truly designed one.

11. Choose Fixtures That Age Beautifully Outdoors
Let’s talk about something less glamorous – but absolutely critical: how your lighting holds up over time.
Outdoor kitchens are exposed to heat, moisture, grease, and weather. One of the practical lighting secrets of designer outdoor kitchens is choosing fixtures that don’t just survive – but age well.
Cheap fixtures fade, rust, or turn cloudy fast. And nothing kills a high-end look quicker than worn-out lighting.
Look for:
- Powder-coated or marine-grade finishes
- Stainless steel or brass materials
- UV-resistant lenses that won’t yellow
Here’s the mindset shift:
You’re not just buying lighting – you’re investing in long-term appearance.
Pro tip:
If it looks good on day one but not year one, it’s the wrong choice.
Durability is part of good design. Always has been.

12. Create Intimate Zones within a Larger Space
Big outdoor kitchens are great – but without structure, they can feel… impersonal.
That’s where lighting steps in.
One of the more advanced lighting secrets of designer outdoor kitchens is using light to break a large space into smaller, intimate zones.
Instead of one uniform brightness, you create pockets of experience:
- A softly lit dining area
- A brighter prep zone
- A cozy lounge corner with low lighting
This makes the space feel:
- More inviting
- More functional
- More dynamic
I’ve seen large patios completely change just by adjusting lighting levels across zones.
Suddenly, people gather naturally instead of hovering in one spot.
Key takeaway:
Lighting isn’t just about visibility – it’s about guiding how people use the space.
And when you get that right, your outdoor kitchen doesn’t just look better – it lives better.
Bonus: Common Outdoor Lighting Mistakes to Avoid
Even with the best intentions, a few missteps can undo everything.
Watch out for these:
- Overlighting
Too bright = no mood. You want layers, not floodlights. - Mismatched color temperatures
Warm + cool lighting together creates visual confusion. - Poor placement
Lights in your eyes? Harsh shadows? That’s a placement issue. - Ignoring durability
Outdoor lighting needs to handle weather. Always. - Forgetting pathways and edges
Safety matters just as much as style.
Quick rule:
If it feels uncomfortable, it’s probably poorly placed.
Small Changes, Big Transformation
Here’s the good news – you don’t need a full renovation to get that resort feel.
You just need to apply the right lighting secrets of designer outdoor kitchens.
Start small:
- Add under-counter lighting
- Swap to warm bulbs
- Install a dimmer
Then build from there.
Because at the end of the day, lighting isn’t just about visibility.
It’s about experience.
And when you get it right?
Your patio stops being just a backyard – and starts feeling like a place people don’t want to leave.
Featured image credit: @a1landscapessyd