The first bite of sizzling meat is a sound, a smell, and a moment that makes you stop in your tracks. That’s yakiniku – Japanese-style BBQ that’s fun, fast, and incredibly satisfying.
There’s something magical about watching thinly sliced meat hit a hot grill, releasing aromas that fill the kitchen and make your taste buds leap.
Perfect for a quick weeknight dinner or a weekend grill-fest with friends, this recipe teaches you how to flip, sear, and serve like a seasoned pitmaster.
With simple ingredients, interactive grilling, and flavors that pop, you’ll be turning any meal into a sizzling, unforgettable experience – right in your own kitchen.
Why You’ll Love This Recipe
Yakiniku is all about flavor, speed, and interaction.
- Fast and easy: Most of your prep takes under 20 minutes. The grill does the rest.
- Interactive: Everyone can join in. Think of it as a mini indoor BBQ party.
- Customizable: Swap meats, veggies, and sauces to suit your taste.
- Satisfying: Nothing beats that moment when a perfectly seared slice hits your plate.
I always tell people: the grill is your stage, the meat is your star, and your friends are the audience. Time to steal the show.

Choosing the Best Meats for Yakiniku
The magic of yakiniku starts with the right cuts of meat. Thinly sliced beef ribeye, short rib, or sirloin works beautifully, delivering tenderness and flavor with minimal effort.
Pork belly or pork loin adds richness, while chicken thigh gives a juicy alternative for variety.
For adventurous cooks, lamb or seafood can elevate the experience, turning a simple meal into a mini feast. Always look for even marbling – it’s what gives that melt-in-your-mouth texture and flavorful char when grilled.
Don’t forget, slicing thinly is key; it ensures the meat cooks fast and evenly, capturing that classic sizzle. Even with simple cuts, a little marinade magic – soy sauce, garlic, ginger, and a dash of mirin – transforms ordinary meat into restaurant-quality yakiniku.
Think of it as prepping your star players before the grill show begins.
Essential Veggies for Your Yakiniku Grill
While meat steals the spotlight, vegetables bring balance, color, and texture to your yakiniku experience. Crisp bell peppers, earthy mushrooms, sweet onions, and tender zucchini are perfect for the grill.
Their natural sugars caramelize beautifully when seared, giving that smoky, charred flavor that complements your meat. Lettuce leaves or cabbage add fresh crunch and double as edible wraps for a fun, interactive experience.
Don’t shy away from seasonal vegetables – asparagus, eggplant, or even cherry tomatoes can elevate your spread. Lightly brush veggies with sesame oil or a splash of soy sauce before grilling to enhance flavor.
And remember, grilling veggies is fast, so keep an eye on them to avoid overcooking. Done right, your vegetables not only add visual appeal but also make your yakiniku meal healthier, balanced, and more exciting.
Mastering Marinades for Maximum Flavor
A good marinade is the secret weapon of any yakiniku chef. Think soy sauce, mirin, sake, garlic, ginger, and sesame oil – a simple blend that boosts flavor and tenderness. For a hint of sweetness, add a small amount of sugar or honey; it caramelizes beautifully on the hot grill.
Want a little heat? Sprinkle in chili flakes or a dash of shichimi togarashi for a kick. Marinades don’t need to soak for hours – 15–20 minutes is enough for thinly sliced meat. For vegetables, a light brush of sesame oil and soy sauce before grilling adds flavor without overpowering.
The key is balance – don’t drown your ingredients; let the natural flavors shine while enhancing them. With the right marinade, every slice of meat becomes juicy, flavorful, and grill-ready – the hallmark of home-style yakiniku.
The Art of Grilling Yakiniku Like a Pro
Grilling is where yakiniku comes alive. Preheat your grill until it’s hot enough to sizzle at first contact. Lightly oil the surface to prevent sticking, then lay thin slices of meat and vegetables down.
The trick? Don’t overcrowd the grill – each slice needs space to sear perfectly. Meat cooks fast, usually 1–2 minutes per side, so stay close. Flip, rotate, and watch as the edges crisp while the center remains tender. Veggies may cook slightly slower; stagger their placement for even results.
Remember, the sizzle is your guide – listen for that satisfying hiss, smell the aromas, and you’ll know when it’s ready. With practice, you’ll develop a sense of timing, turning simple ingredients into perfectly cooked, restaurant-style yakiniku at home.

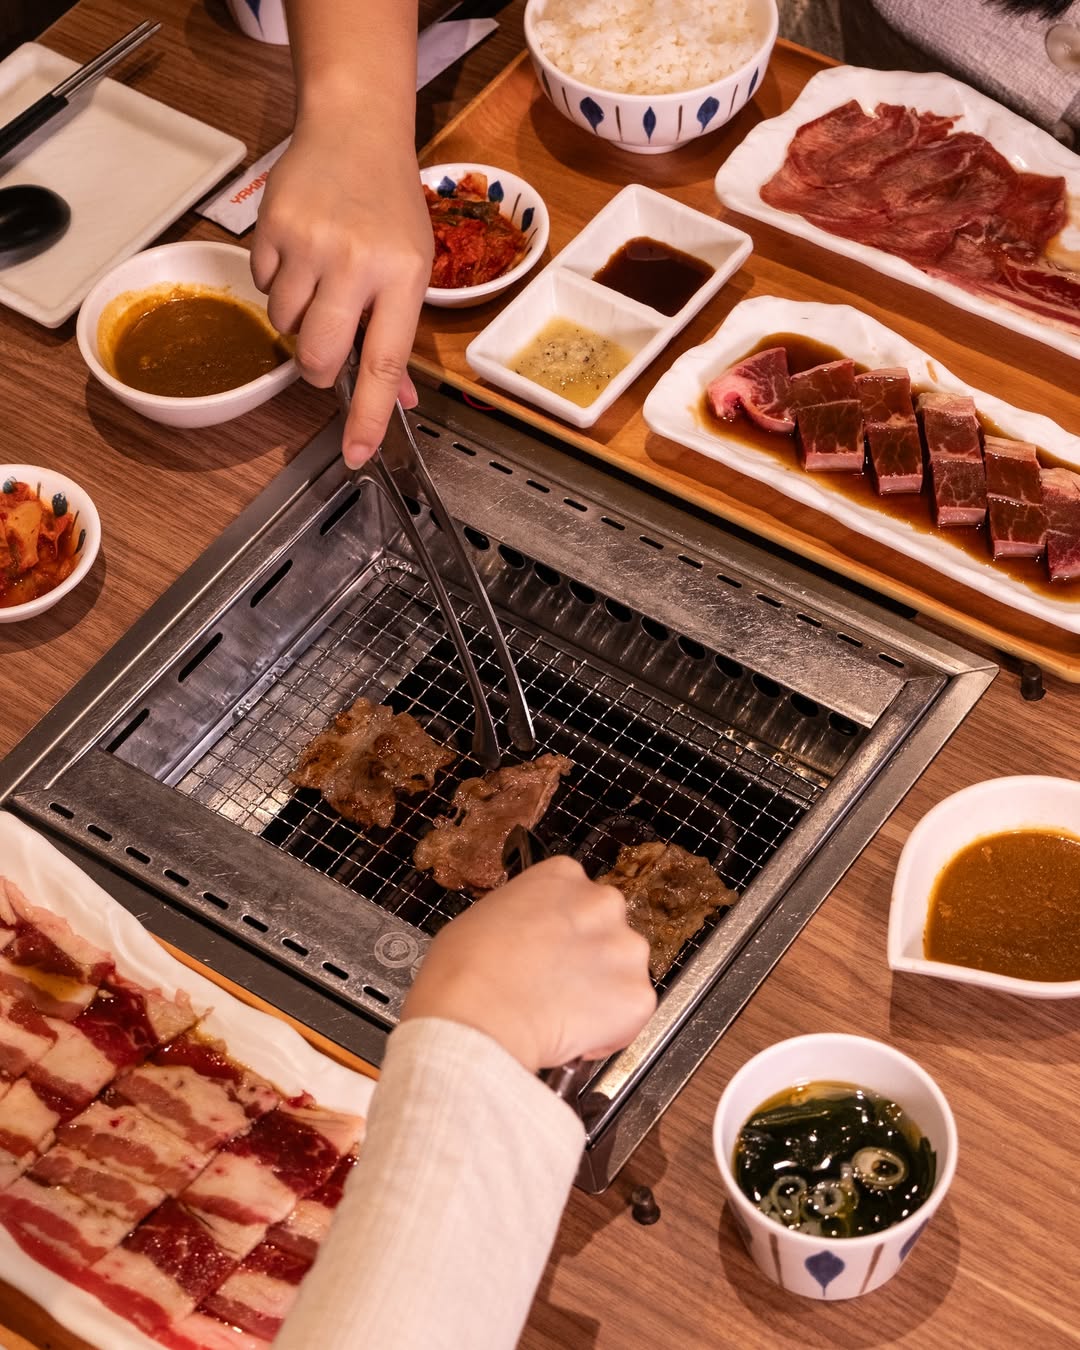
Interactive Yakiniku: Make It a Tabletop Event
One of the most fun aspects of yakiniku is its interactive nature. Set up a tabletop grill and let everyone join the fun. Guests can grill their own slices, experiment with different veggies, and create custom dipping combinations. It’s not just dinner – it’s a social experience.
Serve small bowls of sauces like soy-ginger, sesame, or spicy miso, and let people mix and match. Lettuce wraps or rice bowls make it playful, letting everyone assemble their own bites. This setup encourages conversation, laughter, and culinary creativity.
Plus, it’s a chance to show off your pitmaster skills while letting others enjoy the thrill of sizzling meat without any pressure. Interactive yakiniku turns a regular meal into a memorable, shared experience everyone will want to repeat.
Serving Suggestions & Pairings
- Rice bowls: Simple, classic, and lets the meat shine.
- Lettuce wraps: Adds crunch and freshness.
- Beverages: Japanese tea, cold beer, or sparkling water to cut through the richness.
Tips & Tricks
- Thin slices cook fast – don’t wander off!
- Marinade hack: Use a little sugar or honey for caramelization magic.
- Storage: Leftovers can be grilled again or added to stir-fries.
- Vegetarian or seafood variation: Tofu cubes or shrimp work beautifully on the grill.
Little secret: Even a simple drizzle of sesame oil at the end can make the flavors pop like a professional BBQ.
Fun Variations to Keep Your Yakiniku Exciting
Once you master the basics, yakiniku becomes a playground for experimentation. Try seafood options like shrimp, scallops, or salmon for variety. Vegetarian versions with tofu, eggplant, or mushrooms work beautifully on the grill.
Mix and match marinades and dipping sauces – maybe a tangy citrus soy blend or spicy sesame chili. Play with textures by adding crunchy toppings like toasted sesame seeds or crushed nuts.
You can even experiment with fusion flavors, like miso butter or teriyaki glaze. The key is to keep it fun, interactive, and flavorful.
Every variation teaches a new trick about grilling, marinating, or plating. With endless combinations, your yakiniku nights will never get boring and will keep friends and family coming back for more.

Final Thoughts
Yakiniku at home is more than just a recipe – it’s an experience. The sizzle, the aroma, the laughter around the table – it all comes together in a fun, interactive, and delicious meal.
Try different meat and veggie combos, experiment with sauces, and most importantly, enjoy the process.
Remember: the grill is your playground, and every slice sizzling is a small victory. So fire it up, grab your tongs, and sizzle & serve tonight.

Easy Beef Yakiniku Recipe
Image credit: @yakinikugo.sg
Ingredients
- Thinly sliced beef (ribeye or short rib works best)
- Pork belly or loin
- Chicken thigh (skin-on for extra flavor)
- (Optional: lamb or seafood for adventurous eaters)
Vegetables
- Bell peppers, mushrooms, onions, zucchini
- Small side salads or lettuce leaves for wraps
Marinade / Sauce
- Soy sauce, mirin, and sake for balance
- Grated garlic and ginger for punch
- Sesame oil for richness
- Optional: a dash of chili for heat
Extras
- Sesame seeds and chopped green onions for garnish
- Store-bought or homemade dipping sauces
- Pro tip: Thin slices are key. You want your meat to cook fast, retain juiciness, and get that classic yakiniku char without drying out.
Instructions
- Prep the Meat and Veggies. Slice meat thinly and toss with your marinade for at least 10 minutes. Chop veggies into bite-sized pieces. They don’t need to be fancy – rough cuts add character.
- Heat the Grill. Preheat until hot. A drop of water should dance across the surface. Lightly oil the grill to prevent sticking.
- Sizzle and Cook. Lay meat on the grill. Thin slices take just 1–2 minutes per side. Watch closely! Grill veggies alongside – bell peppers char beautifully, mushrooms get deep umami. Flip, rotate, and enjoy the aroma filling the kitchen.
- Serve and Garnish. Arrange meat and veggies on plates. Sprinkle with sesame seeds and green onions. Offer dipping sauces on the side. Soy-ginger and spicy miso are personal favorites.
- Interactive Fun. Let everyone grill their own slices at the table. There’s something oddly satisfying about watching meat cook in real-time. Pair with steamed rice or wrap in lettuce for added texture.
Tip from the pitmaster: Don’t overcrowd the grill. Each slice deserves its moment in the spotlight.
Featured image credit: @yakinikugo.sg