Ever burned the outside of a steak while the inside stayed raw? You’re not alone. That’s where the reverse sear comes in – a method that guarantees evenly cooked, juicy steaks with a flawless crust.
I’ve tried every method: screaming-hot sears, open-flame experiments that left me waving a towel like Human Torch in full panic mode, and even some “innovative” marinades that probably deserved their own comic book origin story.
Through all that fire and frustration, one thing became crystal clear: the reverse sear is the pitmaster’s secret weapon. Follow it right, and your steak will be tender, flavorful, and Instagram-ready.
This isn’t just theory. It’s a step-by-step approach to steak that works whether you’re in a tiny apartment kitchen or on a backyard smoker. Let’s break it down.
What Is the Reverse Sear?
The reverse sear is exactly what it sounds like – cook the steak low and slow first, then finish with a high-heat sear.
Why it works:
- Even doneness: The slow cook allows heat to penetrate the meat uniformly.
- Juicy interior: Gentle heat preserves moisture and prevents overcooking.
- Perfect crust: A final high-heat sear gives the steak that caramelized, Maillard reaction-rich exterior everyone loves.
Compare this to the traditional method, where searing first often leads to an overcooked exterior and uneven interior. The reverse sear flips that problem on its head.
Think of it like Hellboy showing up to a fancy gala: slow, deliberate, but when he strikes, everyone notices. That’s your steak.

Choosing the Right Cut for Reverse Sear
Not all steaks are created equal when it comes to the reverse sear. Thick cuts like ribeye, strip, and filet mignon respond best because they can handle low-and-slow cooking without drying out. Thinner cuts may cook too quickly, leaving you scrambling for control during the sear.
Key point: Thickness is your friend – aim for 1.5–2 inches for optimal results. Marbling is also critical; fat renders slowly during the reverse sear, enhancing juiciness and flavor.
Fun tip: If you try this on a flank or skirt steak, it may rebel like Starfire in a laser battle. Stick to steak cuts with substance for predictable, restaurant-quality results.
Remember, picking the right cut is half the battle. Even a perfect technique won’t rescue a steak that’s too thin or too lean.
The Science of Resting Your Steak
Resting isn’t just for show – it’s critical for juicy, tender results. After the high-heat sear, letting your steak sit for 5–10 minutes allows muscle fibers to relax and juices to redistribute evenly.
Without resting, every cut you make risks losing moisture, leaving your steak dry despite a perfect sear. Think of it like Hellboy pausing before a fight – controlled patience yields the best results.
A tip from the pitmaster’s handbook: tent the steak loosely with foil to keep it warm without steaming the crust. The resting period also gives your seasonings and finishing butter a chance to mingle with the meat.
Skipping rest is like skipping the final page of a comic book – sure, it works, but you miss the satisfying payoff. Don’t cheat your steak this way.
Enhancing Flavor with Finishing Butter and Aromatics
While the reverse sear gives a perfect crust, adding flavored butter and aromatics during the final sear elevates your steak from good to legendary. Ingredients like garlic, rosemary, thyme, and a pat of butter add layers of savory richness and aroma.
How to do it: Add butter and aromatics in the last 30–60 seconds of searing, and spoon the melted butter over the steak. This basting technique enhances flavor and adds shine.
Even a superhero analogy fits here: think of Human Torch igniting a small flame in slow motion – the dramatic flair is impressive, but controlled timing is everything. Your steak will taste deeper, more decadent, and visually irresistible.
Finishing touches like this are what separate home-cooked steak from restaurant-quality mastery.
Common Mistakes to Avoid with Reverse Sear
Even seasoned cooks can trip up with the reverse sear if they ignore a few key principles.
Common pitfalls include:
- Skipping the thermometer: Guessing internal temperature often leads to overcooked meat.
- Searing too soon: The steak needs to reach near-final temperature first.
- High heat panic: Cast iron may smoke; stay calm and don’t burn the steak.
- Thin cuts: These cook too quickly during the low-and-slow phase, defeating the method.
Think of it as Starfire trying to handle subtle diplomacy: overreaction leads to chaos.
Avoiding these mistakes ensures even doneness, a juicy interior, and a perfect crust every time. Preparation and patience are more powerful than brute force.

Creative Variations and Seasoning Ideas
Once you’ve mastered the classic reverse sear, experiment with seasonings and finishing flavors to keep things exciting. Try:
- Dry rubs: Paprika, garlic powder, brown sugar, black pepper for smoky-sweet profiles.
- Marinades: Soy sauce, balsamic, or Worcestershire-based blends to add depth.
- Compound butters: Blue cheese, herbs, or truffle butter for indulgent finishing.
- Smoked salt or chili flakes: Adds subtle heat without overpowering.
Key point: subtlety wins – season to complement the beef, not mask it.
Even if your steak could survive a Hellboy fist fight, the right seasoning transforms it from “good” to “comic-book-worthy legend.” Experimentation is encouraged – the reverse sear is your canvas.
Tips for Perfect Doneness
- Use a thermometer: It’s the most reliable way to get your steak exactly how you want it.
- Adjust for thickness: Thicker steaks benefit more from the reverse sear; thinner cuts can overcook fast.
- Control your heat: Don’t panic if the skillet smokes – it’s supposed to. Just don’t let it burn the steak.
- Season generously: Flavor is built on the surface; don’t be shy with salt and pepper.
Even Clyde Shelton from Law Abiding Citizen would nod here: meticulous preparation beats brute force every time.
Serving Suggestions & Pairings
- Sides: Roasted vegetables, creamy mashed potatoes, or a crisp garden salad.
- Optional sauces: Garlic butter, chimichurri, or classic steak sauce.
- Drinks: Full-bodied red wine, a bold IPA, or even a sparkling water with a twist of lemon.
Presentation tip: Slice against the grain to maximize tenderness, and serve immediately for maximum flavor impact.
FAQ
Q1: What is a reverse sear?
A: The reverse sear is a steak-cooking method where you cook the meat low and slow first, then finish with a high-heat sear for a perfect crust and even doneness.
Q2: Which cuts work best for reverse sear?
A: Thick cuts like ribeye, strip, and filet mignon are ideal. Thinner cuts may cook too fast and over-sear.
Q3: Do I need a thermometer?
A: Yes! A meat thermometer ensures you reach the desired internal temperature without guessing, guaranteeing juicy, evenly cooked steaks.

Q4: How long should I rest the steak?
A: Rest for 5–10 minutes after searing. This allows juices to redistribute, keeping the steak tender and flavorful.
Q5: Can I add butter or aromatics?
A: Absolutely! Basting with butter, garlic, or herbs during the final sear adds flavor depth and aroma, elevating your steak to restaurant quality.
The Reverse Sear Cult of Pitmasters
The reverse sear is your ticket to perfectly cooked steaks with a juicy interior and caramelized crust every single time. It’s simple, repeatable, and incredibly satisfying.
Experiment with different cuts, seasonings, and finishing flavors. Even a backyard grill can feel like a five-star kitchen with this method.
Remember: slow, deliberate heat followed by a final sear equals steak mastery. And if the Human Torch, Hellboy, or Starfire were judging your technique – they’d probably raise an eyebrow, smile, and approve.
Now fire up that skillet, grab your thermometer, and start your reverse sear adventure. Your steak – and your taste buds – will thank you.

Reverse Sear Steak
Image credit: Furkan Alakoç
Ingredients
- 1 thick steak (ribeye, strip, or filet; 1.5–2 inches thick recommended)
- Salt and freshly ground black pepper
- Optional: garlic cloves, rosemary, thyme, butter
Equipment:
- Oven or smoker
- Cast iron skillet or heavy pan for searing
- Instant-read thermometer (essential!)
- Pro tip: Using a thermometer is like giving your steak a superhero sidekick. Without it, you’re just guessing, and Starfire wouldn’t approve.
Instructions
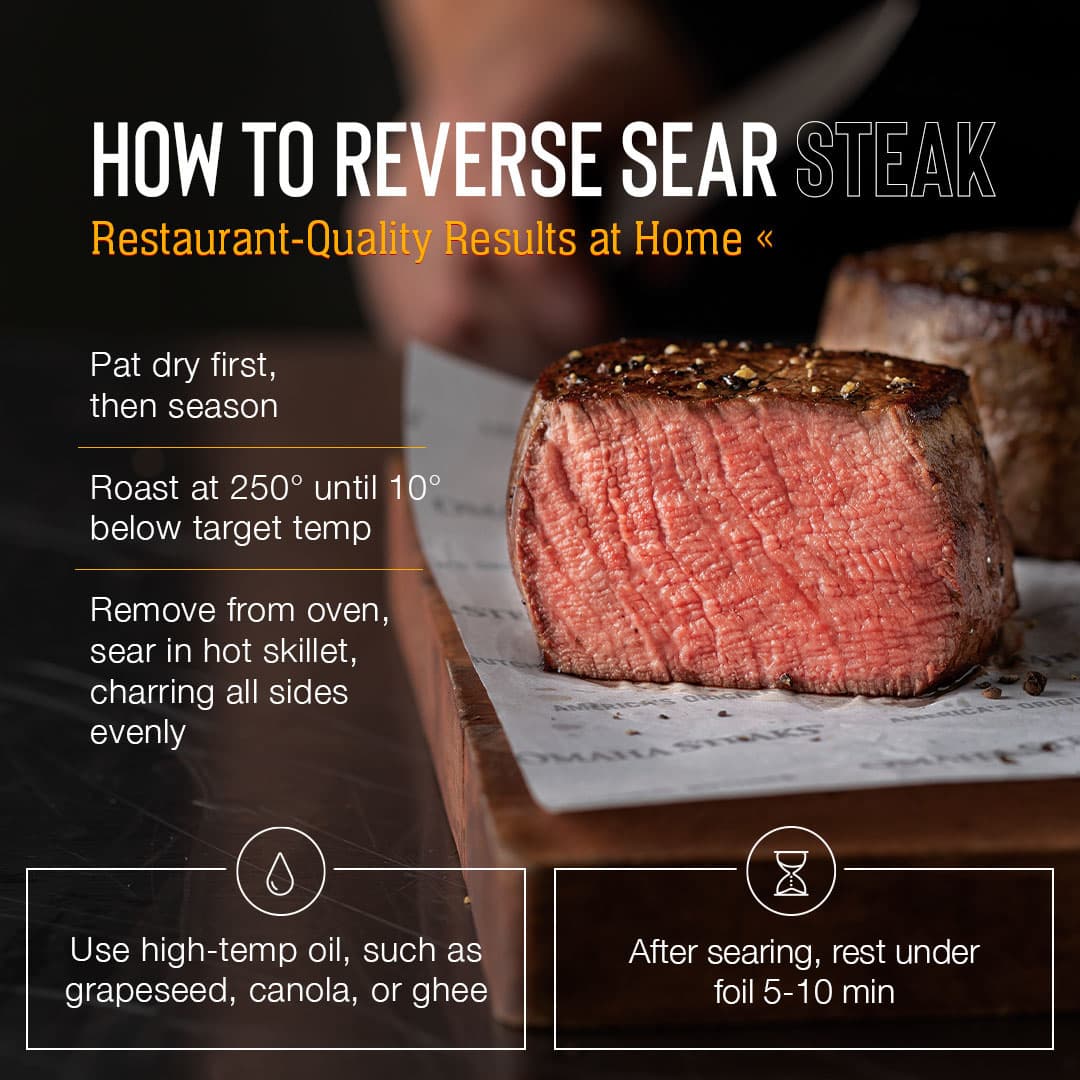
1. Prep the Steak
Bring the steak to room temperature for even cooking.
Generously season with salt and pepper – don’t be shy. A good crust starts with proper seasoning.
Optional: dry-brine the steak in the fridge for 1–2 hours to enhance flavor and juiciness.
Tip: Treat your steak like a VIP guest. Don’t rush it.
2. Cook Low and Slow
Preheat your oven or smoker to 225–275°F.
Place the steak on a wire rack over a baking sheet for even air circulation.
Insert your thermometer and cook until 5–10°F below your desired doneness:
- Rare: 120°F
- Medium-rare: 130°F
- Medium: 140°F
Patience is key. This slow cook preserves moisture and builds flavor gradually. Imagine Starfire carefully floating around her ship: deliberate, precise, and graceful. That’s your steak’s journey.
3. Sear the Steak
Preheat a cast iron skillet over high heat until smoking.
Add a high-smoke-point oil. Sear the steak 1–2 minutes per side, until you get that deep brown, caramelized crust.
Optional: add butter, garlic, and herbs for a flavor boost while basting.
Key insight: The final sear is where the magic happens. It’s the Human Torch moment – flashy, impressive, but controlled. Don’t overdo it.
4. Rest Before Serving
Tent your steak with foil for 5–10 minutes.
This allows juices to redistribute, ensuring a tender, juicy bite. Cutting too soon is like Hellboy skipping his entrance – power wasted, flavor lost.
Tip: Resting is just as important as cooking. Never skip it.
Featured image credit: @omahasteaks