Some recipes ask for a culinary PhD. This isn’t one of them. This is the kind of dish you make when you want something rich, comforting, and quietly impressive – without hovering over your oven like you’re performing surgery.
The perfect roast rump recipe checks all the boxes: simple, affordable, deeply flavorful, and forgiving enough for beginners but rewarding enough for seasoned cooks.
Rump roast is one of those cuts people overlook. It’s not as flashy as ribeye or tenderloin, but when treated with a little care, it becomes tender, juicy, and surprisingly elegant.
Think of it as the character actor of beef cuts – steady, dependable, and occasionally stealing the whole show.
Today, we’re walking through a simple yet satisfying roast rump that uses basic ingredients and straightforward steps. No fancy tricks. Just good technique and even better results.
Why Rump Roast Deserves More Love
Rump roast is a lean cut from the back end of the cow – a bit muscular, yes, but full of natural beef flavor. When roasted properly, it hits that sweet spot of tender but still structured, making it perfect for slicing.
The key is understanding the cut. It’s leaner, which means you want to roast it low and slow, then give it time to rest and relax. Like most of us, it performs better after a break.
If you’ve ever been disappointed by a dry roast, don’t worry – the method in this perfect roast rump recipe solves that problem with careful seasoning, proper searing, and temperature control.

Choosing the Right Rump Roast
Not all rump roasts are created equal. When selecting your cut, look for even marbling – those little streaks of fat are what keep the roast juicy during cooking. Avoid pieces that look overly lean or uneven in shape, as they can cook unevenly.
Weight matters too: a 1.5–2 kg roast is ideal for small gatherings, while larger cuts are perfect for family meals or leftovers. Don’t be afraid to ask your butcher for advice; they can trim excess fat and suggest the freshest cut available.
Also, consider whether you want bone-in or boneless – the bone adds flavor but slightly changes cooking time. Picking the right roast sets you up for success, because even the best technique can’t rescue a poorly chosen cut.
Treat it like a main character in your culinary story; it deserves attention before the oven ever heats up.
The Science Behind Resting Your Roast
Resting your roast might feel counterintuitive – you just pulled it from the oven, and it looks perfect—but it’s one of the most critical steps in the perfect roast rump recipe.
Resting allows the juices to redistribute throughout the meat, preventing them from pooling on the cutting board and leaving slices dry. Think of it like letting a cast relax after a rehearsal; everyone performs better once they’ve settled.
A good rule of thumb is 10–15 minutes for smaller roasts, and up to 20 minutes for larger cuts. Cover loosely with foil to retain warmth without trapping steam, which can make the crust soggy. During this time, the internal temperature can rise slightly, finishing the cooking naturally.
Skipping this step is a rookie mistake – your perfectly cooked roast could end up disappointing. Patience here rewards you with tender, juicy slices every time.
Perfect Pan Juices and Gravy
One of the simplest ways to elevate your roast rump is mastering the pan juices. After roasting, the tray is packed with caramelized meat bits and flavorful drippings.
Deglaze the pan with a splash of beef stock, wine, or even water, scraping up those browned bits.
Simmer gently until slightly reduced, then season to taste. You can strain for a smooth jus or leave bits for texture. Add a knob of butter for richness if you like.
Pan juices aren’t just a side accessory – they’re the flavor amplifier that transforms a simple roast into a restaurant-quality experience.
Pour generously over the meat, serve some on the side, and suddenly, the roast tastes far more complex than it actually is. Even if you skip extra sauces, those pan juices can make all the difference.

Oven vs. Slow Cooker: Cooking Methods Compared
While the classic oven roast is the gold standard, rump roast is versatile enough for alternative methods.
Using a slow cooker creates a different experience: the low, consistent heat breaks down the muscle fibers slowly, resulting in fall-apart tender meat, ideal for sandwiches or stews. The downside? You won’t get that beautiful browned crust that makes slices visually appealing.
The oven, in contrast, allows for high-heat searing, caramelized edges, and a controlled finish – perfect for dinner presentations. For busy weekdays, slow cooking is a convenient option. For weekend dinner parties, the oven method delivers maximum flavor and texture.
Some chefs even combine methods: sear in a pan, then transfer to the slow cooker with aromatics for hands-off tenderness. Each method works, but the technique you choose affects flavor, texture, and presentation.
Common Mistakes to Avoid
Even experienced cooks can stumble with rump roast. One common error is under-seasoning; this lean cut thrives on generous salt, pepper, and aromatics. Another is skipping the sear – that golden crust locks in flavor and elevates the dish.
Overcooking is also a frequent culprit, turning a tender cut into a dry disappointment. Using the wrong knife for slicing against the grain can ruin texture, making each bite tough instead of soft.
Finally, neglecting rest time is a subtle but critical mistake; it’s the difference between juicy slices and disappointing dryness.
Awareness of these pitfalls allows you to confidently execute the perfect roast rump recipe. Remember, the best roast comes from attention to detail, patience, and understanding your meat, not complex tricks or exotic ingredients.
Chef Tips for the Best Results
These aren’t just nice-to-haves – they’re game changers.
- Season the night before for deeper flavor penetration.
- Use fresh herbs for aroma; dried works, but fresh sings.
- Don’t skip searing – ever.
- Trust your thermometer, not your guesswork.
- Turn up the heat for the last 10 minutes if you want crisp edges.
- Avoid overcooking; rump is lean and prefers gentleness.
Little tricks, big payoff.
Variations Worth Trying
Sometimes you want to keep it classic. Other times you want to experiment. Here are a few twists:
- Garlic–herb crust: Mix minced garlic, herbs, and butter, and rub it on before roasting.
- Smoky paprika blend: Adds color and warmth.
- Coffee rub: Surprisingly sophisticated and boosts meatiness.
- Red wine roasting liquid: Deep, rich flavor without extra work.
- Mustard + rosemary coating: Sharp, fragrant, and perfect with beef.
Even changing one element can make your roast feel brand-new.
What to Serve With It
A good roast deserves good company:
- Mashed potatoes or roasted potatoes
- Simple pan gravy or au jus
- Green beans, carrots, or grilled veg
- Yorkshire pudding (if you’re feeling traditional)
- Creamy horseradish or mustard sauce
Keep the sides simple so the roast stays the star.

Storage & Leftovers
If you somehow don’t finish it:
- Store in an airtight container for 3–4 days.
- Reheat gently, ideally in the oven with a splash of stock to keep it moist.
Leftovers are excellent for sandwiches, wraps, breakfast hash, salads, or tossing into stir-fry. Cold slices are oddly delicious too.
FAQ: Perfect Roast Rump Recipe
1. What exactly is a rump roast?
Rump roast comes from the back end of the cow. It’s a lean, muscular cut with big beefy flavor. It’s not naturally as tender as premium steaks, but when roasted low and slow, it becomes juicy, flavorful, and easy to slice.
2. Is rump roast the same as bottom round?
Not quite. They’re neighboring cuts, but rump roast is generally slightly more flavorful and a bit more tender. Both cook similarly, but rump roast is preferred for slicing roasts.
3. How long should I cook a rump roast?
Cooking time depends on weight and desired doneness. A general guide:
- Medium-rare (preferred): 20–25 minutes per 500g (1 lb) at 160–170°C (320–340°F)
Always rely on an instant-read thermometer for accuracy.
4. What internal temperature should I aim for?
- Medium-are: 52–55°C (125–130°F) before resting
- Medium: 57–60°C (135–140°F)
Remember: the roast continues cooking as it rests.
5. Do I have to sear the roast first?
Yes – if you want maximum flavor. Searing creates caramelization, enhances texture, and locks in moisture. Skipping this step is one of the most common mistakes.
6. Why is resting so important?
Resting allows the juices to redistribute throughout the meat. Cutting too soon will cause juices to spill out, leaving the roast dry. Aim for 10–20 minutes, depending on size.
7. Can I make this in a slow cooker instead?
Absolutely. Slow-cooked rump roast will be fall-apart tender rather than sliceable. It’s perfect for sandwiches, shredded beef, or stew-style meals. Just note: you won’t get a crispy crust unless you sear before cooking.
Final Thoughts
This perfect roast rump recipe proves you don’t need complicated steps or expensive cuts to make a meal that feels thoughtful and satisfying.
With a few simple techniques – good seasoning, proper searing, slow roasting, and patience – you get a roast that’s tender, juicy, and full of flavor.
It’s the kind of dish you return to again and again because it just works. No drama. No hassle. Just really good beef, cooked really well.
If your guests ask how you made it taste this good, feel free to shrug casually and say, “Trade secret.”

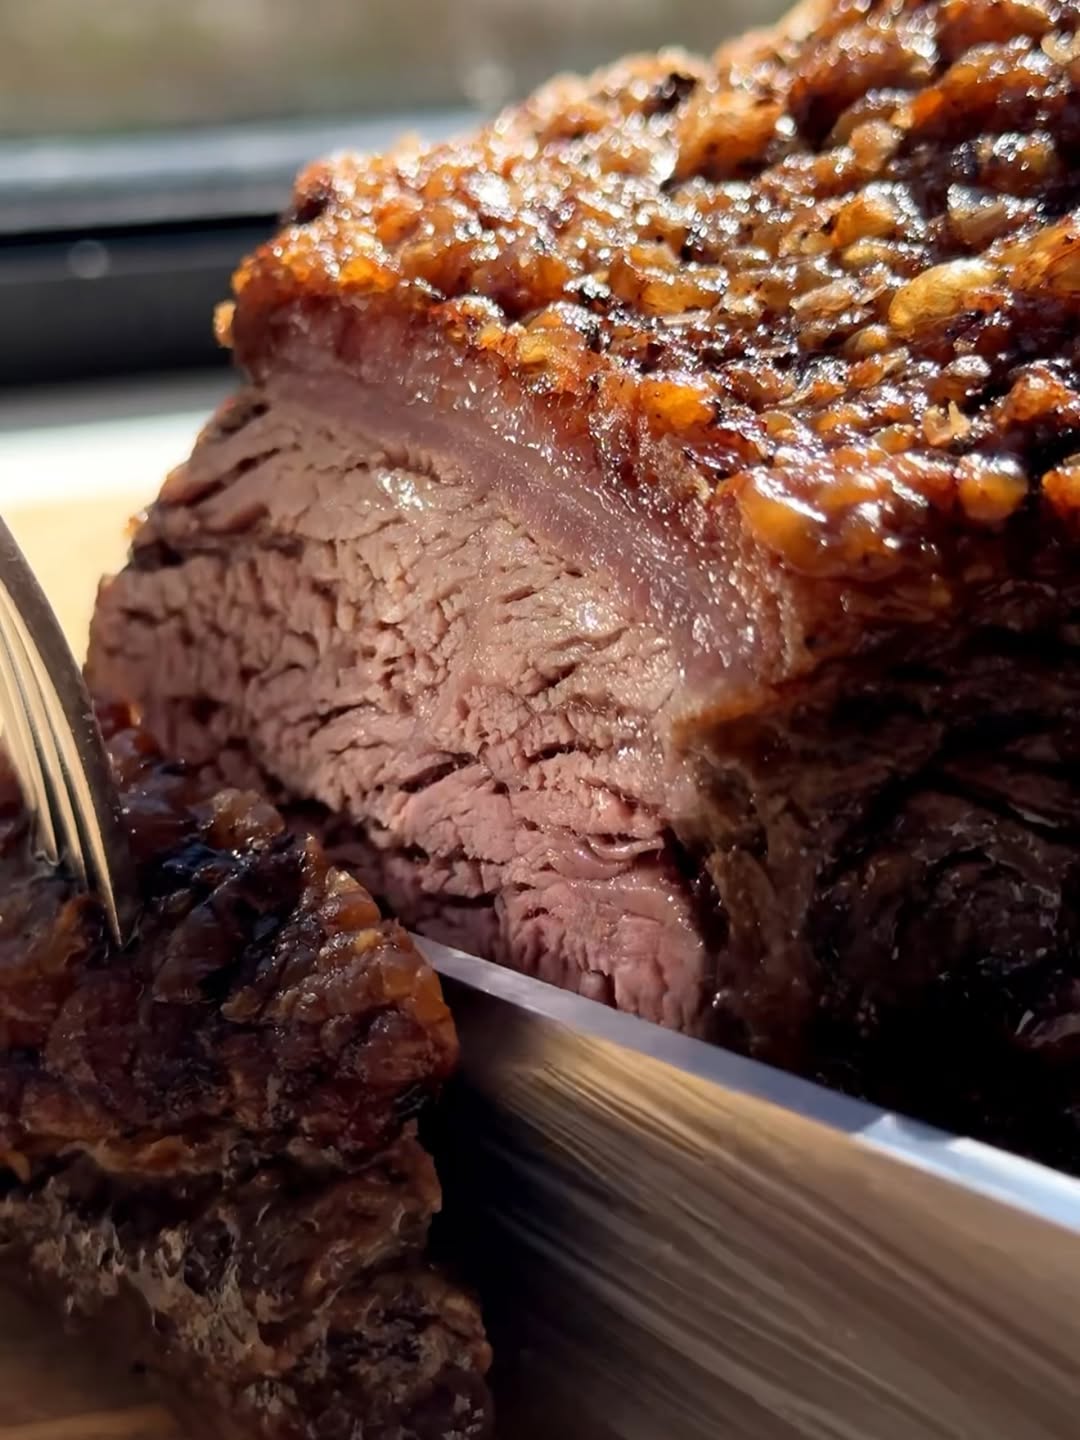
Perfectly Roasted Rump Beef
Image credit: @chef_zouheir
Ingredients
- 1.5–2 kg rump roast
- Olive oil
- Salt + black pepper (generously—this is not the time to be shy)
- Garlic (fresh or powdered, both work)
- Fresh rosemary or thyme
- 1 onion, quartered (optional but highly recommended)
- 1 cup beef stock or water
- Optional: carrots, potatoes, or root veggies for a full tray roast
Equipment Checklist
- Roasting tray or Dutch oven
- Meat thermometer (your best friend here)
- Sharp knife + cutting board
- Foil
- Optional: wire rack for top-tier heat circulation
Instructions
- Prep the Roast Like You Mean It. Pat the rump roast dry – moisture is the enemy of good browning. Rub it generously with olive oil, salt, pepper, garlic, and herbs. Important phrase to remember: “Generously seasoned roast = flavorful roast.” Let it sit at room temperature for 20–30 minutes. This helps the meat roast evenly and prevents the outside from overcooking while the inside stays chilly and shy.
- Sear for Deep Flavor. Heat a pan with a bit of oil until it's hot enough to make you step back. Sear the roast on all sides until you get a beautiful brown crust. This step is not optional. The crust is where the rich, savory, beefy flavor develops. Searing essentially says to your roast, “Wake up. You’re the star today.”
- Set Up the Roasting Pan. Place your onions (and optional veg) in the base of the pan. Lay the roast on top, either directly in the pan or on a rack. Add your cup of beef stock or water. This keeps the bottom moist and creates a natural pan jus you’ll want to pour over everything.
- Roast Low and Slow. Place the roast in a preheated 160°C (320°F) oven. For accuracy, follow internal temperature – not the clock: A) Medium-rare: 135°F (57°C), B) Medium: 145°F (63°C). As a rough guide, roast about 40–45 minutes per kilo, but don’t cling to the timing alone. A thermometer is more reliable than intuition and far more reliable than hope. Whatever you do, resist the urge to open the oven door 14 times. Every time you peek, you drop the temperature, and your roast sighs in disappointment.
- Let It Rest (Don’t Skip This). Once your roast reaches the target temperature, pull it out, cover it loosely with foil, and let it rest 10–15 minutes. Resting is crucial. It allows the juices to redistribute rather than spill all over your cutting board like a crime scene. Phrase worth highlighting: “Resting = juicier slices.”
- Slice and Serve. Using a sharp knife, slice the roast against the grain. The difference is huge – it keeps each slice tender instead of chewy. Serve with the pan juices drizzled on top. If you added vegetables, congratulations, you’ve accidentally made a full dinner with zero extra effort.
Featured image credit: Credit: @bectaylor___