Grilling steak sounds simple, right? Throw it on the grill, wait a few minutes, flip it, done. But if you’ve ever bitten into a steak that’s dry, bland, or unevenly cooked, you know the truth: grilling steak well is both an art and a science.
Here’s the good news: you don’t need to be a restaurant chef to get restaurant-quality flavor at home.
With the right seasoning, searing, and grilling technique, you can turn a humble cut of beef into a juicy, flavorful masterpiece that makes friends and family whisper, “Did you make this yourself?”
In this guide, I’ll walk you through every step – from picking the perfect cut, to prepping it, to grilling steak like a pro.
Along the way, you’ll learn the little tricks that make a big difference: why salt is your secret weapon, how to nail the perfect sear, and why resting the steak isn’t optional – it’s mandatory.
By the end, you’ll have a methodical, foolproof way to get charred crust, juicy interior, and maximum flavor, every single time. No guesswork. No smoke-and-mirrors. Just steak done right.
Choosing the Right Cut of Steak
Before you even touch the grill, you need to choose the right cut of steak. Picking the wrong cut is like buying a sports car and trying to tow a trailer – it just won’t work the way you want.

Popular Cuts for Grilling
Some cuts are built to shine on a hot grill, others… not so much. Here’s the lineup of crowd-pleasers:
- Ribeye: Rich, marbled, and juicy – basically the Beyoncé of steaks.
- New York Strip: Leaner than ribeye but still flavorful. Great for that perfect bite without too much chew.
- T-Bone / Porterhouse: Two steaks in one: tenderloin on one side, strip on the other. Ideal if you like variety.
- Sirloin: Affordable and versatile, though a little less forgiving.
- Filet Mignon: Tender, buttery, but you’ll need a good sear to get flavor beyond its delicate texture.
How to Choose Quality Meat
Marbling is king. Those white streaks of fat inside the meat aren’t just decoration – they melt during grilling, keeping the steak juicy and flavorful. Look for USDA Prime or Choice grades when possible.
Thickness matters, too. 1.25–1.5 inches is ideal for even cooking and a perfect sear. Thinner steaks cook too fast; thicker steaks can be tricky without indirect heat.
And if you’re willing to splurge, dry-aged steaks have a nutty, beefy depth that’s hard to beat. Wet-aged is fine, too – but know what you’re getting.
Bone-In vs Boneless
Bones add flavor and help with heat conduction, but they can also make timing a little tricky. Boneless steaks are easier to handle, great for weeknight grilling. Bone-in cuts? Perfect when you want that extra juiciness and dramatic presentation.
Once you’ve got your cut, you’re ready to prep it for seasoning – the step that turns a good steak into a great steak.
Preparing Your Steak Before Seasoning
You’ve picked a stellar cut – now it’s time to prep it. Preparation is where most home cooks stumble, but it’s simple once you understand the why. Think of it as giving your steak a spa day before it hits the heat.
Bringing the Steak to Room Temperature
Cold meat goes on the grill and stays stubbornly cold in the center. Let your steak sit out for 30–60 minutes before grilling. This ensures even cooking from edge to center, so your juicy center doesn’t turn into a hockey puck.
Patting the Steak Dry for Better Browning
Moisture is the enemy of a good sear. Use a paper towel to dry both sides of the steak. A wet steak? It steams instead of sears, leaving you with a sad gray crust. Remember: dry surface = Maillard reaction = flavor magic.
Trimming Excess Fat
A little fat adds flavor, but thick layers can flare up and burn. Trim carefully, leaving just enough to render slowly during grilling. Think of it as leaving a nice little armor for the steak rather than a whole coat of chainmail.

The “Rest Before Resting”
Yes, steak will rest after the grill – but prepping it properly is the first rest. Letting it relax at room temperature prevents shocking it on the hot grill, so juices don’t flee.
Once the steak is prepped, the next step is seasoning, where we really start building layers of flavor that make a restaurant-quality steak pop off the grill.
Seasoning the Steak for Maximum Flavor
Seasoning isn’t just sprinkling salt and calling it a day. It’s layering flavor, building a crust, and coaxing every ounce of beefy goodness from your steak. Done right, your seasoning makes people wonder if you smuggled your grill into a five-star restaurant.
The Golden Rule on How to Grill Steak: Salt First, Salt Generously
Salt is your secret weapon. Don’t be timid – you want enough to season deeply, not just surface-level. For thick steaks, consider salting 45–60 minutes before grilling.
This is called dry brining: salt draws out moisture, which then reabsorbs, seasoning the meat all the way through. The result? Juicy, flavorful steak.
Pepper: Before or After Grilling?
Freshly cracked black pepper adds bite, but it can burn on a screaming-hot grill. A good compromise: lightly season with pepper before grilling, then add more after searing if you want that sharp pop. Coarse grind works best for texture and flavor.
Building a Flavor Layer
Salt and pepper are the foundation, but optional extras can take your steak over the top:
- Garlic powder
- Smoked paprika
- Onion powder
- Fresh herbs like rosemary or thyme (added after grilling to avoid burning)
Keep it simple. You want beef-forward flavor, not a spice explosion that masks the meat.
Marinades vs Dry Rubs
Marinades are great for tougher cuts, like flank or skirt steak, adding tenderness and flavor. For prime cuts, dry rubs are king.
They enhance the natural flavor without compromising texture. Think brown sugar + smoked paprika + salt + pepper for a simple, smoky rub.
Oil or No Oil?
A light brush of high-smoke-point oil – like grapeseed or avocado – prevents sticking and helps the crust develop. But don’t drown your steak; a thin coat is enough. Some pitmasters skip it entirely if the grill is clean and well-heated.
Once your steak is seasoned, it’s ready for the grill. The next step is searing, where the magic happens: a caramelized crust that makes your steak irresistible.
Grilling Steak with Wood Chips: Smoky Flavor at Home
Adding wood chips to your grill instantly elevates the flavor of your steak. Hickory, mesquite, or cherry chips impart a smoky, restaurant-style aroma without needing a smoker.
The trick is simple: soak the chips in water for 30 minutes, then scatter them over hot coals or in a smoker box on a gas grill. As the wood smolders, it releases aromatic smoke that clings to the steak, giving it a rich, complex flavor profile.
Experiment with combinations – like apple and hickory – for a sweet-smoky balance. A key pitmaster tip: don’t overdo it. Too much smoke can overpower the meat.
This technique works for all cuts but shines on thicker steaks that can soak up flavor while finishing over indirect heat. It’s a small step that creates restaurant-quality flavor without fancy equipment.

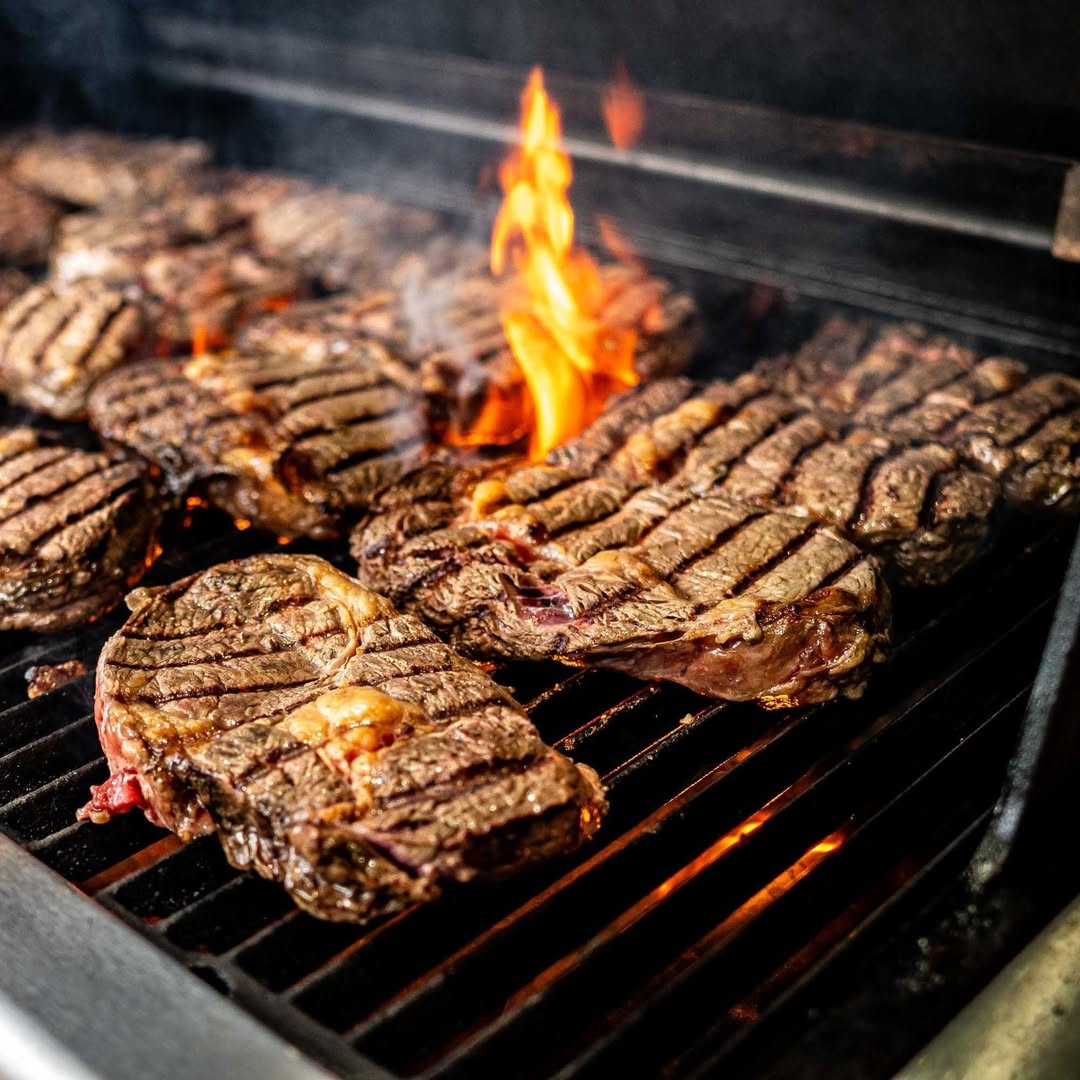
Mastering the Sear
If seasoning is the soul of your steak, the sear is its personality. That crispy, caramelized crust is where flavor and texture collide. Skip it, and you’re just eating warm beef. Nail it, and people start whispering, “Wow, how did they get that crust?”
What a Proper Sear Actually Does
The secret is the Maillard reaction – a fancy term for when amino acids and sugars brown under heat. The result is a deep, complex flavor you can’t get from roasting or pan-frying alone. Searing = flavor + texture, pure and simple.
Preheating the Grill
A hot grill is non-negotiable. Gas or charcoal, you want it screaming hot – around 450–500°F for direct heat. A properly heated grill ensures instant crust formation without overcooking the interior.
The Searing Process
- Place the steak on the grill and don’t touch it for the first 2–3 minutes. Patience is key.
- Rotate 90° halfway for those crosshatch marks that scream “pro chef.”
- Flip only once if possible. Flipping too often interrupts crust formation.
Remember: the steak should sizzle immediately when it hits the grill. If it doesn’t, your grill isn’t hot enough, and you’ll miss out on that perfect sear.
Common Searing Mistakes
- Pressing down on the steak: don’t crush the juices.
- Moving it too early: the crust needs time to form.
- Excess flames: flare-ups are fun to watch, but burnt edges aren’t. Keep tongs handy to move it slightly if flames spike.
Once seared, your steak has developed that coveted brown, flavorful crust. From here, it’s time to finish cooking it to perfection, using the right heat, timing, and technique.
Grilling steak is about balancing high heat and patience – too much of one without the other, and you’re in trouble.
Grilling the Steak to Perfection
You’ve seasoned your steak, nailed the sear, and now comes the part that separates good steaks from unforgettable steaks: finishing it on the grill. This is where heat management and timing turn a solid sear into restaurant-quality flavor.
Direct vs Indirect Heat
- Direct heat is your high-heat zone for searing and quick-cooking steaks. Perfect for thinner cuts or when you want that crispy crust.
- Indirect heat is cooler and slower, ideal for thick cuts. After searing, move your steak to indirect heat to cook evenly without burning the crust.
A classic trick: reverse sear. Start your thick steak on indirect heat until it’s just below your target temperature, then finish it over direct heat for a perfect crust. This method guarantees even cooking and maximum juiciness.
Cooking Times & Internal Temperatures
Forget guessing – use a meat thermometer. Here’s a quick guide for a 1.5-inch steak:
- Rare: 120–125°F
- Medium-rare: 130–135°F (sweet spot for most cuts)
- Medium: 140–145°F
- Medium-well: 150–155°F
- Well-done: 160°F+
Remember, carryover cooking will raise the internal temp by a few degrees while resting, so pull the steak slightly before your target.

Gas vs Charcoal: Flavor and Technique Differences
- Gas grills: Easy to control heat, consistent results. Great for weeknight grilling.
- Charcoal grills: Impart smoky flavor and better sear potential, but require more skill.
Pro tip: For extra smoky flavor on a gas grill, toss a few wood chips in a smoker box.
The Two-Zone Grilling Method
Set up your grill with hot and cool zones. Sear the steak over direct heat, then move it to the cooler side to finish cooking. This lets you control doneness without burning the exterior.
Grilling steak isn’t about brute force – it’s about understanding heat, timing, and patience. With these techniques, you’ll get juicy, flavorful steaks every time, no matter your grill.
Resting Your Steak
You might think the steak is done once it’s off the grill, but resting is where the magic happens. Skip this step, and all the juices you fought for will end up on your plate… or worse, the cutting board.
Reverse Sear Method: Perfect for Thick Steaks
The reverse sear is a game-changer for thick cuts like ribeye or porterhouse.
Instead of starting on high heat, cook the steak slowly over indirect heat first, bringing it just below your target temperature. Then finish it over direct, blazing heat for a perfect crust.
This method ensures even cooking from edge to center without overcooking the exterior. Think of it as the steak’s spa day followed by a hot sauna – it relaxes the meat and locks in flavor.
The reverse sear also reduces the risk of flare-ups while giving you control over doneness.
For extra flavor, sprinkle a light rub or add wood chips during the indirect phase. Once seared, your steak will have restaurant-quality crust and perfect internal temperature, every time.
It’s the method pros use when they need a foolproof, juicy result for thick, premium cuts.
Why Resting Matters
When a steak cooks, its juices are pushed toward the center. Resting lets those juices redistribute evenly, so every bite is tender and juicy. Skip it, and your steak will be dry, even if it looks perfect on the outside.
How Long to Rest
- Thin steaks (<1 inch): 5 minutes
- Thicker steaks (>1 inch): 10–15 minutes
- Extra-thick cuts (T-bone, porterhouse): 15–20 minutes
Tent or No Tent?
Lightly tenting the steak with foil keeps it warm, but don’t wrap it tightly – you’ll steam the crust you worked so hard to build. A loose tent preserves heat without sacrificing texture.
Pro tip: Use this resting window to make a quick compound butter or slice some fresh herbs to finish the steak. It’s a small move that makes a big difference.
Once rested, your steak is ready to be sliced and served – juicy, flavorful, and worthy of any restaurant plate.
Slicing and Serving
You’ve grilled, seared, and rested your steak – now it’s time for the final flourish: slicing and serving. Done right, this step maximizes tenderness and flavor, making your steak look as good as it tastes.
Slice Against the Grain
Look at your steak: you’ll notice the lines of muscle fibers, or the “grain.” Cutting against the grain shortens these fibers, making each bite tender and easy to chew. Cutting with the grain is like chewing rope – it’s not fun.
Finishing Touches
- Compound butter: Garlic, herbs, or a little blue cheese melted on top takes flavor to the next level.
- Flaky sea salt: A pinch just before serving enhances the crust and brightens the flavor.
- Fresh herbs: Sprinkle rosemary, thyme, or parsley for aroma and presentation.
- Juices: Don’t dump the resting juices – they’re liquid gold. Drizzle over the steak or mix into a quick pan sauce.

Presentation Tips
Serve on a warm plate, slice slightly off-center for visual appeal, and let the steak speak for itself. A perfectly grilled steak doesn’t need gimmicks – it already commands attention.
With the steak sliced and dressed, you’re ready to impress anyone who sits at your table. It’s the moment all that prep and grilling pays off: juicy, flavorful, perfectly cooked bites every time.
Professional Tips for Restaurant-Quality Steak
Even with perfect seasoning, searing, and grilling, a few pro tricks separate average steaks from restaurant-quality masterpieces. Think of these as the little hacks chefs swear by—and now you get them too.
Don’t Be Afraid of High Heat
A screaming-hot grill is your friend. High heat creates the crust that locks in juices. Just watch for flare-ups – they’re dramatic, but you don’t want charred edges.
Use a Thermometer, Not Guesswork
Forget poking or slicing – it’s unreliable. A digital meat thermometer ensures perfect doneness every time. Aim for your target temp, pull the steak, and let carryover cooking finish the job.
Dry Brine Overnight for Maximum Flavor
For thick cuts, a dry brine – salted and refrigerated for 12–24 hours – deeply seasons the meat. It’s an easy way to elevate flavor with minimal effort.
Cast Iron + Grill Combo
Some pros sear on a hot cast iron pan, then finish on the grill. This gives maximum crust and still lets you impart smoky flavor. It’s cheat-code level, but worth trying.
Minimal Touching = Better Crust
Once the steak hits the heat, let it be. Resist the urge to poke, press, or move it. Patience = flavor.
With these pro tips, your home-grilled steak isn’t just good – it’s chef-level impressive. People will wonder how you pulled off that crust, that flavor, and that perfect juiciness without a commercial kitchen.
Resting Juices: How to Make Your Steak Even Juicier
Most home cooks skip resting or underestimate its impact. Letting a steak rest for 5–15 minutes after grilling allows internal juices to redistribute, so every bite is consistently juicy. Thick cuts need longer rest; thin cuts, just a few minutes.
Don’t wrap it too tightly in foil – you’ll steam the crust. Instead, tent it loosely. During this rest, juices move from the center to the edges, preventing the all-too-common “plate full of juice, dry steak” scenario.
Pro pitmasters sometimes use the resting period to enhance flavor: add compound butter or fresh herbs, which melt slightly and soak into the surface. Resting is simple, but skipping it is a rookie mistake. For those who want steak perfection, this step is non-negotiable.
A properly rested steak is juicier, more tender, and packed with flavor – the difference between “good” and “wow.”
Common Mistakes to Avoid
Even experienced home cooks slip up when grilling steak. Avoid these common mistakes, and you’ll consistently hit restaurant-quality results.
1. Overseasoning or Underseasoning
Too little salt = bland steak. Too much = salty nightmare. Season generously, but know your limits, and consider dry brining for thick cuts.
2. Using Cold Meat
Grilling straight from the fridge? Bad move. Cold meat cooks unevenly, leaving a dry center. Let it sit at room temperature for 30–60 minutes first.
3. Not Drying the Steak
Moisture = steam, not sear. Pat the steak dry before seasoning to get that golden, caramelized crust.
4. Flipping Too Often or Too Late
Constant flipping = no crust. Waiting too long = burned exterior. Flip once, maybe twice, and let the heat do its work.
5. Skipping the Rest
Cutting into the steak immediately after grilling = juices everywhere. Resting is essential for juicy, tender bites.
6. Overcooking
Even a perfectly seared steak can be ruined if left too long on the grill. Use a thermometer and know your target temps.
7. Ignoring Grill Zones
High heat and low heat zones = your best friends. Direct for sear, indirect for cooking through. Ignoring zones leads to uneven cooking.
By avoiding these missteps, your steaks will consistently be juicy, flavorful, and perfectly cooked. Mistakes are easy to make – but easier to prevent with a little knowledge and patience.

Creative Finishing Touches: Butters, Sauces, and Toppings
Even a perfectly grilled steak can benefit from a finishing touch. Compound butters – like garlic-herb, blue cheese, or smoked paprika butter – melt over the hot steak and enhance flavor instantly.
Quick pan sauces made from pan drippings, wine, or balsamic vinegar add complexity without overshadowing the beef. Fresh toppings, such as sautéed mushrooms, caramelized onions, or microgreens, bring texture and aroma.
Flaky sea salt sprinkled last minute amplifies the crust and flavor. A small garnish can transform a simple grilled steak into a restaurant-quality dish. The key is balance: enhance the steak, don’t cover it up.
These finishing touches are easy, fast, and highly effective, giving your home-grilled steak the flair and flavor of a professional kitchen.
Frequently Asked Questions
Here are the questions I get asked the most about grilling steak, along with straightforward answers that actually work.
1. Should you season steak the night before?
Yes! Dry brining overnight enhances flavor and tenderness. Just lightly salt, wrap loosely, and refrigerate. Bring it to room temp before grilling.
2. Should you oil the steak or the grill?
Either works, but a light brush on the steak ensures it won’t stick and helps create a crust. Avoid soaking it; too much oil = flare-ups.
3. How do restaurants get such a good crust?
High heat, minimal flipping, and a hot grill or cast iron pan. Many restaurants also use dry-aged beef for extra flavor and texture.
4. Can you grill frozen steak?
It’s possible, but not recommended. Frozen steaks cook unevenly and rarely develop a proper sear. Thaw fully before grilling for best results.
5. Why does my steak come out tough?
Common reasons: overcooking, cutting with the grain, or not resting. Follow proper temps, slice against the grain, and always rest.
6. How do I know when it’s done without a thermometer?
You can use the finger test, but it’s tricky. A thermometer is foolproof and the only way to guarantee your steak is exactly how you like it.
These FAQs cover the usual roadblocks for home cooks. Follow them, and you’ll avoid frustration and enjoy restaurant-quality steak at home every time.
Now You’ve Earned the Title of “Pitmaster”!
Grilling steak isn’t complicated – it’s about understanding your meat, controlling your heat, and mastering timing. From picking the right cut and seasoning it properly, to nailing the sear and letting it rest, every step adds up to restaurant-quality flavor at home.
Remember the three pillars:
- Seasoning: Salt is your secret weapon; build layers of flavor.
- Searing: High heat + patience = irresistible crust.
- Grilling: Direct and indirect zones, proper temps, and resting = juicy, perfectly cooked steak.
With these techniques and a few professional tips, you can consistently grill steak that’s juicy, tender, and full of flavor, impressing friends, family, or just yourself.
So fire up that grill, pay attention to the details, and enjoy the payoff: steak done right, every single time.
Featured image credit: @broilkingbbq