Fire Is Your Ingredient, Not Your Enemy
Beginners tend to miss this: fire isn’t just heat – it’s an ingredient that shapes flavor, texture, and the cooking process in surprising ways. Treat it right, and it rewards you with perfectly cooked food. Ignore it, and it’ll humble you fast.
I’ve seen it all – steaks burnt on the outside and raw in the middle, chicken sacrificed to flare-ups, burgers that never stood a chance. And almost every time, the problem wasn’t the recipe…
It was fire management.
Here’s the good news: you don’t need years of experience or fancy gear to get this right. What you need is a simple understanding of heat zones, a bit of patience, and a mindset shift:
👉 You’re not just cooking food – you’re managing fire like a pitmaster.
By the end of this guide, you’ll know how to control heat without stress, cook with confidence, and actually enjoy the process.
What is Fire Management? (And Why It Changes Everything)
At its core, fire management is the ability to control heat, not chase it.
That means:
- Knowing where your heat is strongest
- Knowing when to move food – not panic
- Letting the fire work for you, not against you
A lot of beginners think cooking is about timing. It’s not. It’s about temperature control.
Direct vs Indirect Heat (The Game-Changer)
Let’s keep this simple:
- Direct heat = food sits right over the flame
👉 Fast, hot, great for searing - Indirect heat = food sits away from the flame
👉 Slower, gentler, perfect for cooking through
Here’s the punchline:
If you’re only using one type of heat, you’re making life harder than it needs to be.
Real control comes from using both – at the same time.

Understanding Heat Zones: Your Secret Weapon
This is where beginners level up.
Heat zones are simply different temperature areas on your grill or fire. Instead of one big chaotic heat source, you create organized control.
Think of it like this:
One fire. Multiple personalities.
The Three Core Zones
High Heat Zone (The Searing Zone)
This is where the magic crust happens. Hot, aggressive, unforgiving if you’re not paying attention.
Medium Heat Zone (The Cooking Zone)
Your safe space. Balanced heat for steady cooking.
Low Heat Zone (The Safety Net)
This is your insurance policy. Too hot? Move the food here. Flare-up? Escape route.
Here’s a little pitmaster truth:
👉 The low heat zone saves more meals than any seasoning ever will.
Why Heat Zones Reduce Stress
Because now you have options.
Instead of flipping food like you’re swatting flies, you simply move it to a better zone. Calm. Controlled. Intentional.
Types of Fire Setups: Build Your Foundation
Different setups, same goal: controlled heat.
Charcoal Grills: The Classic Playground
Charcoal gives you flavor – but demands respect.
Two-Zone Setup
- Coals piled on one side
- Empty space on the other
Simple. Effective. Beginner-friendly.
Three-Zone Setup
- Hot side
- Medium spread
- Cool side
More control, more flexibility.
👉 Pro tip: Don’t spread coals evenly unless you enjoy chaos.
Gas Grills: Precision Mode
Gas grills are like cooking with training wheels – but in a good way.
- Turn one burner high → searing zone
- Another on medium → cooking zone
- Leave one off → cool zone
That’s it. You’ve got heat zones in seconds.
Campfires: Controlled Chaos
Cooking over a campfire? Now we’re talking survival skills.
Forget flames. Flames are flashy.
👉 You cook over coals, not fire.
- Push hot coals to one side → high heat
- Spread some out → medium
- Keep a bare spot → low
It’s primitive, but it works beautifully.

Essential Tools for Fire Control
You don’t need a truck full of gear – but a few tools make fire management way easier.
- Tongs – Your extension. Stop stabbing food like it owes you money.
- Heat-resistant gloves – Confidence boost when adjusting fire
- Chimney starter – Fast, even charcoal lighting
- Thermometer – Guessing is not a strategy
- Vent controls – Oxygen = heat control
Here’s the truth:
👉 Great tools don’t make you a pitmaster – but they remove excuses.
Step-by-Step: Setting Up Heat Zones Without Stress
Let’s walk it out like we’re cooking together.
Step 1: Choose Your Fuel
Charcoal, gas, or wood – doesn’t matter. Control matters.
Step 2: Light It Properly
Don’t rush this. A rushed fire is an angry fire.
- Charcoal should be ashy and glowing, not flaming like a bonfire
- Gas should be preheated with the lid closed
Step 3: Build Your Zones
Create separation.
👉 No separation = no control = unnecessary stress
Step 4: Preheat and Observe
Give it time. Watch how the heat behaves.
This is where beginners get impatient – and pay for it later.
Step 5: Adjust Airflow or Burners
More air = hotter fire
Less air = calmer fire
You’re not guessing anymore – you’re managing.
Cooking with Heat Zones: Where It All Comes Together
Now the fun part.
The Basic Flow (Let’s Cook a Steak)
- Start on high heat → get that crust
- Move to medium heat → cook it through
- Shift to low heat if things get too intense
That’s it. That’s the system.
Handling Flare-Ups Without Panic
Flare-ups happen. That’s life.
But here’s the difference:
- Beginners panic
- Pitmasters relocate the food
👉 Move it to the low heat zone. Problem solved.
No drama. No burnt dinner.
Common Fire Management Mistakes
Let’s clean these up real quick.
Using One Heat Level Only
You’re cooking blind. Stop it.
Overloading the Grill
Too much food = blocked airflow = uneven heat
Ignoring Airflow
Fire needs oxygen. Starve it, and it misbehaves.
Flipping Constantly
Relax. Let the heat do its job.
Not Letting the Fire Settle
A wild fire cooks wild food.

Pro Tips to Stay Stress-Free
Here’s where experience kicks in.
Prep Everything First
Fire waits for no one.
Start with Two Zones
Simple beats complicated every time.
Use the Cool Zone Often
It’s not cheating – it’s smart cooking.
Watch the Fire, Not Just the Food
Fire tells you everything – if you pay attention.
And my favorite:
👉 “If you’re stressed, your fire probably is too.”
Safety Tips: Respect the Flame
Fire is fun – until it isn’t.
- Keep a spray bottle or water nearby
- Never leave your fire unattended
- Open lids slowly (avoid flare-ups)
- Keep your area clear of clutter
👉 Confidence is good. Carelessness is expensive.
Reading the Fire: Learn to “See” Heat Without Tools
One thing I tell every beginner: your eyes are just as important as your thermometer.
Good fire management starts with observation. A healthy charcoal bed glows deep orange with a light ash coating – that’s your sweet spot. If the coals are still black and smoking heavily, they’re not ready. If they’re blazing with flames, you’ve gone too far.
Watch how the heat moves. You’ll notice hotter zones shimmer slightly. Hold your hand (carefully) above the grill – count how many seconds before it gets uncomfortable. That’s an old-school trick that still works.
👉 Fast burn = high heat. Slow warmth = low heat.
Over time, you’ll stop guessing and start reading your fire like a language. And once you can read it, you can control it.
The Role of Lid Control in Fire Management
Here’s a mistake I see all the time: people treating the grill lid like it doesn’t matter.
It matters. A lot.
Opening and closing the lid changes everything – temperature, airflow, and cooking speed.
Leave it open, and you’re feeding oxygen directly into the fire, making it hotter and more unpredictable. Close it, and you create an oven-like environment with steady, controlled heat.
👉 Open lid = aggressive heat. Closed lid = controlled cooking.
Want even cooking? Keep it closed.
Want a quick sear? Open it briefly.
Think of the lid as your volume knob for heat. Not using it properly is like driving a car but ignoring the brakes.
Master this, and your fire management instantly levels up.
Fuel Matters: Not All Fire Burns the Same
Let’s clear this up: all fuel is not created equal.
Charcoal briquettes burn steady and predictable – great for beginners learning fire management. Lump charcoal burns hotter and faster, with more natural flavor – but it demands attention.
Wood? That’s where flavor really shines. But it’s also less forgiving.
👉 Stable fuel = stable fire = less stress
Mixing fuels is where things get interesting. Add wood chunks to charcoal, and now you’ve got both heat and flavor working together.
But here’s the catch:
Too much wood = bitter smoke.
Too little = missed opportunity.
Start simple. Learn how each fuel behaves. Once you understand that, you’re no longer just cooking – you’re building flavor through fire.

Timing Your Cook: Fire Management Is a Waiting Game
Nobody likes waiting – but great cooking depends on it.
One of the biggest secrets in fire management is knowing when NOT to cook yet.
A fresh fire is unstable. Temperatures spike, smoke is thick, and heat zones aren’t defined.
Throw food on too early, and you’re setting yourself up for uneven results.
👉 Patience at the start saves frustration later
Let your fire settle. Give it 10–20 minutes to stabilize. Watch the smoke thin out – that’s your signal.
Cooking isn’t just about action. It’s about timing.
And here’s the irony:
The more patient you are, the faster you actually improve.
Wind and Weather: The Invisible Opponent
You can do everything right – and still struggle if you ignore the environment.
Wind is the silent troublemaker in fire management. It feeds oxygen into your fire, making it burn hotter and faster than expected.
Cold weather? It pulls heat away. Rain? That’s a whole different battle.
👉 Control the environment, or it controls your fire
Position your grill to block wind when possible. Adjust vents more carefully on breezy days. In colder weather, give yourself extra preheat time.
This is where beginners get confused – they blame the fire, when it’s really the weather.
A good pitmaster doesn’t fight the elements.
They adapt to them.
Managing Smoke: Flavor vs Overkill
Smoke is where good food becomes great – but also where things can go wrong.
Clean smoke is thin and almost invisible, with a light blue tint. That’s what you want. Thick, white smoke? That’s dirty smoke – and it can make your food taste bitter fast.
👉 Clean smoke = clean flavor
In fire management, smoke is a signal. It tells you how well your fire is burning.
Too much smoke usually means:
- Not enough oxygen
- Too much wood
- Fire not fully established
The goal isn’t to create clouds – it’s to create balanced flavor.
Remember:
You’re seasoning with smoke, not drowning in it.
Resting the Fire (and the Food)
Here’s something people overlook: both fire and food need rest.
After setting up your zones, let the fire stabilize before cooking. After cooking, let your meat rest before cutting.
👉 Resting locks in control and flavor
Cut into meat too early, and juices run everywhere. Rush the fire, and heat becomes unpredictable.
This is where fire management connects directly to patience. It’s not just about heat – it’s about timing and restraint.
Think of it like this:
You’ve done the hard work. Now let everything settle into place.
The result? Better texture, better flavor, and a whole lot less stress.

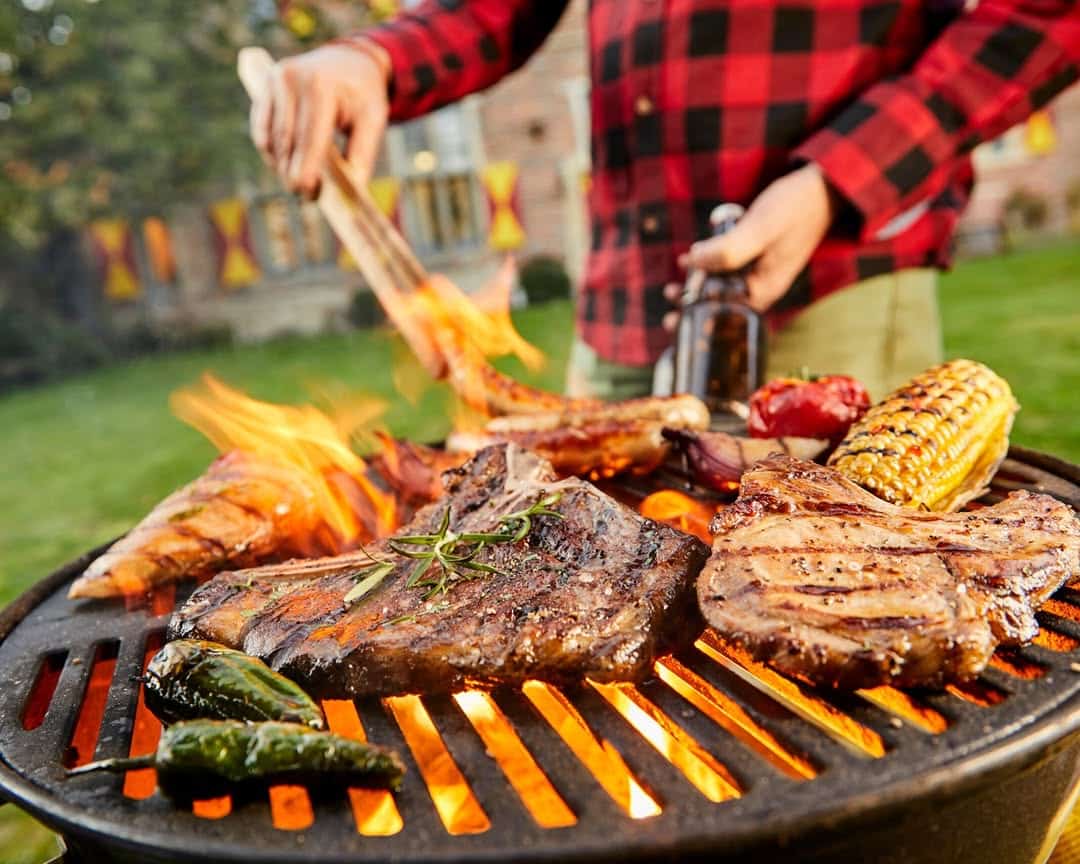
Cooking Different Foods with the Same Fire
Here’s a fun challenge: cooking multiple foods at once without losing control.
This is where heat zones shine.
- Steak on high heat
- Chicken on medium
- Veggies on low
Same fire. Different results. All perfectly cooked.
👉 One fire, multiple outcomes – that’s real fire management
The key is spacing and timing. Don’t crowd the grill. Give each food its own zone and attention.
This is when cooking starts to feel effortless. You’re no longer reacting – you’re orchestrating.
And honestly? That’s when it gets really fun.
Building Confidence: The Real Secret to Fire Management
Let’s end on something that doesn’t get talked about enough: confidence.
Every beginner second-guesses themselves. Too hot? Too cold? Did I mess this up?
Here’s the truth:
👉 Confidence comes from understanding, not luck
The more you practice fire management, the more patterns you notice. You start recognizing heat behavior, timing, and movement without overthinking it.
Mistakes will happen. That’s part of it.
But every mistake teaches you something valuable – if you pay attention.
One day, you’ll light a fire and just know what to do.
That’s when you stop feeling like a beginner…
And start cooking like a pitmaster.
FAQs
Q: How do I know if my fire is too hot?
If food burns quickly on the outside but stays raw inside, your heat is too high. Move it to a low heat zone immediately.
Q: What’s the easiest setup for beginners?
A two-zone fire is the simplest and most effective way to learn fire management without stress.
Q: Should I cook with the lid open or closed?
Closed for control and even cooking. Open only when searing or adjusting.
Q: Why does my food taste bitter?
You’re likely using too much wood or cooking with dirty smoke. Aim for thin, clean smoke.
Q: How long should I wait before cooking?
Wait until the fire stabilizes – usually when coals are ashy and glowing, not flaming.
Conclusion: You’re in Control Now
Here’s the big takeaway:
Fire management isn’t about perfection – it’s about control.
You don’t need to master everything overnight. Just remember:
- Build your heat zones
- Stay calm and move the food
- Let the fire work for you
The more you practice, the more natural it feels.
And one day, without even thinking about it, you’ll realize:
👉 You’re not reacting to the fire anymore…
👉 You’re running the show.
Now go light that fire – and enjoy it.
Featured image credit: @wesleyfamilyservices