Let me tell you something most backyard pitmasters learn the hard way.
You can buy the best brisket.
The fanciest rub.
The most expensive smoker on the block.
But if your cooker is caked in old grease and crusty carbon?
Your food will taste like last month’s regret.
This is your no-nonsense, pitmaster-approved guide to BBQ smoker clean-up – the kind that keeps your smoker running smooth, your smoke clean, and your grates gloriously non-sticky.
And yes… we’re putting an end to sticky grates today.
Why BBQ Smoker Clean-Up Actually Matters
A lot of folks treat their smoker like a cast iron skillet – “Never clean it!” they say proudly.
That’s only half right.
You don’t want to strip away the protective seasoning.
But you absolutely must manage grease, ash, and creosote.
Here’s why:
1. Flavor Control
Old grease doesn’t add “character.”
It adds bitterness.
When buildup burns, it creates dirty smoke – thick, white, acrid smoke that clings to meat like a bad cologne.
Clean smoker = clean smoke = better flavor.
That’s not opinion. That’s combustion science.
2. Temperature Stability
Ash blocks airflow.
Grease traps heat in the wrong places.
And suddenly you’re chasing temps like you’re trying to herd cats.
A properly maintained smoker:
- Breathes better
- Holds temperature longer
- Uses less fuel
That’s efficiency you can taste.
3. Safety
Grease fires in smokers are dramatic.
And not the fun kind.
A heavy grease layer can ignite fast, especially during high-heat cooks.
Routine BBQ smoker clean-up reduces flare-up risks significantly.
4. Longevity
Moisture + grease + neglect = rust.
Rust doesn’t care how much you paid for your smoker.
Take care of your cooker and it’ll outlive trends, fads, and probably your favorite BBQ sauce brand.
 1")
Know Your Smoker Before You Clean It
Different smokers need slightly different love.
Charcoal Smokers
Ash management is critical.
Vents must stay clear or your fire suffocates.
Offset Smokers
Your firebox collects heavy soot and carbon.
This is where heat damage and rust usually start.
Pellet Smokers
That burn pot needs attention.
Ash buildup here leads to ignition problems.
Electric Smokers
Heating elements must stay dry and debris-free.
No aggressive scraping around wires.
The principle stays the same:
Remove buildup, protect seasoning, maintain airflow.
The Tools That Make BBQ Smoker Clean-Up Easy
You don’t need a hazmat suit. But you do need the right gear.
Keep it simple:
- A quality grill brush (bristle-free preferred)
- Plastic or wooden scraper
- Warm water + mild dish soap
- Food-safe degreaser
- Microfiber cloths
- Gloves
- Shop vacuum for ash
- High smoke-point oil (canola, avocado, grapeseed)
Optional but powerful: a handheld steam cleaner.
Steam loosens grease like magic.
Step-By-Step BBQ Smoker Clean-Up (The Right Way)
Let’s get practical.
Step 1: Cool It Down
Never clean a hot smoker.
Warm? Yes.
Hot enough to brand cattle? No.
Let it cool safely. Disconnect power or remove leftover fuel.
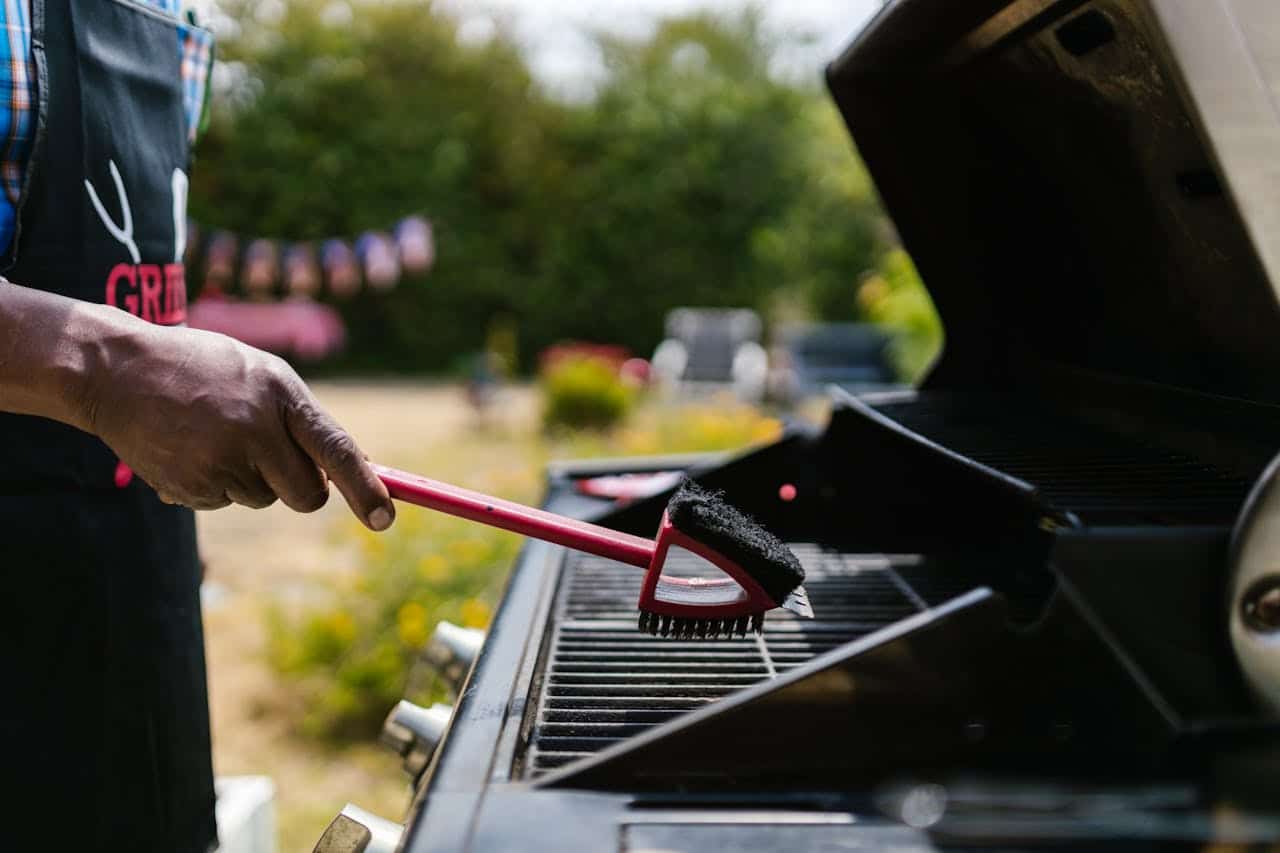
Step 2: Tackle the Grates (No More Sticky Grates!)
Sticky grates are caused by:
- Sugary sauces
- Protein residue
- Poor preheating
- Skipping post-cook burn-offs
Here’s the fix.
- Preheat smoker slightly (about 250°F).
- Brush grates thoroughly.
- If heavily crusted, remove and soak in warm soapy water for 30–60 minutes.
- Scrape gently – no metal gouging.
Now the secret most beginners skip:
Re-season the grates.
Dry completely.
Lightly coat with high smoke-point oil.
Heat smoker to 300°F for 30 minutes.
That oil polymerizes and creates a natural non-stick layer.
Boom. No more sticking.
Step 3: Remove Ash Properly
Ash attracts moisture.
Moisture causes rust.
After every cook:
- Empty ash pan
- Vacuum leftover ash
- Check air intakes for blockages
Quick. Simple. Powerful.
Step 4: Clean Interior Walls (But Don’t Overdo It)
Here’s where people panic.
You open the lid and see black flakes.
Relax.
That black coating is seasoning.
What you do remove:
- Loose creosote flakes
- Thick, peeling carbon
- Grease drips
Use a scraper gently.
You’re not restoring a classic car – you’re maintaining controlled seasoning.
 2")
Step 5: Water Pan & Drip Tray
This is the forgotten battlefield.
If left dirty:
- Mold forms
- Grease turns rancid
- Fires become likely
Wash with hot soapy water after every long cook.
Line trays with foil if you want easier cleanup.
Step 6: Firebox or Burn Pot
Offsets: scrape heavy soot from firebox walls.
Pellets: vacuum burn pot every few cooks.
Airflow is everything.
Think of your smoker like lungs.
Ash clogs the breathing.
Step 7: Exterior Maintenance
Wipe down the outside regularly.
For stainless steel:
- Use a soft cloth
- Wipe with the grain
For painted steel:
- Keep dry
- Touch up rust spots quickly
And for the love of brisket – use a cover.
Routine vs Deep Cleaning
Here’s the rhythm I teach students.
After Every Cook (10–15 Minutes)
- Brush grates
- Empty ash
- Wipe exterior
This alone prevents 80% of problems.
Monthly Maintenance
- Check seals
- Inspect thermometer accuracy
- Scrape loose interior flakes
Seasonal Deep Clean
Once or twice a year:
- Remove all grates and trays
- Scrape buildup thoroughly
- Wash removable parts
- Re-season interior
This is your smoker’s spa day.
How to Prevent Sticky Grates Forever
Prevention beats scrubbing.
Here’s the system:
1. Always preheat fully.
Cold grates grab protein.
2. Oil the grates – not the meat.
Light coating. Don’t drown it.
3. Avoid sugary sauces early.
Sauce during the final 20–30 minutes.
4. Do a post-cook burn-off.
Let smoker run 10 minutes after removing food.
Burn residue before it hardens.
5. Keep grates seasoned.
Consistency wins.
Sticky grates aren’t bad luck.
They’re usually bad timing.
 3")
Rust Prevention That Actually Works
Rust prevention is simple but requires discipline.
- Store smoker under cover
- Keep vents slightly open to prevent trapped moisture
- Re-season after deep cleaning
- Sand and repaint small rust spots early
Once rust spreads, it spreads fast.
Moisture is the enemy.
The Science of Clean Smoke (And Why It Changes Everything)
Let’s talk about something most backyard cooks overlook: combustion quality.
When your smoker is dirty, airflow suffers. When airflow suffers, combustion becomes incomplete.
And incomplete combustion creates thick white smoke loaded with impurities.
That’s not “extra flavor.”
That’s dirty smoke.
Clean smoke should be:
- Thin
- Light blue
- Almost invisible
That beautiful blue haze only happens when:
- Your firebox is clean
- Your vents are clear
- Your fuel burns efficiently
Heavy soot buildup interrupts this balance. It traps heat unevenly and restricts oxygen flow.
Here’s the punchline:
If your smoke smells bitter or stings your eyes, your smoker needs attention.
BBQ smoker clean-up isn’t just cosmetic – it directly affects combustion chemistry.
Clean metal + proper airflow = clean fire.
And clean fire makes championship-level flavor.
Gasket and Seal Maintenance (The Hidden Temperature Thief)
You can scrub grates all day, but if your door gaskets and seals are leaking, you’re fighting physics.
Over time, grease and smoke residue harden around seals. That buildup prevents doors from closing tightly.
What happens next?
- Heat escapes
- Oxygen sneaks in
- Temperatures spike
- Fuel burns faster
It’s subtle. But it costs you consistency.
During routine BBQ smoker clean-up, wipe down:
- Lid edges
- Door seams
- Gasket material
- Latch contact points
If your gasket is brittle or peeling, replace it. It’s inexpensive insurance for temperature control.
Here’s how I test seals:
Close the lid on a strip of paper. If it slides out easily, you’ve got leakage.
A clean seal means:
- Stable temps
- Better smoke control
- Less fuel waste
Sometimes the biggest performance upgrade is a clean edge.
Managing Grease Drain Systems (The Fire You Don’t See Coming)
Let me tell you about “surprise grease fires.”
They don’t happen during the cook.
They happen when old grease ignites in hidden channels.
Many smokers – especially pellet units – have grease management systems. These include:
- Drain channels
- Grease buckets
- Internal drip slopes
If those channels clog, grease pools.
And pooled grease + heat = fireworks.
During deep BBQ smoker clean-up, run a thin scraper or brush through:
- Drain troughs
- Exit holes
- Grease spouts
Flush with warm water if removable.
The goal isn’t perfection.
It’s clear flow.
Think of it like plumbing.
If the pipes back up, the problem shows up at the worst possible time.
Clear drains mean safer cooks and zero mid-brisket panic attacks.
 4")
Wood Storage & Fuel Cleanliness (Flavor Starts Before the Fire)
Nobody talks about this enough:
Your smoker can be spotless – but bad fuel ruins everything.
Wet wood creates:
- Excessive smoke
- Creosote buildup
- Temperature instability
During proper BBQ smoker clean-up, also check your fuel storage area.
Wood should be:
- Stored off the ground
- Covered but ventilated
- Dry to the touch
- Cracked cleanly when split
Pellet users?
Inspect for sawdust buildup in the hopper. Too much dust restricts feed flow.
Charcoal users?
Discard damp or crumbling briquettes.
Here’s the rule:
Clean fuel supports clean combustion.
You can’t fix dirty smoke with scrubbing alone. It starts with dry, quality wood and proper storage.
Flavor begins before you light the match.
Thermometer Calibration (Because Guessing Is Not Pitmaster Energy)
If your thermometer is wrong, everything else falls apart.
And yes – they drift over time.
Grease vapor, soot, and heat cycles slowly impact gauge accuracy.
During seasonal BBQ smoker clean-up, test your thermometer.
Here’s how:
- Boil water.
- Insert probe (without touching sides).
- It should read 212°F (at sea level).
If it’s off by more than a few degrees, adjust or replace.
A misreading thermometer leads to:
- Overcooked brisket
- Undercooked poultry
- Temperature chasing
You might think your smoker runs hot.
It might just be lying to you.
Accurate readings mean confident cooking.
And confidence is half the battle in barbecue.
Mold Prevention (Yes, It Happens)
Let’s address something slightly gross.
If your smoker sits unused in humid weather, especially in places with tropical climates, mold can form inside.
It feeds on:
- Grease residue
- Moisture
- Organic particles
It shows up as:
- Fuzzy patches
- Musty odor
- White or green growth
Don’t panic.
High heat kills mold easily.
If discovered:
- Scrape loose growth
- Run smoker at 300–350°F for 45 minutes
- Wipe surfaces after cooling
Then improve airflow during storage. Leave vents slightly open.
Regular BBQ smoker clean-up prevents mold by eliminating its food source.
Dry interior + clean surfaces = no science experiments growing inside your pit.
And nobody wants “smoked brisket with notes of basement.”
 5")
Off-Season Storage Strategy (Protecting Your Investment)
When grilling season slows down, neglect begins.
That’s when rust sneaks in.
Before storing your smoker long-term:
- Perform a full BBQ smoker clean-up
- Empty ash completely
- Clean grease systems
- Lightly oil grates and interior steel
- Cover with breathable, weather-resistant cover
Avoid plastic tarps that trap condensation.
If possible, store in:
- A garage
- Covered patio
- Dry shed
Here’s my ritual:
I season the interior lightly before storage.
It creates a protective barrier against humidity.
Your smoker isn’t just equipment.
It’s an investment in flavor.
Treat it like a tool you plan to use for years – not something you’ll replace next summer.
Protect it now, and it’ll fire up flawlessly when the next cookout calls.
Common BBQ Smoker Clean-Up Mistakes
Let’s save you from rookie errors.
Using oven cleaner
Too harsh. Strips seasoning.
Power washing interior
Forces water into seams. Hello rust.
Over-scraping walls
You’re not trying to expose shiny steel.
Ignoring vents
Airflow is your engine.
Waiting until it’s “really bad.”
Maintenance works because it’s consistent.
A Quick Story from the Pit
Years ago, I cooked for a local event.
My smoker had been neglected after a busy month.
“Ah, it’ll be fine,” I told myself.
Midway through the cook, thick white smoke rolled out.
The meat tasted bitter.
Why?
Heavy creosote buildup.
That day taught me something simple:
Respect your fire, and respect your smoker.
Clean smoke comes from clean airflow and clean surfaces.
Since then, my BBQ smoker clean-up routine is non-negotiable.
Pitmaster Pro Tips
If you want next-level maintenance:
- Keep a small cleaning kit near your smoker.
- Log your deep cleans.
- Line drip trays with foil for fast swaps.
- Use steam for stubborn grease.
- Keep spare thermometers to check accuracy.
Small habits. Big results.
Frequently Asked Questions
How often should I perform BBQ smoker clean-up?
Light clean every cook. Deep clean twice a year.
Is creosote dangerous?
Yes. It tastes bitter and can flake onto food. Remove loose buildup.
Can I use soap inside the smoker?
Only on removable parts. Avoid soaking interior steel.
Why does my food taste bitter?
Often caused by dirty smoke from buildup or restricted airflow.
Should I clean after every use?
Quick clean, yes. Deep scrub, no.
Final Thoughts: Clean Smoker, Better BBQ
Here’s the truth most people skip:
You don’t need to obsessively scrub your smoker.
You need a simple, consistent BBQ smoker clean-up routine.
Clean grates.
Clear airflow.
Controlled seasoning.
That’s it.
Take care of your smoker, and it’ll reward you with:
- Better bark
- Cleaner smoke
- Stable temperatures
- And meat that slides off the grate without sticking
No drama. No scraping battles.
Just good fire, good smoke, and great barbecue.
And if you ever forget?
Just remember:
Sticky grates are a warning sign.
Your smoker is talking to you.
Now go give it the maintenance it deserves – and cook something legendary.
Featured image credit: RDNE Stock project