There’s nothing quite like the smell of lechon manok (chicken rotisserie) roasting over charcoal or wood. That aroma – smoky, garlicky, and slightly sweet – can make a grown person drool in seconds. For Filipinos, lechon manok isn’t just food; it’s culture on a spit.
From street carts spinning slowly in Manila to family gatherings, it’s a symbol of flavor, community, and, let’s be honest, crispy skin.
Here’s the good news: you don’t need to be in the Philippines to master it. With the right chicken, a flavorful marinade, and patience over fire, you can make golden, juicy, crispy lechon manok in your own backyard.
I’ve roasted enough chickens over wood and charcoal to call myself a pitmaster, so let me guide you step by step.
The Story Behind Lechon Manok
Before we touch fire, let’s talk history. Lechon manok comes from the Spanish “lechón,” which originally meant roasted pig.
Filipinos adapted it to chicken – quicker to cook, easier to handle, and perfect for street vendors.
- Street vendors perfected the art: spinning rotisserie chickens slowly over charcoal.
- Regional variations exist: some favor garlic-heavy marinades, others sweet and tangy.
- Core truth: charcoal or wood roasting is non-negotiable for authentic flavor.
Fun fact: the spin of the rotisserie isn’t just for show – it’s science. Even rotation ensures juicy, evenly cooked meat. If you ever find yourself staring hypnotized at a street vendor, now you know why.
 Over Charcoal Or Wood 1")
Choosing the Right Chicken
Not all chickens are created equal. Picking the perfect bird is the first step to legendary lechon manok. A fresh, whole chicken with firm meat and intact skin makes all the difference between juicy, flavorful meat and a dry, sad roast.
For perfect lechon manok, aim for:
- Whole chicken around 2.5–3 pounds.
- Firm meat and intact skin for juiciness and crispiness.
- Free-range or local birds for better flavor.
Avoid oversized supermarket birds – they often dry out before the skin crisps.
Pro tip: save the giblets; they make a killer stock or gravy.
Ingredients and Marinade Basics
The secret to flavorful lechon manok starts with the right ingredients. A balanced marinade of savory, tangy, and slightly sweet elements transforms a simple chicken into a juicy, aromatic masterpiece.
Essentials:
- Soy sauce: the salty backbone.
- Calamansi or lemon juice: brightens the flavor.
- Garlic: lots. Crushing works better than mincing.
- Salt and pepper: the basics done right.
- Sugar or honey: helps caramelize the skin beautifully.
Optional: ginger, bay leaves, onions, and annatto oil for that golden hue.
Tip: marinate for at least 4 hours; overnight is better. Think of it as a flavor infusion bath – your chicken will thank you.
Preparing the Chicken
Proper prep sets the stage for perfect lechon manok. From cleaning and trussing to scoring the skin, these steps ensure even cooking, juicy meat, and that coveted crispy skin.
Cleaning and prepping the bird is crucial:
- Rinse and pat dry: excess moisture = soggy skin.
- Truss the chicken: legs together, wings tucked. Helps with even cooking.
- Score the skin lightly: allows marinade to penetrate.
- Optional injection: infuse flavor directly into breasts and thighs.
Then, let it rest in the fridge uncovered for 30–60 minutes. This dries the skin slightly – crispy skin 101.
Charcoal vs. Wood: Choosing Your Heat Source
Fire is where the magic happens. Charcoal and wood impart that unmistakable smoky aroma. The type of heat you use can make or break your lechon manok.
Charcoal offers consistent, manageable heat, making it ideal for beginners and backyard cooks alike. Wood, on the other hand, adds a distinctive smoky aroma and subtle flavor nuances that take your chicken to the next level.
Understanding the differences – and how to control the fire – ensures perfectly cooked, golden, and flavorful rotisserie chicken every time.
- Charcoal: steady, easy to control, widely available.
- Wood: adds subtle flavor variations depending on type – mango, guava, coconut.
Pro tips for fire control:
- Use medium heat, not high. Flare-ups = burned outside, raw inside.
- Keep the chicken 6–8 inches above coals.
- Rotate slowly for even cooking.
Indirect heat is your friend. You’re roasting, not flambéing.
 Over Charcoal Or Wood 2")
Step-by-Step Cooking Instructions
Cooking lechon manok to perfection is all about technique and timing. Following a clear, step-by-step approach ensures juicy meat, crispy skin, and that irresistible smoky aroma.
Follow these steps for perfect lechon manok:
- Preheat grill/rotisserie: coals glowing red, light ash layer.
- Place chicken on spit or rack: rotate slowly if using rotisserie.
- Baste every 20–30 minutes: sugar in the marinade caramelizes, creating golden skin.
- Check temperature: thighs should reach 165°F internally.
- Crisp skin: last 10 minutes, slightly increase heat or move closer to coals.
- Rest 10 minutes before slicing: juices redistribute, meat stays juicy.
Pitmaster’s secret: save drippings for dipping sauce or drizzling over rice.
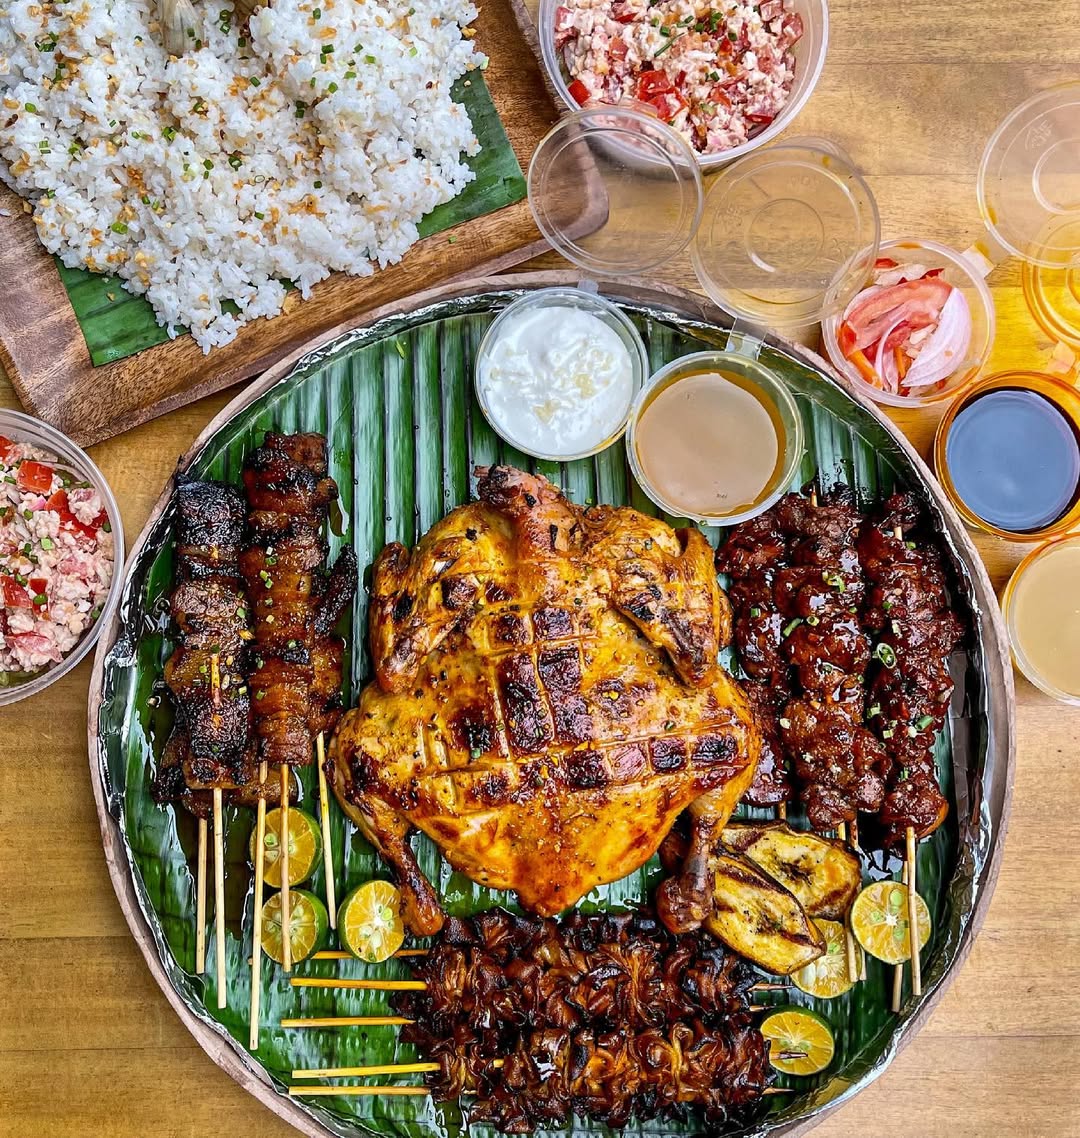
Serving Suggestions
How you serve your lechon manok can elevate it from a simple meal to a memorable feast. Traditional sides like garlic rice and atchara complement the rich, juicy chicken perfectly.
A simple dipping sauce of soy, vinegar, and chili adds a tangy kick that keeps everyone coming back for more.
Serve your lechon manok the traditional way:
- Garlic rice: fluffy, flavorful, and perfect for soaking up drippings.
- Atchara (pickled papaya): sweet, tangy, crunchy.
- Soy-vinegar dipping sauce: combine soy sauce, vinegar, garlic, and chili.
Presentation tip: slice breast meat thin, leave thighs whole. Someone will fight for crispy skin – embrace it.
Optional drinks: light beer, sparkling water with calamansi (calamondin), or crisp white wine.
Troubleshooting Common Issues
Even experienced cooks run into hiccups when roasting lechon manok. Knowing how to fix common problems like dry meat, uneven cooking, or underwhelming skin ensures every chicken turns out perfect.
Here’s how to fix them:
- Dry chicken: lower heat, baste often.
- Uneven cooking: rotate and keep chicken trussed.
- Skin not crispy: pat dry before roasting, sugar-based marinade, finish with higher heat.
- Marinade imbalance: taste the liquid; adjust soy, citrus, or sugar.
Patience is flavor. Trust the process, and the chicken will reward you.
 Over Charcoal Or Wood 3")
Tips and Tricks for Perfect Lechon Manok
Mastering lechon manok is about more than following a recipe – it’s about technique, timing, and a few insider hacks. Small adjustments, like marinating overnight or using indirect heat, make a huge difference in flavor and texture.
With the right tips, you can achieve juicy meat, crispy skin, and that irresistible smoky aroma every time.
- Marinate overnight for deeper flavor.
- Indirect heat prevents burning and ensures even cooking.
- Rotate slowly for crisp, even skin.
- Experiment with wood types for aroma.
- Save drippings for rice, veggies, or sauce.
- Slice against the grain after resting.
Little tweaks create a big difference.
Advanced Flavor Techniques
Once you’ve mastered the basics of lechon manok, it’s time to elevate your flavor game.
Techniques like injecting marinades, layering herbs under the skin, or double-basting can take your chicken from great to unforgettable. These advanced methods help infuse deeper, more complex flavors while keeping the meat juicy and the skin perfectly crispy.
Want your lechon manok to taste next-level? Try:
- Injecting marinade: garlic-citrus combo into the thighs and breasts.
- Double basting: first with soy-calamansi, then a honey glaze in the last 20 minutes.
- Herb layering: tuck bay leaves, lemongrass, or pandan under skin for subtle aroma.
Fun pitmaster note: your neighbors will start hovering. That’s okay – they’re just appreciating your craft.
Optimizing Wood and Charcoal Flavor
The choice of wood or charcoal can dramatically influence the taste of your lechon manok. Different types of wood – like mango, guava, or coconut – impart unique smoky aromas, while charcoal provides steady, consistent heat.
Learning how to balance these heat sources ensures your chicken is both flavorful and perfectly cooked every time.
Different woods give different flavors:
- Mango wood: sweet, tropical aroma.
- Coconut wood: nutty, slightly smoky.
- Guava wood: rich, slightly fruity.
Tip: mix charcoal and wood chunks for consistent heat and aromatic smoke. Keep extra coals ready – rotisserie cooking is about patience, not speed.
 Over Charcoal Or Wood 4")
Perfect Basting and Glaze Tricks
Basting and glazing are key to achieving that signature lechon manok golden skin and rich flavor. Knowing when and how to apply your glaze ensures every bite is juicy, caramelized, and full of depth.
Basting is more than flavor; it’s skin management.
- Sugar or honey in basting = caramelized, crunchy skin.
- Frequency: every 20–30 minutes. Don’t over-baste; it can drip and flare.
- Optional citrus squeeze in last 10 minutes brightens flavors.
Pitmaster joke: If your skin isn’t crisp yet, whisper encouragement. Works emotionally if not scientifically.
Chicken Liver Sauce: The Perfect Dip for Lechon Manok
Nothing complements lechon manok quite like a rich, savory chicken liver sauce. This velvety, deeply flavored dip adds an extra layer of indulgence to every bite of golden, juicy chicken.
Start by sautéing fresh chicken livers with garlic and onions until fragrant, then deglaze with soy sauce and a splash of vinegar to balance the richness.
Puree the mixture for a smooth, creamy texture, and finish with chicken stock, salt, pepper, and a pinch of sugar. For those who like a subtle tang, a squeeze of calamansi or a hint of chili adds brightness and complexity.
Serve it warm alongside your lechon manok, letting diners dip crispy skin or juicy meat into the sauce for maximum flavor impact. This sauce transforms a simple meal into a memorable feast, making every bite a little more luxurious.
Here’s the full recipe for the Chicken Liver Sauce.
Alternative Sauces/Dips to Pair with the Lechon Manok
Lechon manok, with its smoky aroma and tender, juicy meat, pairs beautifully with more than just the classic toyomansi or liver sauce.
For a sweet and tangy twist, try a honey-garlic glaze or a pineapple barbecue sauce that complements the roasted flavors with tropical brightness.
Those who enjoy spice can go for a chili-lime dipping sauce or a spicy vinegar infused with crushed garlic, peppercorns, and bird’s eye chilies – perfect for cutting through the rich skin.
A creamy garlic aioli or herbed butter sauce adds a smooth, savory layer, ideal for drizzling over freshly carved pieces. You can also experiment with Southeast Asian-inspired sauces like Thai peanut sauce or a ginger-soy glaze for a fusion flair.
Even a simple calamansi butter or lemongrass dipping sauce can highlight the chicken’s natural flavor while adding a refreshing citrus lift.
For something hearty and indulgent, pair it with a mushroom gravy or peppercorn sauce, turning your lechon manok into a more luxurious meal.
Ultimately, the best sauce depends on whether you want to enhance the smoky, savory, or tangy notes of the dish – but whichever you choose, a well-crafted sauce can transform every bite into a new experience.
 Over Charcoal Or Wood 5")
Serving Like a Filipino Pro
Serve lechon manok with sides that enhance its flavor:
- Garlic fried rice – traditional and comforting.
- Atchara or pickled vegetables – cuts richness.
- Simple dipping sauces: soy-vinegar-chili mix is classic.
Presentation counts. Even casual backyard meals look gourmet if chicken is sliced carefully, drizzled with drippings, and garnished with herbs.
Lechon Manok for Parties and Gatherings
Lechon manok isn’t just a meal – it’s the life of the party.
Whether it’s a family gathering, birthday, or casual weekend get-together, a perfectly roasted chicken over charcoal or wood instantly becomes the centerpiece.
Its irresistible aroma draws people in, the crispy skin disappears first, and the juicy meat keeps everyone coming back for more. With a few chickens and careful timing, you can feed a crowd while keeping the cooking stress-free and fun.
- One large rotisserie chicken feeds 4–6 people.
- Multiple chickens = slow rotation, staggered cooking.
- Crispy skin and aroma = conversation starter.
- Everyone will ask for seconds. Accept this as fact.
Troubleshooting for Advanced Pitmasters
Common mistakes even pros make:
- Overcooking: internal temp too high, skin too dark.
- Flare-ups: sugar in glaze + open flame = potential disaster.
- Uneven glaze: rotate and brush consistently.
Remember: practice, patience, and attention to fire make perfect lechon manok.
Bonus Tips and Fun Pitmaster Anecdotes
Every pitmaster has stories, and lechon manok comes with plenty of fun tales and insider hacks.
From the hypnotic spin of a rotisserie to the small tricks that make skin perfectly crisp, these anecdotes reveal the heart behind the technique.
Picking up tips from years of roasting over wood or charcoal can save time, enhance flavor, and make the cooking process as enjoyable as the meal itself.
- Watching a rotisserie spin is hypnotic – most vendors know it, that’s why it’s part of the street show.
- A well-roasted chicken can elevate a simple rice meal to culinary legend status.
- Flipping and basting at the right intervals? That’s your time to sip, admire, and smell victory.
It’s Always a Party When You Serve Lechon Manok in Any Kind Gathering
Making lechon manok at home is about more than flavor. It’s about patience, tradition, and a little bit of culinary theater.
Follow these tips:
- Marinate thoughtfully.
- Roast over charcoal or wood with indirect heat.
- Baste strategically and let it rest.
- Slice against the grain and serve with traditional sides.
Do all that, and you’ve got a chicken that’s juicy, flavorful, and irresistibly crispy.
Final word: Once you taste your homemade lechon manok, you’ll never go back to store-bought or takeout. And your friends?
They’ll beg for your secret. Smile. Keep it a pitmaster secret…for now.
Featured image credit: @chefjayps