A grill that won’t start is the universe’s way of telling you that you’ve been neglecting your chores. It’s that first beautiful Saturday of spring. You’ve got the dry-rubbed ribs ready. You’ve got the cold drinks staged.
You go to fire up the rig, and… nothing.
Or worse, a massive plume of acrid, black smoke rolls out from under the lid, smelling less like Texas brisket and more like a tire fire.
I’ve been there. I once spent forty-five minutes trying to troubleshoot a clogged burner while my hungry guests stared at me like I was a failing contestant on a cooking show. Proper grill maintenance isn’t just about tidiness; it’s about respect for the craft.
If you treat your grill like a dumpster with a lid, it’s going to cook like one. But if you give it a little love, that hunk of steel will reward you with perfect sears and reliable heat for decades.
The Essential Maintenance Toolkit
Before you dive into the grease, you need the right gear. Forget those flimsy “all-in-one” kits sold at big-box stores. You need a focused arsenal.
First, let’s talk about the brush. I’m a huge advocate for safety. Traditional wire brushes can shed bristles that end up in your burger – and eventually, a trip to the ER.
Switch to a high-quality nylon brush for cold cleaning or a wooden scraper that “shapes” itself to your grates over time. If you must use metal, go for a coiled stainless steel brush without bristles.
For the chemical side, keep it simple.
A heavy-duty degreaser is great for the tough spots, but a 50/50 mix of white vinegar and water in a spray bottle handles 90% of your daily needs. It’s cheap, effective, and won’t leave your steaks tasting like a chemistry lab.
Lastly, grab a shop vac. If you’re cleaning a charcoal or pellet grill, a vacuum is the “secret weapon” that separates the amateurs from the pros.
The Post-Cook Ritual: The 5-Minute Daily Clean
The biggest mistake people make is walking away as soon as the food is plated. I get it – the steak is resting and you’re hungry. But the best time to perform grill maintenance is when the unit is still hot.
As soon as you pull the meat off, crank the heat to high for about five minutes.
This “burn-off” carbonizes the drippings into ash. Once that’s done, give the grates a quick scrub. This isn’t a deep clean; you’re just clearing the deck for the next session.
After the scrub, apply a “protective seasoning.” Dip a folded paper towel in a high-smoke-point oil (like canola or grapeseed), grab it with your tongs, and wipe down the grates. This creates a non-stick barrier and prevents rust.
Think of it like a spa treatment for your steel. If you skip this, moisture in the air will start the oxidation process before you even finish your dessert.

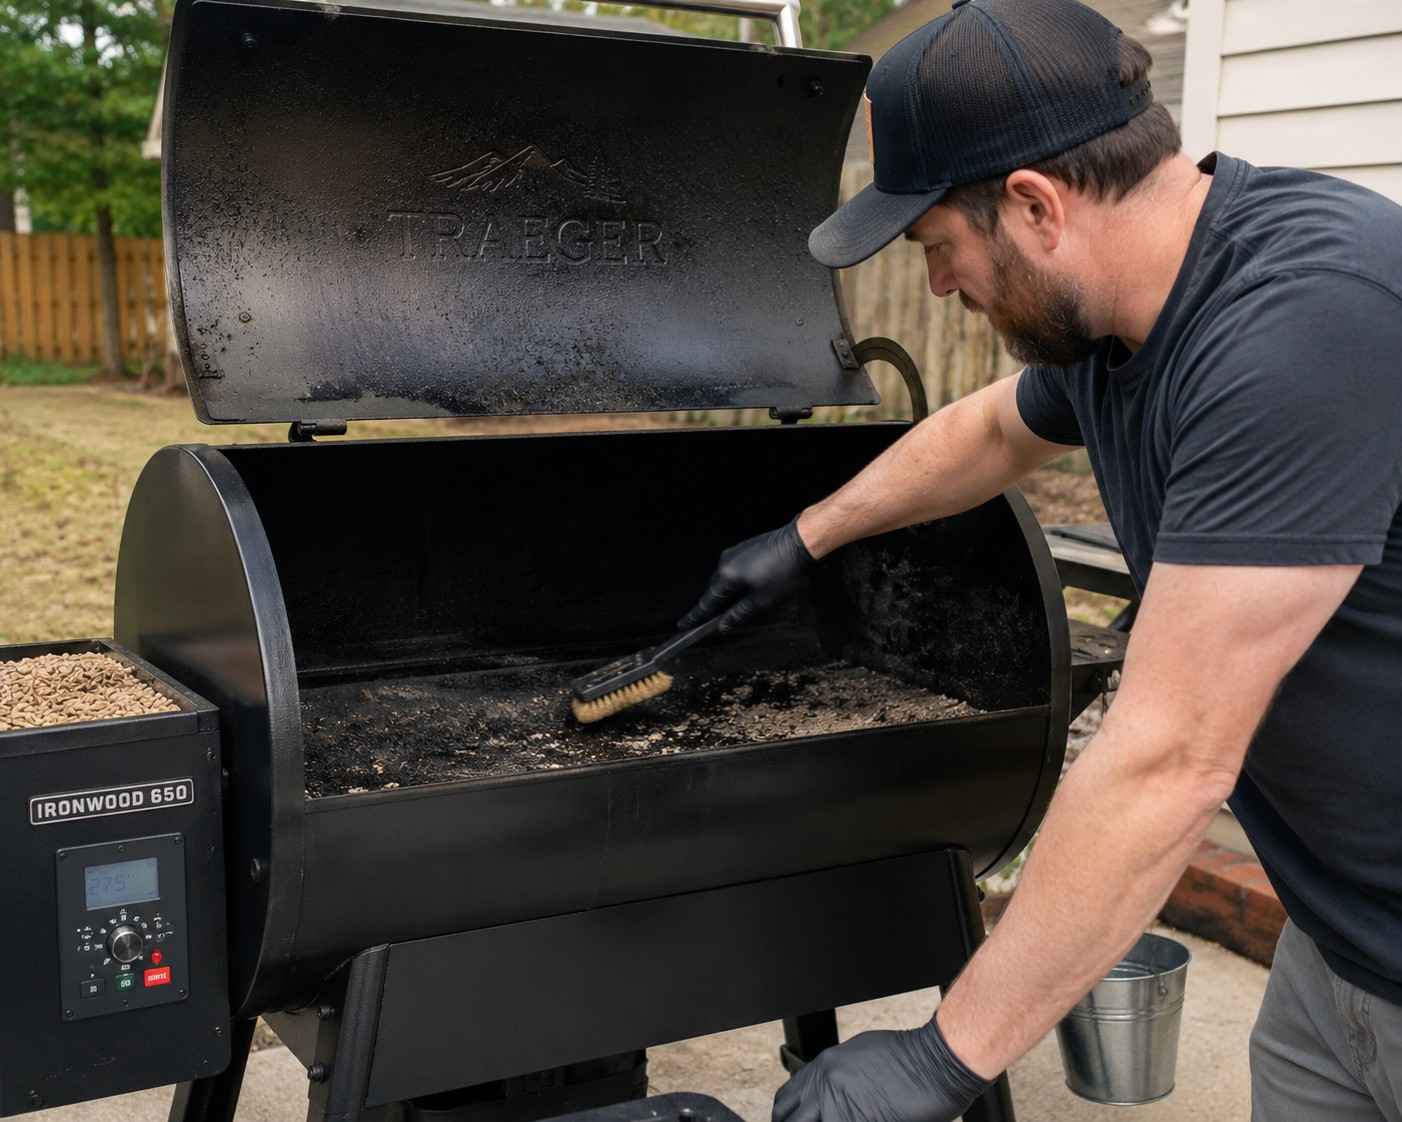
Monthly Deep-Clean Procedures
Once a month, or every five to ten cooks, you need to go beneath the surface. This is where the real grill maintenance happens.
For Gas Grills: The most common performance killer is a blocked burner. Spiders love the smell of propane and frequently spin webs inside the “venturi tubes” (the pipes connecting the knobs to the burners).
Pull the burners out and run a pipe cleaner through them. If the tiny holes where the flames come out are clogged with grease, use a paperclip to poke them open. A clear burner means even heat distribution.
For Charcoal Grills: Ash is the enemy. It absorbs moisture from the air and turns into a caustic paste that eats through metal. Never leave ash in the bottom of your kettle for more than twenty-four hours.
Every month, take a plastic putty knife and scrape the “alligator skin” off the inside of the lid. That’s not paint peeling; it’s carbonized grease. If it falls on your food, it tastes like soot.
Scrape it off and keep your flavor profile clean.
Advanced Troubleshooting: Restoring Performance
If your grill is acting “moody” – maybe the flame is low even when turned to high – you likely have a tripped regulator. Most modern gas grills have a safety feature that limits gas flow if it senses a leak.
To fix this, perform the “Regulator Reset”: Turn everything off, unhook the tank, wait thirty seconds, then reconnect it. Open the tank valve very slowly. This equalizes the pressure and usually brings your “roar” back.
If your igniter is clicking but nothing is happening, don’t just reach for the lighter. Check the ceramic housing around the electrode. If it’s covered in grease, the spark won’t jump to the burner.
A quick wipe with a cotton swab soaked in rubbing alcohol usually does the trick. Small fixes save you from big replacement costs.
The Science of Seasoning: Beyond the Grates
We often talk about seasoning cast iron, but your entire grill firebox benefits from a “seasoned” coating. Over time, a well-maintained grill develops a dark, oily patina on its interior walls.
This isn’t dirt; it’s a protective layer that radiates heat more efficiently than bare, shiny metal.
When you finish a deep clean and the metal is stripped bare, you must re-season. Spray the interior (not the outside!) with a light coat of cooking oil and run the grill on medium-high for thirty minutes.
This “bakes” the oil into the pores of the metal. This is the difference between a grill that lasts five years and one that lasts twenty.

Seasonal Storage & Winterization
If you live in a climate where “grilling season” actually ends (though I’d argue a parka is just another piece of BBQ gear), you need a storage plan. Never store a dirty grill.
Grease is organic matter; it will mold, and it will attract rodents.
Before you put the cover on for the winter, do a full deep clean. If you use a cover, make sure it’s breathable. A cheap, plastic tarp traps moisture underneath, creating a “greenhouse effect” for rust.
If you’re storing the grill in a garage or shed, wrap the burner ends in plastic wrap to keep bugs out – just remember to remove it before you fire it up in the spring!
The Lid Gasket: Sealing in the Smoke
While we often obsess over the grates, the seal of the lid is frequently ignored. For smokers and high-end grills, the gap between the lid and the firebox is a primary culprit for heat loss and erratic temperature swings.
- The Warning Sign: If smoke billows out the sides instead of the chimney, your thermal efficiency is tanking.
- The Fix: Installing a high-temperature felt or fiberglass gasket traps heat and moisture –
- the secret to succulent, competition-style bark.
- Maintenance: Inspect the seal every few months. If it feels brittle or shows gaps due to creosote buildup, scrape it clean and apply a fresh self-adhesive strip.
A tight seal doesn’t just save fuel; it provides precision airflow control, ensuring “low and slow” doesn’t accidentally turn into “fast and burnt.”
Managing the Heat Tents: The Flavorizers
Directly beneath your grates sit the heat tents, also known as flavorizer bars or flame tamers. These metal shields protect the burners from dripping fat, but their most important job is vaporization.
When grease hits these hot metal plates, it’s supposed to smoke, sending flavor back up into the meat. However, when they become caked in carbonized crust, they become a major fire hazard.
Excessive buildup leads to “flare-up fatigue,” where your grill creates localized infernos that char your chicken before it’s cooked through. Once a season, take these bars out and hit them with a heavy-duty degreaser and a plastic scraper.
If you see flaking metal or rusted-through holes, replace them immediately. Keeping these bars clean ensures your grill provides even radiant heat rather than unpredictable pyrotechnics.

The Caster and Wheel Tune-Up
A grill is only as good as its mobility. Most owners ignore the casters until they are forced to move the rig during a sudden downpour and a wheel snaps off.
Because grills live outdoors, axles and swivel joints are constantly exposed to moisture.
- Lubrication: Every spring, spray the wheel assemblies with a silicone-based lubricant. Avoid heavy greases, which attract dust and debris.
- Stability: Check the locking mechanisms. A grill that “walks” while you’re scraping the grates is a safety risk.
- Foundation: A level foundation prevents grease from pooling in the drip tray, a common cause of unexpected cabinet fires.
Taming the Gas Manifold and Knobs
The manifold is the “brain” of your gas grill, distributing fuel to the individual burners. Over time, the area behind the control knobs becomes a graveyard for sticky sauces and dust.
- Valve Care: If knobs feel “crunchy,” you likely have oxidized valve stems. Pull the knobs off and use compressed air and a damp cloth to prevent the valves from seizing.
- The Leak Test: Perform a soapy water test on the manifold connections annually. Brush a dish soap/water mixture over the lines; if bubbles grow, you have a gas leak.
This simple five-minute check is the ultimate preventative safety measure, ensuring that the only thing “exploding” at your BBQ is the flavor of your secret sauce.
Thermometer Calibration: Don’t Trust the Dial
Most “hood thermometers” are notoriously unreliable, often nicknamed “guess-o-meters.” They are frequently calibrated for the air at the top of the lid, not the cooking surface temperature where your food actually sits.
- Drift: Soot and humidity can cause analog dials to drift by as much as 50°F.
- Testing: Perform a boiling water test. If the thermometer doesn’t read 212°F (at sea level), adjust the nut on the back until it is accurate.
- The Pro Move: Invest in a digital ambient probe that clips directly to the grate to master true thermal zones and indirect heat.
Understanding the true thermal zones of your grill allows you to master indirect heat cooking, preventing the dreaded “grey steak” syndrome caused by a grill that isn’t nearly as hot as the lid claims.
Combatting “Flash Rust” on Exterior Stainless
We buy stainless steel because it looks sharp, but “stainless” does not mean “stain-proof.” If you live near the ocean or in a humid climate, your grill can develop pitting and tea-staining (surface rust) within a single season.
This is often caused by atmospheric chlorides or even the salt in your dry rubs. To keep that showroom shine, never use steel wool or harsh abrasives, which can scratch the protective chromium oxide layer.
Instead, use a dedicated stainless steel cleaner or a simple mixture of club soda and vinegar.
Always wipe with the grain of the metal to avoid micro-scratches. For an extra layer of defense, apply a thin coat of high-heat carnauba wax or specialized grill polish to the exterior.
This acts as a hydrophobic barrier, causing rain and grease to bead off rather than eating into the finish.
The Pellet Grill Auger and Internal Sensors
If you’ve upgraded to a pellet grill, you have a whole different set of mechanical needs. The auger – the screw that feeds wood pellets into the fire – is the heart of the machine. The biggest threat here is humidity.
If pellets get damp, they expand into a “sawdust cement” that can snap the auger motor.
Always empty the hopper if you aren’t planning to grill for more than a week. Additionally, keep an eye on the RTD (Resistance Temperature Detector), the small vertical probe inside the cookbox.
If it’s covered in black smoke residue, it will give false readings to the computer, causing your grill to overfeed pellets and overheat.
A gentle wipe with a vinegar-soaked cloth keeps the sensor “seeing” clearly, ensuring your digital controller maintains that perfect, steady blue smoke.

Managing the Venturi Tubes and Air Shutters
The venturi tubes are the intake pipes that mix oxygen with your gas. They are the favorite nesting spot for yellow sac spiders, whose webs are dense enough to redirect gas flow.
- Flashbacks: Web blockages can redirect gas flow, causing a “flashback” fire behind the control panel.
- Air Mixture: If flames are lazy and yellow rather than crisp and blue, your air shutters may be clogged with debris, leading to incomplete combustion and soot on your food.
- Maintenance: Use a venturi brush to clear the pathways twice a year to ensure a hotter, cleaner fire.
Maintaining the proper oxygen mix ensures a hotter, cleaner fire that maximizes every BTU your tank provides.
When to Repair vs. When to Replace
I hate seeing a good grill in a graveyard, but sometimes it’s time to move on. If the firebox – the actual tub where the heat happens – has holes rusted through it, the unit is a safety hazard.
At that point, the structural integrity is gone, and no amount of cleaning will save it.
However, if the burners are shot or the grates are crusty, those are “consumables.” It’s almost always cheaper to spend $80 on high-end replacement stainless steel burners than it is to spend $600 on a brand-new grill.
Maintenance is an investment in sustainability.
Closing Remarks
At the end of the day, grill maintenance is about the food. You can buy the most expensive Wagyu ribeye in the world, but if you cook it on a rusty, soot-covered grate over a clogged burner, it’s going to taste like disappointment.
Take the five minutes after your cook to clean. Take the hour once a month to inspect. Your grill isn’t just an appliance; it’s a flavor factory. Treat it with respect, keep the air flowing, and keep the metal seasoned.
Your taste buds – and your wallet – will thank you. Now, get out there and get to work. That brisket isn’t going to smoke itself!

Frequently Asked Questions on Grill Maintenance
General Cleaning & Tools
What is the safest way to clean my grill grates?
Avoid traditional wire brushes, as bristles can break off and end up in your food. Instead, use a nylon brush (for cold cleaning), a wooden scraper that molds to your grates, or a coiled stainless steel brush without bristles.
Can I use household cleaners on my grill?
Yes. While heavy-duty degreasers are good for deep cleans, a 50/50 mix of white vinegar and water is effective for 90% of daily cleaning. It’s food-safe and won’t leave a chemical aftertaste.
What is the “Post-Cook Ritual”?
Immediately after removing your food, turn the heat to high for five minutes to carbonize drippings. Scrub the grates, then apply a “protective seasoning” by wiping them with a high-smoke-point oil (like canola) to prevent rust.
Gas Grill Specifics
My gas grill has a weak flame. How do I fix it?
You likely have a tripped regulator. Perform a “Regulator Reset”: turn off the gas, disconnect the tank for 30 seconds, reconnect it, and then open the tank valve very slowly to equalize pressure.
How do I prevent “flashback” fires behind the control panel?
Clean the venturi tubes (the pipes connecting the knobs to the burners). Spiders often spin webs inside these tubes, blocking gas flow. Use a long, flexible pipe cleaner or venturi brush to clear them twice a year.
What should I do if my igniter stops working?
Check the ceramic housing around the electrode. If it’s coated in grease, the spark can’t jump. Wipe it down with a cotton swab soaked in rubbing alcohol to restore the connection.
Charcoal & Pellet Grills
Why shouldn’t I leave ash in my charcoal grill?
Ash absorbs moisture from the air, creating a caustic paste that corrodes metal. You should remove ash within 24 hours of every cook.
How do I maintain a pellet grill?
The most important rule is to keep pellets dry; damp pellets expand and can break the auger motor. Also, regularly wipe the RTD (temperature sensor) inside the cookbox with vinegar to ensure accurate temperature readings.
Troubleshooting & Performance
Is the “peeling paint” inside my grill lid dangerous?
It’s likely not paint, but carbonized grease (often called “alligator skin”). While not toxic, it can flake off onto your food and make it taste like soot. Scrape it off with a plastic putty knife.
Why is my hood thermometer giving weird readings?
Most hood thermometers are “guess-o-meters” that measure air at the top of the lid, not the cooking surface. You can calibrate it using a boiling water test (212°F) or, for better results, switch to a digital ambient probe that clips to the grates.
What are “Flavorizer Bars” and why do they matter?
Also known as heat tents, these metal shields protect burners and vaporize drippings into smoke. If they are caked in grease, they cause flare-ups. Scrape them clean once a season, and replace them if they have rusted-through holes.
Storage & Longevity
When should I repair a grill versus replacing it?
- Repair: If the burners, grates, or flavorizer bars are worn out. These are “consumables” and cheaper to replace than the whole unit.
- Replace: If the firebox (the main tub) has holes rusted through it. This is a structural safety hazard that cannot be easily fixed.
How do I prevent rust during the winter?
Perform a deep clean before storage to remove organic matter that attracts mold and rodents. Use a breathable cover; cheap plastic tarps trap moisture and accelerate rust through a “greenhouse effect.”
Featured image credit: ChatGPT