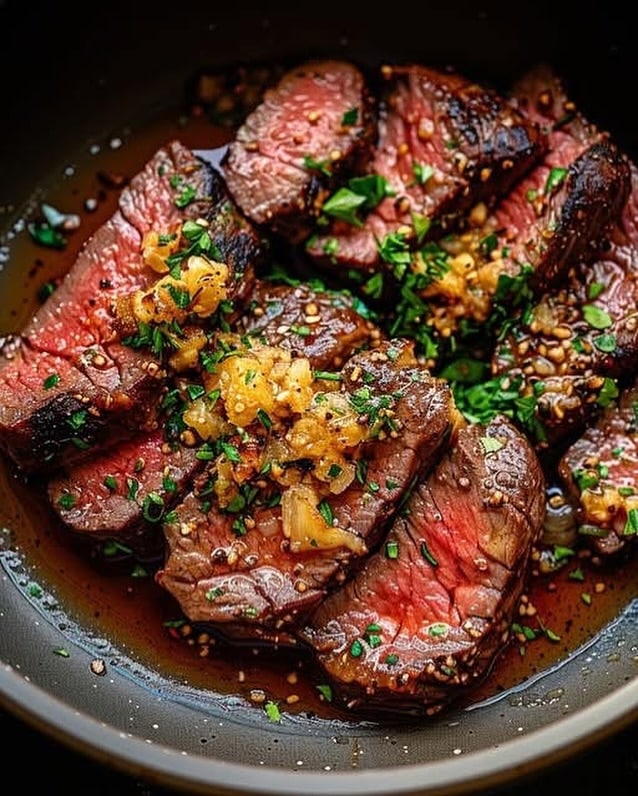
There’s tender… and then there’s “did I just cut through that with zero effort?” tender. That’s exactly what you get with this garlic butter smoked tri-tip – a juicy, smoky roast finished with rich, aromatic butter that melts right into every slice.
As someone who’s spent more weekends than I’d admit babysitting a smoker, I can tell you this: tri-tip is one of the most underrated cuts you can throw over wood fire.
Treat it right, and it rewards you with steakhouse-level flavor without the ribeye price tag.
And when you add garlic butter? Now you’re just showing off.

Why This Recipe Works
A lot of people overcomplicate tri-tip. You don’t need a dozen spices or fancy tricks. What you do need is control – heat, timing, and knowing when to leave it alone.
Here’s why this method hits every time:
Low-and-slow smoking builds deep flavor without drying the meat
Garlic butter adds richness and moisture right when it matters most
Reverse searing locks in juices and creates that crave-worthy crust
And most importantly: proper slicing makes it “slice like butter”
Miss that last one, and even the best cook can end up with chewy slices. I’ve seen it happen. It’s painful.
What Is Tri-Tip (and Why It’s Perfect for Smoking)?
Tri-tip comes from the bottom sirloin and has a distinctive triangular shape. It’s got a beefy flavor like a steak, but cooks more like a roast.
The magic? It has two grain directions, which means slicing correctly is non-negotiable. More on that later.
When smoked properly, tri-tip becomes:
- Juicy
- Tender
- Packed with smoky depth
- And just fatty enough to stay forgiving
In short: it’s a pitmaster’s secret weapon.
Choosing the Right Wood for Maximum Flavor
Not all smoke is created equal – and your wood choice can completely transform your tri-tip. The goal is balanced, clean smokiness that enhances – not overwhelms – the beef.
Best wood options:
- Oak or hickory → bold, classic barbecue flavor
- Cherry or applewood → lighter smoke with a subtle sweetness
- Wood blends → combine oak (structure) + fruitwood (aroma) for layered depth
Key techniques to remember:
- Use restraint – too much heavy smoke creates a bitter, harsh taste
- Watch your smoke: aim for thin blue smoke, not thick white clouds
- Maintain a clean burn for that smooth, professional flavor
Dial this in, and you’ll get smoke that complements the garlic butter instead of competing with it.
The Importance of Meat Selection and Marbling
Great tri-tip starts at the butcher, not the smoker. Choosing the right cut sets the foundation for everything that follows.
What to look for:
- Good marbling → thin streaks of fat = flavor + tenderness
- Deep red color → signals freshness
- Avoid gray or dull meat → possible age or poor handling
- Even thickness → ensures consistent cooking throughout
Upgrade your results:
- Go for USDA Choice or Prime when possible
- Better marbling = self-basting meat as it cooks
- Higher quality cuts deliver juicier, richer slices
Cut corners here, and you’ll spend the rest of the cook trying to fix it. Start strong, and that “slice like butter” texture comes naturally.

Timing Your Reverse Sear Like a Pro
Reverse searing is where good tri-tip becomes unforgettable. It’s all about precision and timing.
When to pull from the smoker:
- Remove at 10–15°F below target temp
- The sear will finish the cooking process
How to execute the sear:
- Use high heat (grill, cast iron, or open flame)
- Flip every 30–45 seconds
- Focus on building a deep, caramelized crust
Why it works:
- Prevents overcooking
- Locks in juices and flavor
- Creates that steakhouse-quality texture
Get the timing wrong, and you risk drying it out. Get it right, and you’ll have a smoky interior with a crisp, flavorful exterior that feels deliberate – not rushed.
Resting: The Step Most People Ruin
You’re at the finish line – don’t rush it. Resting is what locks in everything you just worked for.
What’s happening during rest:
- Juices are redistributing inside the meat
- Internal temperature stabilizes and evens out
How to do it properly:
- Rest for 10–15 minutes
- Loosely tent with foil
- Keep it undisturbed – no slicing early
Why it matters:
- Prevents juices from spilling onto the cutting board
- Ensures slices stay moist and tender
- Helps achieve even doneness edge to center
It’s tempting to cut in immediately – but patience here makes the difference. This is where texture is finalized and your tri-tip delivers on every promise.
Pro Tips for Tri-Tip That Slices Like Butter
- Use a thermometer – guessing leads to overcooking
- Don’t skip the sear – texture matters just as much as flavor
- Rest your meat – patience pays off
- Slice against the grain – this is the difference-maker
If there’s one hill I’ll die on: it’s slicing technique.
Internal Temperature Cheat Sheet
Keep this in your back pocket:
- Rare: 120–125°F
- Medium-rare: 130–135°F (best choice)
- Medium: 135–145°F
- Medium-well: 145–155°F
Anything beyond that… you’re entering roast beef territory.
Flavor Variations (If You Want to Get Fancy)
Once you’ve nailed the base recipe, try:
- Roasted garlic butter for deeper flavor
- A pinch of chili flakes for heat
- Smoked paprika for extra depth
- Herb-heavy butter for a steakhouse vibe
But honestly? The classic garlic butter smoked tri-tip is hard to beat.
What to Serve With It
You’ve got a showstopper – now give it a supporting cast:
- Creamy mashed potatoes
- Grilled corn
- Roasted vegetables
- A crisp green salad
Or do what I do sometimes: slice it thin, throw it on toasted bread, and call it a day.
Storage and Reheating
If you somehow have leftovers:
- Store in an airtight container (up to 4 days)
- Reheat gently – low heat is key
- Add a little butter when reheating to bring it back to life
Microwaving on high? That’s how good tri-tip goes to die.

Final Thoughts
This garlic butter smoked tri-tip is one of those recipes that feels fancy but is surprisingly straightforward once you understand the process.
You’re not just cooking meat – you’re managing heat, timing, and texture. And when it all comes together?
You get slices so tender they practically fall apart, coated in smoky flavor and rich garlic butter.
That’s not just dinner. That’s a flex.
Now fire up that smoker and make it happen.

Garlic Butter Smoked Tri-Tip Steak
Image credit: @tomas_kitchen_
Ingredients
- Keep it simple. Let the meat and smoke do the heavy lifting.
- For the Tri-Tip
- 2–3 lb tri-tip roast
- Salt (kosher preferred)
- Fresh cracked black pepper
- Optional: paprika or garlic powder for extra bark
- For the Garlic Butter
- ½ cup unsalted butter
- 4–6 cloves garlic, finely minced
- Fresh herbs (parsley, thyme, or rosemary)
- Optional squeeze of lemon
- Key tip: Use real butter. Not margarine, not “spread.” This is not the time to cut corners.
- Equipment (Keep It Practical)
- You don’t need a competition rig – just the essentials:
- Smoker (pellet, charcoal, or electric)
- Meat thermometer (non-negotiable)
- Tongs
- Foil or butcher paper
- Basting brush
- If you’re guessing doneness by feel alone… you’re gambling.
Instructions
1. Prep Like a Pro
Pat the tri-tip dry. Moisture is the enemy of a good crust.
Season generously with salt and pepper. Don’t be shy – this is a thick cut, and it can handle it.
Let it sit at room temp for about 30 minutes. This helps it cook more evenly.
2. Build Your Garlic Butter
Melt the butter gently, then stir in garlic and herbs.
Set it aside – but don’t wander too far. You’ll be coming back to this golden goodness soon.
3. Fire Up the Smoker
Preheat to 225°F (107°C).
Best woods for this:
- Oak (classic and balanced)
- Hickory (strong, bold flavor)
- Cherry (slightly sweet, great color)
Pro insight: Don’t over-smoke. You want the beef and butter to shine, not taste like a campfire.
4. Smoke Low and Slow
Place the tri-tip directly on the grates.
Let it ride until the internal temp hits 115–120°F.
Lightly baste with garlic butter during the last stretch – but don’t drown it. A little goes a long way.
5. Reverse Sear for That Crust
Now we crank things up.
Either:
- Increase smoker temp to high
- Or move the tri-tip to a hot grill or cast iron pan
Sear each side until you hit:
- 130–135°F for medium-rare (sweet spot)
- 135–145°F for medium
This step is where the magic happens – crispy outside, juicy inside.
6. Rest, Then Slice (Don’t Rush This)
Pull the meat and let it rest for 10–15 minutes.
This is where juices redistribute. Skip this, and they’ll end up on your cutting board instead of in your meat.
Now comes the critical part:
Slice against the grain. Always.
Remember how tri-tip has two grain directions? You’ll likely need to rotate the meat halfway through slicing.
Do it right, and every bite will be buttery tender. Do it wrong, and… well, let’s not talk about that.
Featured image credit: @steak.world