Imagine a scent so powerful it makes you forget your errands – that’s the garlic-heavy, wood-fired reality of Peruvian rotisserie. This intoxicating perfume of smoldering charcoal and fruity chilies lingers in the air, pulling you toward the golden, crispy skin like a magnet.
This is aji chicken (or Pollo a la Brasa), and while the rotisserie shops do a fine job, they’ve got nothing on a pitmaster with a live fire and a plan.
Today, we’re taking this Peruvian icon out of the spinning oven and putting it where it belongs: over the coals.
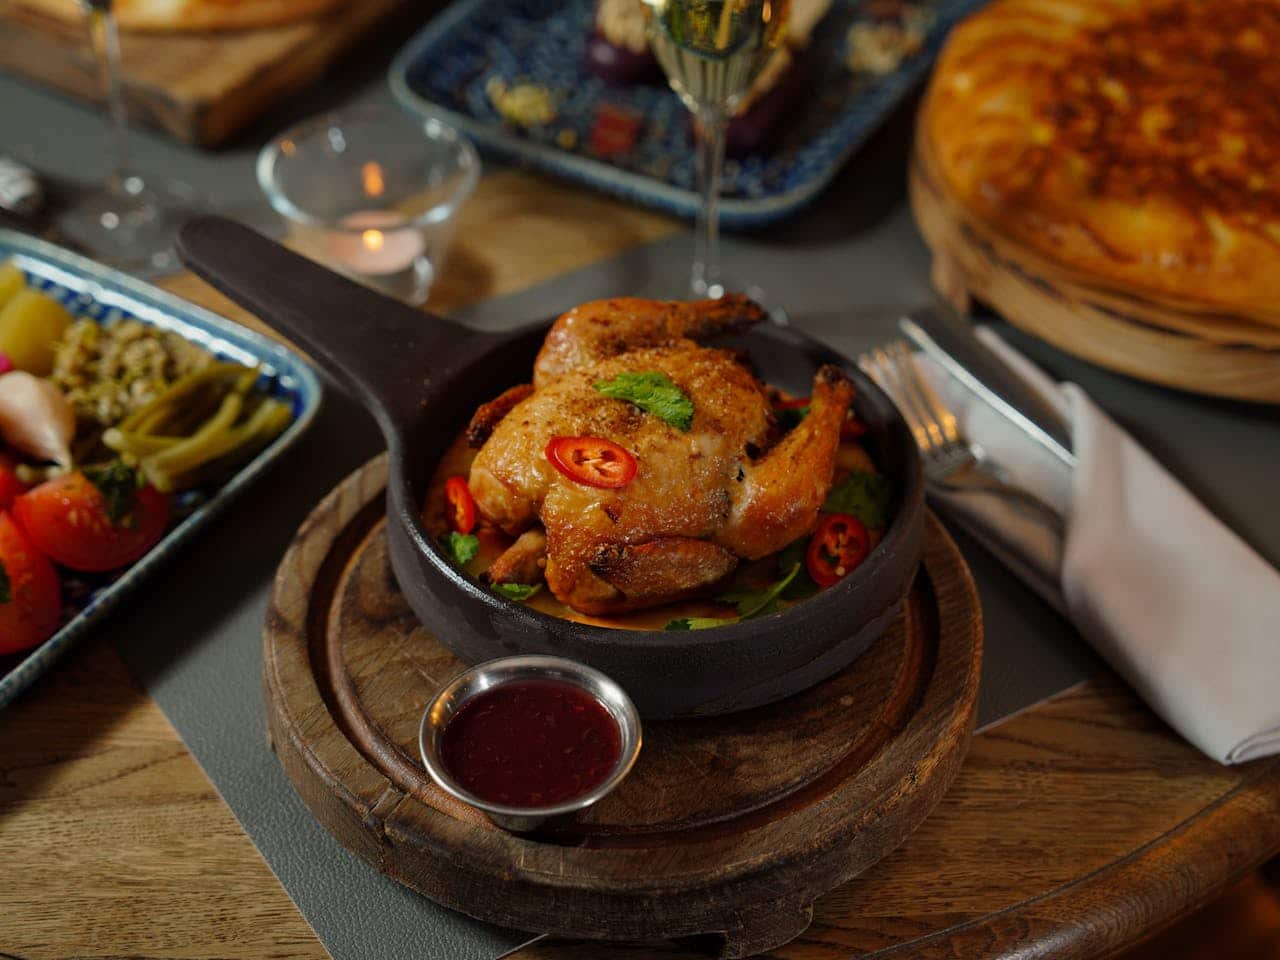
We’re talking about a bird with skin so crisp it crackles, meat that stays impossibly juicy, and a creamy green sauce that you’ll want to drink with a straw. (Please don’t actually do that; use a spoon like a civilized human.)

The Anatomy of the Marinade: Flavor Science 101
The soul of this dish lies in the marinade. We aren’t just splashing on some bottled dressing and calling it a day. To get authentic aji chicken, you need the “Holy Trinity” of Peruvian coastal cooking.
The star of the show is Aji Amarillo paste. These yellow peppers are the backbone of Peruvian cuisine. They aren’t “blow-your-head-off” spicy; instead, they offer a complex, sunny, berry-like sweetness followed by a gentle, creeping heat.
If you can’t find it at your local market, hit the “international” aisle or order it online – it’s the difference between a masterpiece and just another grilled bird.
Next, we add soy sauce and lime juice. This is where the magic happens.
The soy sauce provides a massive hit of umami, while the lime juice acts as a natural tenderizer. Finally, we round it out with cumin, smoked paprika, and plenty of garlic.
The secret is the soak.
While you can get away with four hours, a 12 to 24-hour marinade is the “Pitmaster Sweet Spot.” This allows the acids and salts to penetrate deep into the muscle fibers, ensuring every bite is seasoned to the bone.
Fire Management: Winning the War Against Burned Skin
Grilling a marinated chicken is a high-stakes game. Because the marinade contains sugars and soy, it wants to burn the second it touches the grate. To avoid serving your family a “Cajun-style” (read: blackened by accident) disaster, we use two-zone grilling.
- The Hot Zone: This is where we start. We sear the chicken skin-side down for about 3–4 minutes. We’re looking for the Maillard Reaction—that beautiful chemical wedding between amino acids and reducing sugars that creates the brown, savory crust we live for.
- The Cool Zone: Once you’ve got that gorgeous golden-brown char, move the chicken to the indirect heat side. Close the lid. This turns your grill into an oven, allowing the meat to cook through without turning the exterior into carbon.
Pro Tip: Spatchcock your chicken. By removing the backbone and laying the bird flat, you ensure the thighs and breasts finish at the same time. It also gives you more surface area for the grill to work its magic.
If you’re nervous about the surgery, just ask your butcher; they’ll do it for you, usually for the price of a thank-you.

The “Liquid Gold”: That Addictive Green Sauce
Let’s be honest: the chicken is the vehicle, but the Aji Verde (Green Sauce) is the destination. This sauce is so good it should probably be regulated.
The base is typically mayonnaise or Greek yogurt, which provides the fat needed to carry the heat of the peppers. We load it up with:
- Fresh Cilantro: For that bright, herbaceous punch.
- Aji Amarillo or Jalapeños: To dial in your preferred spice ceiling.
- Garlic and Lime: Because, obviously.
- A pinch of Huacatay (Peruvian Black Mint): If you can find this paste, use a teaspoon.
- It adds a unique, earthy mintiness that is the hallmark of the authentic sauce.
Important: Make this sauce at least two hours before you eat. Like a good joke or a fine wine, it needs time to land. Letting it sit in the fridge allows the garlic to mellow and the cilantro to brighten up.
The Wood-Fire Whisperer: Choosing Your Fuel
While the marinade does the heavy lifting, the smoke profile is the unsung hero of authentic aji chicken. To truly mimic the Pollo a la Brasa rotisseries of Lima, you need to move beyond standard briquettes.
Your choice of fuel dictates the depth of the final dish:
- Lump Hardwood Charcoal: This is the gold standard; it burns hotter and cleaner, providing the essential searing heat of a commercial coal oven.
- Pecan or Fruitwood: Tossing a few chunks onto the embers adds a subtle, sweet nuttiness that complements the fruity aji amarillo.
- The “Blue Smoke” Goal: Aim for a thin, light blue exhaust – a gentle kiss of carbon that binds the garlic and cumin together.
This artisanal approach transforms your aji chicken from a standard barbecue into a deeply aromatic, wood-fired delicacy.
The “Crispy Skin” Insurance Policy: Air-Drying
If you want aji chicken with skin that shatters like glass, you must master the fridge-dry technique.
Most home cooks make the mistake of moving the bird straight from the wet marinade to the grill, which leads to steaming rather than searing. Follow these steps for grilling perfection:
- The Two-Hour Window: Remove the bird from the liquid at least two hours before you plan to cook.
- The Wire Rack Setup: Place the chicken on a rack over a baking sheet to allow cold air circulation to hit every angle.
- Pellicle Formation: Letting it sit uncovered in the fridge dries out the exterior skin while the interior stays brine-soaked and succulent.
When that dry skin hits the rendering fat of the grill, it browns instantly, delivering a satisfying umami-rich crunch that contrasts perfectly with your creamy sauce.
Beyond Fries: The Art of Peruvian Sides
To elevate your aji chicken into a full-blown feast, look beyond standard fries and explore the world of Peruvian heritage sides. These traditional pairings turn a simple meal into a multidimensional culinary experience:
- Choclo con Queso: Large-kernel Andean corn served with salty cheese, providing a starchy textural counterpoint.
- Sarsa Criolla: A punchy relish of julienned red onions and lime. The acidic bite cuts right through the smoky, charred fat of the chicken.
- Grilled Camote: Sweet potatoes caramelized over the coals echo the sunny sweetness of the aji peppers.
By curating your sides, you honor the true spirit of Peruvian street food while ensuring every spicy, sauce-drenched bite is perfectly balanced.

Serving Like a Pro
To keep it traditional, serve your aji chicken with thick-cut steak fries (perfect for mopping up extra sauce) and a simple salad of avocado and tomato.
The beauty of this dish is its balance. You have the smoky, charred fat from the grill, the acidic bite of the lime marinade, and the cool, creamy heat of the green sauce. It hits every part of your palate at once.
Once you master this, the standard BBQ sauce and drumsticks routine is going to feel a little bit like playing checkers when you could be playing 3D chess.
You’ve been warned: your neighbors will start “accidentally” leaning over the fence once they catch a whiff of this hitting the coals.
Happy grilling!

Peruvian Aji Chicken Recipe
Image credit: Dee Dave
Ingredients
- The Chicken
- 1 Whole Chicken (4–5 lbs): Spatchcocked (backbone removed and flattened).
- Kosher Salt: To taste (though the soy sauce handles most of the heavy lifting).
- The "Gold Standard" Marinade
- 1/2 cup Aji Amarillo Paste: The fruity, yellow heart of the dish.
- 1/4 cup Soy Sauce: For that deep, salty umami.
- 3 tbsp Lime Juice: Freshly squeezed; don't use the plastic lime.
- 4 cloves Garlic: Minced or turned into a paste.
- 1 tbsp Cumin: Toasted if you’re feeling extra.
- 1 tbsp Dried Oregano: Preferably Mexican or Peruvian.
- 1 tsp Smoked Paprika: To boost the grill's natural wood notes.
- 2 tbsp Neutral Oil: (Grapeseed or vegetable) to help the marinade stick.
- The "Liquid Gold" Aji Verde Sauce
- 1 cup Fresh Cilantro: Leaves and tender stems.
- 2-3 Fresh Jalapeños: Deseeded (unless you like living dangerously).
- 1/2 cup Mayonnaise: Or Greek yogurt for a tangier, lighter version.
- 2 cloves Garlic: Raw.
- 1 tbsp Aji Amarillo Paste: For color and consistency.
- 1 tsp Lime Juice.
- Salt and Pepper: To taste.
Instructions
1. The Prep & Soak
Pat the chicken completely dry with paper towels. In a medium bowl, whisk together all the marinade ingredients. Place the chicken in a large gallon-sized bag or a shallow dish and pour the marinade over it.
Crucial Step: Use your hands to massage the paste under the skin of the breasts and thighs. Seal it up and refrigerate for at least 12 hours. 24 hours is better.
2. The Sauce
While the chicken is marinating (or at least 2 hours before grilling), throw all the Aji Verde ingredients into a blender or food processor. Blitz until smooth and bright green.
Taste it – if it’s too thick, add a teaspoon of water or more lime juice. Chill in the fridge to let the flavors marry.
3. Fire Management
Prepare your grill for two-zone cooking.
- Charcoal: Pile lit coals on one half of the grill.
- Gas: Turn half the burners to medium-high and leave the others off.
Aim for an ambient grill temperature of 375ºF to 400ºF.
4. The Sear (The Maillard Phase)
Place the chicken skin-side down directly over the heat. Stay close! We want a deep mahogany char, not a grease fire. This usually takes 4–6 minutes. If you see flare-ups, slide the bird over to the cool side momentarily.
5. The Roasting (The Indirect Phase)
Once the skin is crispy and browned, flip the chicken so it is skin-side up and move it to the cool side of the grill (indirect heat). Close the lid. This allows the internal temperature to rise steadily without burning the exterior.
6. The Finish Line
Cook until a digital thermometer inserted into the thickest part of the thigh reads $165^\circ F$. Start checking at the 35-minute mark of indirect cooking.
7. The Rest
Transfer the chicken to a cutting board and let it rest for 10 full minutes. This allows the muscle fibers to relax and reabsorb the juices. If you cut it too soon, the flavor will run away on the board.
Featured image credit: Nadin Sh